# AI Demo Documentation
## AI Demo Application
K230 supports a rich set of AI applications. To facilitate user experience and trial, the CanMV K230 image comes with multiple AI Demo applications built in, divided into single-model applications and multi-model applications, covering object, face, hand, human body, license plate, OCR, audio (KWS, TTS), and other application domains. Users can easily run them by opening the source code via CanMV IDE. The source code of the AI Demo applications is located in the `/CanMV/sdcard/examples/05-AI-Demo` directory. The list of AI Demo applications is as follows. Some Demos cannot run on the K230D chip due to memory limitations, please pay attention to the compatibility list.
| Demo Name | Scenario | Task Type | K230 | K230D |
| ----------------------- | --------------- | ---------- | ---- | ---- |
| body_seg | Human Body Part Segmentation | Single-model task | √ | |
| dynamic_gesture | Dynamic Gesture Recognition | Multi-model task | √ | √ |
| eye_gaze | Gaze Estimation | Multi-model task | √ | |
| face_detection | Face Detection | Single-model task | √ | √ |
| face_landmark | Face Key Points | Multi-model task | √ | √ |
| face_liveness_rgb | Face Liveness Detection | Multi-model task | √ | √ |
| face_mesh | Face 3D Mesh | Multi-model task | √ | |
| face_parse | Face Parsing | Multi-model task | √ | |
| face_pose | Face Pose | Multi-model task | √ | √ |
| face_registration | Face Registration | Multi-model task | √ | |
| face_recognition | Face Recognition | Multi-model task | √ | |
| face_registration_lite | Lightweight Face Registration | Multi-model task | √ | √ |
| face_recognition_lite | Lightweight Face Recognition | Multi-model task | √ | √ |
| falldown_detection | Fall Detection | Single-model task | √ | √ |
| finger_guessing | Finger Guessing Game | Multi-model task | √ | √ |
| hand_detection | Hand Detection | Single-model task | √ | √ |
| hand_keypoint_class | Hand Key Point Classification | Multi-model task | √ | √ |
| hand_keypoint_detection | Hand Key Point Detection | Multi-model task | √ | √ |
| hand_recognition | Hand Gesture Recognition | Multi-model task | √ | √ |
| keyword_spotting | Keyword Wake-up | Single-model task | √ | √ |
| multi_kws | Multi-Command Keyword Wake-up | Single-model task | √ | √ |
| license_plate_det | License Plate Detection | Single-model task | √ | √ |
| license_plate_det_rec | License Plate Recognition | Multi-model task | √ | √ |
| license_plate_det_yolo | YOLO License Plate Detection | Single-model task | √ | √ |
| license_plate_det_rec_yolo| YOLO License Plate Detection + Recognition | Multi-model task | √ | √ |
| nanotracker | Single Object Tracking | Multi-model task | √ | √ |
| object_detect_yolov8n | YOLOv8n Object Detection | Single-model task | √ | √ |
| ocr_det | OCR Detection | Single-model task | √ | |
| ocr_rec | OCR Recognition | Multi-model task | √ | |
| person_detection | Person Detection | Single-model task | √ | √ |
| person_kp_detect | Person Key Point Detection | Multi-model task | √ | √ |
| puzzle_game | Puzzle Game | Multi-model task | √ | √ |
| segment_yolov8n | YOLOv8 Segmentation | Single-model task | √ | |
| self_learning | Self Learning | Single-model task | √ | √ |
| space_resize | Local Magnifier | Multi-model task | √ | √ |
| tts_zh | Chinese Text-to-Speech | Multi-model task | √ | |
| yolo11n_obb | YOLO11n Rotated Object Detection| Single-model task | √ |√ |
| yolov8n_obb | YOLOv8n Rotated Object Detection| Single-model task | √ |√ |
```{admonition} Tip
To run the above demos on a K230D chip development board, you need to change the `display_mode` in `__main__` to `lcd` to adapt the display output, and you also need to lower the resolution to run according to the comments. At the same time, some demos cannot run on K230D, see the table above for details.
```
## AI Demo Development Framework Introduction
### AI Demo Development Framework
To help users simplify the development of the AI part, based on the API interfaces provided by K230_CanMV, we have built a matching AI development framework. The framework structure is shown in the figure below:
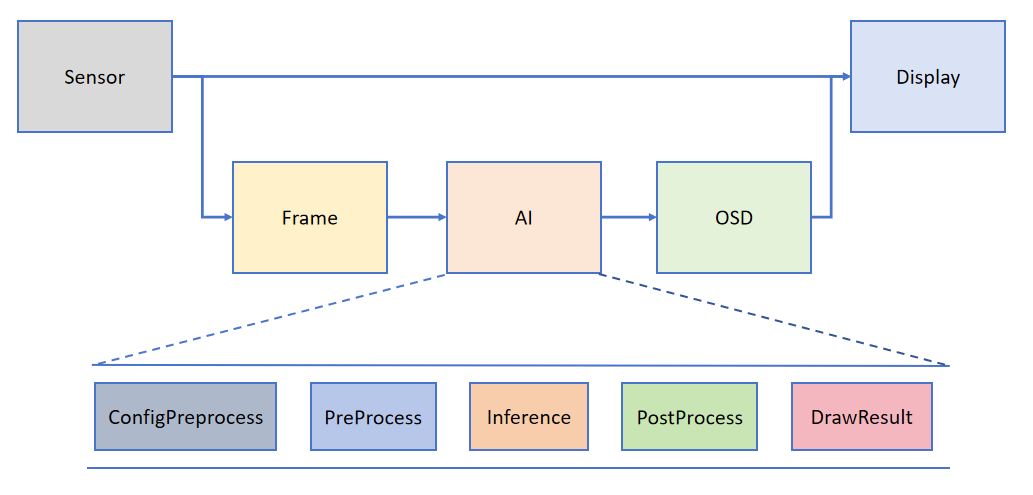
The Camera outputs two streams of images by default: one in YUV420SP format (Sensor.YUV420SP), provided directly to the Display for display; the other in RGBP888 format (Sensor.RGBP888), used for AI processing. The AI is mainly responsible for the pre-processing, inference, and post-processing flow of the task. After processing is complete, the results will be drawn on the OSD image instance and sent to the Display for overlay display.
```{admonition} Tip
The PipeLine process encapsulation mainly simplifies the development of vision tasks. You can use 'get_frame' to obtain a frame of image for machine vision processing; if you wish to customize the AI process, please refer to [face_detection](./face_detection.md). For audio-related AI, please refer to the two examples keyword_spotting and tts_zh in the demo.
```
### Interface Encapsulation
To facilitate user development, based on the above framework, the general functions of obtaining images from Camera, AI2D preprocessing, and kmodel model inference are encapsulated. Please refer to the encapsulated interfaces: [AI Demo API](../../api/aidemo_libs.md)
### Application Methods and Examples
#### Overview
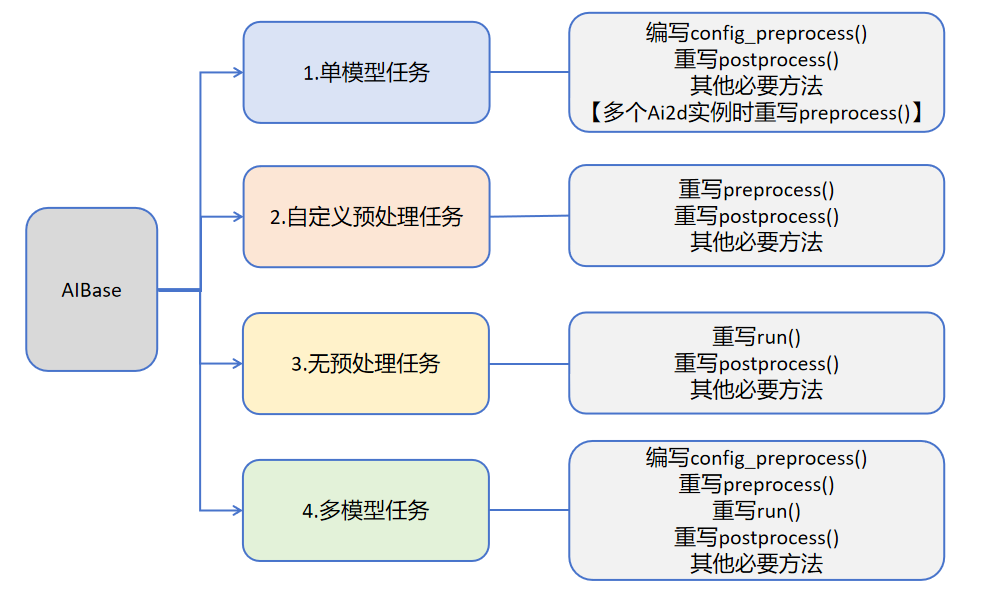
Users can write custom task classes that inherit from AIBase based on specific AI scenarios, and tasks can be divided into the following four categories: single-model tasks, multi-model tasks, custom preprocessing tasks, and no-preprocessing tasks. Different tasks require different code implementations, as shown in the figure below:
Introduction to different tasks:
| Task Type | Task Description | Code Description |
| ---------------- | ------------------------------------------------------------ | ------------------------------------------------------------ |
| Single-model task | This task has only one model, and you only need to focus on the preprocessing, inference, and post-processing of that model. The preprocessing of this type of task is implemented using Ai2d, which may use one Ai2d instance or multiple Ai2d instances. The post-processing is customized based on the scenario. | Write a custom task class, mainly focusing on the config_preprocess, postprocess of the task class, and other methods required by the task such as: draw_result, etc.
If the task contains multiple Ai2d instances, you need to override preprocess and set the calculation process of the preprocessing stage according to the order of preprocessing. |
| Custom preprocessing task | This task has only one model, and you only need to focus on the preprocessing, inference, and post-processing of that model. The preprocessing of this type of task is not implemented using Ai2d but can be customized using ulab.numpy. The post-processing is customized based on the scenario. | Write a custom task class, mainly focusing on the preprocess, postprocess of the task class, and other methods required by the task such as: draw_result, etc. |
| No-preprocessing task | This task has only one model and does not require preprocessing. You only need to focus on the inference and post-processing of the model. This type of task is generally used as part of a multi-model task, directly using the output of the previous model as input for inference. The post-processing is customized based on requirements. | Write a custom task class, mainly focusing on the run (the entire process of model inference, including all or some steps in preprocess, inference, postprocess), postprocess, and other methods required by the task such as: draw_results, etc. |
| Multi-model task | This task contains multiple models, which may be in series or in other combinations. Each model basically belongs to one of the first three types of models, and finally a complete task class is used to unify the above model subtasks. | Write multiple sub-model task classes, and refer to the first three task definitions for different sub-model tasks. Different tasks focus on different methods.
Write a multi-model task class to unify the sub-model task classes to implement the entire scenario. |
#### Single-model Task
The pseudocode structure of a single-model task is as follows:
```python
from libs.PipeLine import PipeLine
from libs.AIBase import AIBase
from libs.AI2D import Ai2d
from libs.Utils import *
import os
from media.media import *
import nncase_runtime as nn
import ulab.numpy as np
import image
import gc
import sys
# 自定义AI任务类,继承自AIBase基类
class MyAIApp(AIBase):
def __init__(self, kmodel_path, model_input_size, rgb888p_size=[224,224], display_size=[1920,1080], debug_mode=0):
# 调用基类的构造函数
super().__init__(kmodel_path, model_input_size, rgb888p_size, debug_mode)
# 模型文件路径
self.kmodel_path = kmodel_path
# 模型输入分辨率
self.model_input_size = model_input_size
# sensor给到AI的图像分辨率,并对宽度进行16的对齐
self.rgb888p_size = [ALIGN_UP(rgb888p_size[0], 16), rgb888p_size[1]]
# 显示分辨率,并对宽度进行16的对齐
self.display_size = [ALIGN_UP(display_size[0], 16), display_size[1]]
# 是否开启调试模式
self.debug_mode = debug_mode
# 实例化Ai2d,用于实现模型预处理
self.ai2d = Ai2d(debug_mode)
# 设置Ai2d的输入输出格式和类型
self.ai2d.set_ai2d_dtype(nn.ai2d_format.NCHW_FMT, nn.ai2d_format.NCHW_FMT, np.uint8, np.uint8)
# 配置预处理操作,这里使用了resize,Ai2d支持crop/shift/pad/resize/affine,具体代码请打开/sdcard/libs/AI2D.py查看
def config_preprocess(self, input_image_size=None):
with ScopedTiming("set preprocess config", self.debug_mode > 0):
# 初始化ai2d预处理配置,默认为sensor给到AI的尺寸,可以通过设置input_image_size自行修改输入尺寸
ai2d_input_size = input_image_size if input_image_size else self.rgb888p_size
# 配置resize预处理方法
self.ai2d.resize(nn.interp_method.tf_bilinear, nn.interp_mode.half_pixel)
# 构建预处理流程
self.ai2d.build([1,3,ai2d_input_size[1],ai2d_input_size[0]],[1,3,self.model_input_size[1],self.model_input_size[0]])
# 自定义当前任务的后处理,results是模型输出array列表,需要根据实际任务重写
def postprocess(self, results):
with ScopedTiming("postprocess", self.debug_mode > 0):
pass
# 绘制结果到画面上,需要根据任务自己写
def draw_result(self, pl, dets):
with ScopedTiming("display_draw", self.debug_mode > 0):
pass
if __name__ == "__main__":
# 显示模式,默认"hdmi",可以选择"hdmi"和"lcd"
display_mode="hdmi"
if display_mode=="hdmi":
display_size=[1920,1080]
else:
display_size=[800,480]
# 设置模型路径,这里要替换成当前任务模型
kmodel_path = "example_test.kmodel"
rgb888p_size = [1920, 1080]
###### 其它参数########
...
######################
# 初始化PipeLine,用于图像处理流程
pl = PipeLine(rgb888p_size=rgb888p_size, display_size=display_size, display_mode=display_mode)
pl.create() # 创建PipeLine实例
# 初始化自定义AI任务实例
my_ai = MyAIApp(kmodel_path, model_input_size=[320, 320],rgb888p_size=rgb888p_size, display_size=display_size, debug_mode=0)
my_ai.config_preprocess() # 配置预处理
while True:
with ScopedTiming("total",1):
img = pl.get_frame() # 获取当前帧数据
res = my_ai.run(img) # 推理当前帧
my_ai.draw_result(pl, res) # 绘制结果
pl.show_image() # 显示结果
gc.collect() # 垃圾回收
my_ai.deinit() # 反初始化
pl.destroy() # 销毁PipeLine实例
```
The following is an example code for face detection:
```python
from libs.PipeLine import PipeLine
from libs.AIBase import AIBase
from libs.AI2D import Ai2d
from libs.Utils import *
from media.media import *
import nncase_runtime as nn
import ulab.numpy as np
import time,os,sys,ujson,gc,random
import image
import aidemo
# 自定义人脸检测类,继承自AIBase基类
class FaceDetectionApp(AIBase):
def __init__(self, kmodel_path, model_input_size, anchors, confidence_threshold=0.5, nms_threshold=0.2, rgb888p_size=[224,224], display_size=[1920,1080], debug_mode=0):
super().__init__(kmodel_path, model_input_size, rgb888p_size, debug_mode) # 调用基类的构造函数
self.kmodel_path = kmodel_path # 模型文件路径
self.model_input_size = model_input_size # 模型输入分辨率
self.confidence_threshold = confidence_threshold # 置信度阈值
self.nms_threshold = nms_threshold # NMS(非极大值抑制)阈值
self.anchors = anchors # 锚点数据,用于目标检测
self.rgb888p_size = [ALIGN_UP(rgb888p_size[0], 16), rgb888p_size[1]] # sensor给到AI的图像分辨率,并对宽度进行16的对齐
self.display_size = [ALIGN_UP(display_size[0], 16), display_size[1]] # 显示分辨率,并对宽度进行16的对齐
self.debug_mode = debug_mode # 是否开启调试模式
self.ai2d = Ai2d(debug_mode) # 实例化Ai2d,用于实现模型预处理
self.ai2d.set_ai2d_dtype(nn.ai2d_format.NCHW_FMT, nn.ai2d_format.NCHW_FMT, np.uint8, np.uint8) # 设置Ai2d的输入输出格式和类型
# 配置预处理操作,这里使用了pad和resize,Ai2d支持crop/shift/pad/resize/affine,具体代码请打开/sdcard/app/libs/AI2D.py查看
def config_preprocess(self, input_image_size=None):
with ScopedTiming("set preprocess config", self.debug_mode > 0): # 计时器,如果debug_mode大于0则开启
ai2d_input_size = input_image_size if input_image_size else self.rgb888p_size # 初始化ai2d预处理配置,默认为sensor给到AI的尺寸,可以通过设置input_image_size自行修改输入尺寸
top, bottom, left, right = self.get_padding_param() # 获取padding参数
self.ai2d.pad([0, 0, 0, 0, top, bottom, left, right], 0, [104, 117, 123]) # 填充边缘
self.ai2d.resize(nn.interp_method.tf_bilinear, nn.interp_mode.half_pixel) # 缩放图像
self.ai2d.build([1,3,ai2d_input_size[1],ai2d_input_size[0]],[1,3,self.model_input_size[1],self.model_input_size[0]]) # 构建预处理流程
# 自定义当前任务的后处理,results是模型输出array列表,这里使用了aidemo库的face_det_post_process接口
def postprocess(self, results):
with ScopedTiming("postprocess", self.debug_mode > 0):
post_ret = aidemo.face_det_post_process(self.confidence_threshold, self.nms_threshold, self.model_input_size[1], self.anchors, self.rgb888p_size, results)
if len(post_ret) == 0:
return post_ret
else:
return post_ret[0]
# 绘制检测结果到画面上
def draw_result(self, pl, dets):
with ScopedTiming("display_draw", self.debug_mode > 0):
if dets:
pl.osd_img.clear() # 清除OSD图像
for det in dets:
# 将检测框的坐标转换为显示分辨率下的坐标
x, y, w, h = map(lambda x: int(round(x, 0)), det[:4])
x = x * self.display_size[0] // self.rgb888p_size[0]
y = y * self.display_size[1] // self.rgb888p_size[1]
w = w * self.display_size[0] // self.rgb888p_size[0]
h = h * self.display_size[1] // self.rgb888p_size[1]
pl.osd_img.draw_rectangle(x, y, w, h, color=(255, 255, 0, 255), thickness=2) # 绘制矩形框
else:
pl.osd_img.clear()
# 获取padding参数
def get_padding_param(self):
dst_w = self.model_input_size[0] # 模型输入宽度
dst_h = self.model_input_size[1] # 模型输入高度
ratio_w = dst_w / self.rgb888p_size[0] # 宽度缩放比例
ratio_h = dst_h / self.rgb888p_size[1] # 高度缩放比例
ratio = min(ratio_w, ratio_h) # 取较小的缩放比例
new_w = int(ratio * self.rgb888p_size[0]) # 新宽度
new_h = int(ratio * self.rgb888p_size[1]) # 新高度
dw = (dst_w - new_w) / 2 # 宽度差
dh = (dst_h - new_h) / 2 # 高度差
top = int(round(0))
bottom = int(round(dh * 2 + 0.1))
left = int(round(0))
right = int(round(dw * 2 - 0.1))
return top, bottom, left, right
if __name__ == "__main__":
# 显示模式,默认"hdmi",可以选择"hdmi"和"lcd"
display_mode="hdmi"
# k230保持不变,k230d可调整为[640,360]
rgb888p_size = [1920, 1080]
if display_mode=="hdmi":
display_size=[1920,1080]
else:
display_size=[800,480]
# 设置模型路径和其他参数
kmodel_path = "/sdcard/examples/kmodel/face_detection_320.kmodel"
# 其它参数
confidence_threshold = 0.5
nms_threshold = 0.2
anchor_len = 4200
det_dim = 4
anchors_path = "/sdcard/examples/utils/prior_data_320.bin"
anchors = np.fromfile(anchors_path, dtype=np.float)
anchors = anchors.reshape((anchor_len, det_dim))
# 初始化PipeLine,用于图像处理流程
pl = PipeLine(rgb888p_size=rgb888p_size, display_size=display_size, display_mode=display_mode)
pl.create() # 创建PipeLine实例
# 初始化自定义人脸检测实例
face_det = FaceDetectionApp(kmodel_path, model_input_size=[320, 320], anchors=anchors, confidence_threshold=confidence_threshold, nms_threshold=nms_threshold, rgb888p_size=rgb888p_size, display_size=display_size, debug_mode=0)
face_det.config_preprocess() # 配置预处理
while True:
with ScopedTiming("total",1):
img = pl.get_frame() # 获取当前帧数据
res = face_det.run(img) # 推理当前帧
face_det.draw_result(pl, res) # 绘制结果
pl.show_image() # 显示结果
gc.collect() # 垃圾回收
face_det.deinit() # 反初始化
pl.destroy() # 销毁PipeLine实例
```
The pseudocode for multiple Ai2d instances is as follows:
```python
from libs.PipeLine import PipeLine
from libs.AIBase import AIBase
from libs.AI2D import Ai2d
from libs.Utils import *
import os
from media.media import *
import nncase_runtime as nn
import ulab.numpy as np
import image
import gc
import sys
# 自定义AI任务类,继承自AIBase基类
class MyAIApp(AIBase):
def __init__(self, kmodel_path, model_input_size, rgb888p_size=[224,224], display_size=[1920,1080], debug_mode=0):
# 调用基类的构造函数
super().__init__(kmodel_path, model_input_size, rgb888p_size, debug_mode)
# 模型文件路径
self.kmodel_path = kmodel_path
# 模型输入分辨率
self.model_input_size = model_input_size
# sensor给到AI的图像分辨率,并对宽度进行16的对齐
self.rgb888p_size = [ALIGN_UP(rgb888p_size[0], 16), rgb888p_size[1]]
# 显示分辨率,并对宽度进行16的对齐
self.display_size = [ALIGN_UP(display_size[0], 16), display_size[1]]
# 是否开启调试模式
self.debug_mode = debug_mode
# 实例化Ai2d,用于实现模型预处理
self.ai2d_resize = Ai2d(debug_mode)
# 设置Ai2d的输入输出格式和类型
self.ai2d_resize.set_ai2d_dtype(nn.ai2d_format.NCHW_FMT, nn.ai2d_format.NCHW_FMT, np.uint8, np.uint8)
# 实例化Ai2d,用于实现模型预处理
self.ai2d_resize = Ai2d(debug_mode)
# 设置Ai2d的输入输出格式和类型
self.ai2d_resize.set_ai2d_dtype(nn.ai2d_format.NCHW_FMT, nn.ai2d_format.NCHW_FMT, np.uint8, np.uint8)
# 实例化Ai2d,用于实现模型预处理
self.ai2d_crop = Ai2d(debug_mode)
# 设置Ai2d的输入输出格式和类型
self.ai2d_crop.set_ai2d_dtype(nn.ai2d_format.NCHW_FMT, nn.ai2d_format.NCHW_FMT, np.uint8, np.uint8)
# 配置预处理操作,这里使用了resize和crop,Ai2d支持crop/shift/pad/resize/affine,具体代码请打开/sdcard/libs/AI2D.py查看
def config_preprocess(self, input_image_size=None):
with ScopedTiming("set preprocess config", self.debug_mode > 0):
# 初始化ai2d预处理配置,默认为sensor给到AI的尺寸,可以通过设置input_image_size自行修改输入尺寸
ai2d_input_size = input_image_size if input_image_size else self.rgb888p_size
# 配置resize预处理方法
self.ai2d_resize.resize(nn.interp_method.tf_bilinear, nn.interp_mode.half_pixel)
# 构建预处理流程
self.ai2d_resize.build([1,3,ai2d_input_size[1],ai2d_input_size[0]],[1,3,640,640])
# 配置crop预处理方法
self.ai2d_crop.crop(0,0,320,320)
# 构建预处理流程
self.ai2d_crop.build([1,3,640,640],[1,3,320,320])
# 假设该任务需要crop和resize预处理,顺序是先resize再crop,该顺序不符合ai2d的处理顺序,因此需要设置两个Ai2d实例分别处理
def preprocess(self,input_np):
resize_tensor=self.ai2d_resize.run(input_np)
resize_np=resize_tensor.to_numpy()
crop_tensor=self.ai2d_crop.run(resize_np)
return [crop_tensor]
# 自定义当前任务的后处理,results是模型输出array列表,需要根据实际任务重写
def postprocess(self, results):
with ScopedTiming("postprocess", self.debug_mode > 0):
pass
# 绘制结果到画面上,需要根据任务自己写
def draw_result(self, pl, dets):
with ScopedTiming("display_draw", self.debug_mode > 0):
pass
# 重写deinit,释放多个ai2d资源
def deinit(self):
with ScopedTiming("deinit",self.debug_mode > 0):
del self.ai2d_resize
del self.ai2d_crop
super().deinit()
if __name__ == "__main__":
# 显示模式,默认"hdmi",可以选择"hdmi"和"lcd"
display_mode="hdmi"
if display_mode=="hdmi":
display_size=[1920,1080]
else:
display_size=[800,480]
# 设置模型路径,这里要替换成当前任务模型
kmodel_path = "example_test.kmodel"
rgb888p_size = [1920, 1080]
###### 其它参数########
...
######################
# 初始化PipeLine,用于图像处理流程
pl = PipeLine(rgb888p_size=rgb888p_size, display_size=display_size, display_mode=display_mode)
pl.create() # 创建PipeLine实例
# 初始化自定义AI任务实例
my_ai = MyAIApp(kmodel_path, model_input_size=[320, 320],rgb888p_size=rgb888p_size, display_size=display_size, debug_mode=0)
my_ai.config_preprocess() # 配置预处理
while True:
with ScopedTiming("total",1):
img = pl.get_frame() # 获取当前帧数据
res = my_ai.run(img) # 推理当前帧
my_ai.draw_result(pl, res) # 绘制结果
pl.show_image() # 显示结果
gc.collect() # 垃圾回收
my_ai.deinit() # 反初始化
pl.destroy() # 销毁PipeLine实例
```
#### Custom Preprocessing Task
For AI tasks that need to override the preprocessing (do not use the provided ai2d class, write the preprocessing manually), the pseudocode is as follows:
```python
from libs.PipeLine import PipeLine
from libs.AIBase import AIBase
from libs.AI2D import Ai2d
from libs.Utils import *
import os
from media.media import *
import nncase_runtime as nn
import ulab.numpy as np
import image
import gc
import sys
# 自定义AI任务类,继承自AIBase基类
class MyAIApp(AIBase):
def __init__(self, kmodel_path, model_input_size, rgb888p_size=[224,224], display_size=[1920,1080], debug_mode=0):
# 调用基类的构造函数
super().__init__(kmodel_path, model_input_size, rgb888p_size, debug_mode)
# 模型文件路径
self.kmodel_path = kmodel_path
# 模型输入分辨率
self.model_input_size = model_input_size
# sensor给到AI的图像分辨率,并对宽度进行16的对齐
self.rgb888p_size = [ALIGN_UP(rgb888p_size[0], 16), rgb888p_size[1]]
# 显示分辨率,并对宽度进行16的对齐
self.display_size = [ALIGN_UP(display_size[0], 16), display_size[1]]
# 是否开启调试模式
self.debug_mode = debug_mode
# 实例化Ai2d,用于实现模型预处理
self.ai2d = Ai2d(debug_mode)
# 设置Ai2d的输入输出格式和类型
self.ai2d.set_ai2d_dtype(nn.ai2d_format.NCHW_FMT, nn.ai2d_format.NCHW_FMT, np.uint8, np.uint8)
# 对于不使用ai2d完成预处理的AI任务,使用封装的接口或者ulab.numpy实现预处理,需要在子类中重写该函数
def preprocess(self,input_np):
#############
#注意自定义预处理过程
#############
return [tensor]
# 自定义当前任务的后处理,results是模型输出array列表,需要根据实际任务重写
def postprocess(self, results):
with ScopedTiming("postprocess", self.debug_mode > 0):
pass
# 绘制结果到画面上,需要根据任务自己写
def draw_result(self, pl, dets):
with ScopedTiming("display_draw", self.debug_mode > 0):
pass
if __name__ == "__main__":
# 显示模式,默认"hdmi",可以选择"hdmi"和"lcd"
display_mode="hdmi"
if display_mode=="hdmi":
display_size=[1920,1080]
else:
display_size=[800,480]
# 设置模型路径,这里要替换成当前任务模型
kmodel_path = "example_test.kmodel"
rgb888p_size = [1920, 1080]
###### 其它参数########
...
######################
# 初始化PipeLine,用于图像处理流程
pl = PipeLine(rgb888p_size=rgb888p_size, display_size=display_size, display_mode=display_mode)
pl.create() # 创建PipeLine实例
# 初始化自定义AI任务实例
my_ai = MyAIApp(kmodel_path, model_input_size=[320, 320],rgb888p_size=rgb888p_size, display_size=display_size, debug_mode=0)
my_ai.config_preprocess() # 配置预处理
while True:
with ScopedTiming("total",1):
img = pl.get_frame() # 获取当前帧数据
res = my_ai.run(img) # 推理当前帧
my_ai.draw_result(pl, res) # 绘制结果
pl.show_image() # 显示结果
gc.collect() # 垃圾回收
my_ai.deinit() # 反初始化
pl.destroy() # 销毁PipeLine实例
```
Take keyword wake-up keyword_spotting as an example:
```python
from libs.Utils import ScopedTiming
from libs.AIBase import AIBase
from libs.AI2D import Ai2d
from media.pyaudio import * # 音频模块
from media.media import * # 软件抽象模块,主要封装媒体数据链路以及媒体缓冲区
import media.wave as wave # wav音频处理模块
import nncase_runtime as nn # nncase运行模块,封装了kpu(kmodel推理)和ai2d(图片预处理加速)操作
import ulab.numpy as np # 类似python numpy操作,但也会有一些接口不同
import aidemo # aidemo模块,封装ai demo相关前处理、后处理等操作
import time # 时间统计
import struct # 字节字符转换模块
import gc # 垃圾回收模块
import os,sys # 操作系统接口模块
# 自定义关键词唤醒类,继承自AIBase基类
class KWSApp(AIBase):
def __init__(self, kmodel_path, threshold, debug_mode=0):
super().__init__(kmodel_path) # 调用基类的构造函数
self.kmodel_path = kmodel_path # 模型文件路径
self.threshold=threshold
self.debug_mode = debug_mode # 是否开启调试模式
self.cache_np = np.zeros((1, 256, 105), dtype=np.float)
# 自定义预处理,返回模型输入tensor列表
def preprocess(self,pcm_data):
pcm_data_list=[]
# 获取音频流数据
for i in range(0, len(pcm_data), 2):
# 每两个字节组织成一个有符号整数,然后将其转换为浮点数,即为一次采样的数据,加入到当前一帧(0.3s)的数据列表中
int_pcm_data = struct.unpack(" 0):
logits_np = results[0]
self.cache_np= results[1]
max_logits = np.max(logits_np, axis=1)[0]
max_p = np.max(max_logits)
idx = np.argmax(max_logits)
# 如果分数大于阈值,且idx==1(即包含唤醒词),播放回复音频
if max_p > self.threshold and idx == 1:
return 1
else:
return 0
if __name__ == "__main__":
os.exitpoint(os.EXITPOINT_ENABLE)
nn.shrink_memory_pool()
# 设置模型路径和其他参数
kmodel_path = "/sdcard/examples/kmodel/kws.kmodel"
# 其它参数
THRESH = 0.5 # 检测阈值
SAMPLE_RATE = 16000 # 采样率16000Hz,即每秒采样16000次
CHANNELS = 1 # 通道数 1为单声道,2为立体声
FORMAT = paInt16 # 音频输入输出格式 paInt16
CHUNK = int(0.3 * 16000) # 每次读取音频数据的帧数,设置为0.3s的帧数16000*0.3=4800
reply_wav_file = "/sdcard/examples/utils/wozai.wav" # kws唤醒词回复音频路径
# 初始化音频预处理接口
fp = aidemo.kws_fp_create()
# 初始化音频流
p = PyAudio()
MediaManager.init() #vb buffer初始化
# 用于采集实时音频数据
input_stream = p.open(format=FORMAT,channels=CHANNELS,rate=SAMPLE_RATE,input=True,frames_per_buffer=CHUNK)
# 用于播放回复音频
output_stream = p.open(format=FORMAT,channels=CHANNELS,rate=SAMPLE_RATE,output=True,frames_per_buffer=CHUNK)
# 初始化自定义关键词唤醒实例
kws = KWSApp(kmodel_path,threshold=THRESH,debug_mode=0)
try:
while True:
os.exitpoint() # 检查是否有退出信号
with ScopedTiming("total",1):
pcm_data=input_stream.read()
res=kws.run(pcm_data)
if res:
print("====Detected XiaonanXiaonan!====")
wf = wave.open(reply_wav_file, "rb")
wav_data = wf.read_frames(CHUNK)
while wav_data:
output_stream.write(wav_data)
wav_data = wf.read_frames(CHUNK)
time.sleep(1) # 时间缓冲,用于播放回复声音
wf.close()
else:
print("Deactivated!")
gc.collect() # 垃圾回收
except Exception as e:
sys.print_exception(e) # 打印异常信息
finally:
input_stream.stop_stream()
output_stream.stop_stream()
input_stream.close()
output_stream.close()
p.terminate()
MediaManager.deinit() #释放vb buffer
aidemo.kws_fp_destroy(fp)
kws.deinit() # 反初始化
```
#### No-preprocessing Task
For AI tasks that do not require preprocessing (direct input inference), the pseudocode is as follows:
```python
from libs.PipeLine import PipeLine
from libs.AIBase import AIBase
from libs.AI2D import Ai2d
from libs.Utils import *
import os
from media.media import *
import nncase_runtime as nn
import ulab.numpy as np
import image
import gc
import sys
# 自定义AI任务类,继承自AIBase基类
class MyAIApp(AIBase):
def __init__(self, kmodel_path, model_input_size, rgb888p_size=[224,224], display_size=[1920,1080], debug_mode=0):
# 调用基类的构造函数
super().__init__(kmodel_path, model_input_size, rgb888p_size, debug_mode)
# 模型文件路径
self.kmodel_path = kmodel_path
# 模型输入分辨率
self.model_input_size = model_input_size
# sensor给到AI的图像分辨率,并对宽度进行16的对齐
self.rgb888p_size = [ALIGN_UP(rgb888p_size[0], 16), rgb888p_size[1]]
# 显示分辨率,并对宽度进行16的对齐
self.display_size = [ALIGN_UP(display_size[0], 16), display_size[1]]
# 是否开启调试模式
self.debug_mode = debug_mode
# 自定义当前任务的后处理,results是模型输出array列表,需要根据实际任务重写
def postprocess(self, results):
with ScopedTiming("postprocess", self.debug_mode > 0):
pass
# 对于无预处理的AI任务,需要在子类中重写该函数
def run(self,inputs_np):
# 先将ulab.numpy.ndarray列表转换成tensor列表
tensors=[]
for input_np in inputs_np:
tensors.append(nn.from_numpy(input_np))
# 调用AIBase内的inference函数进行模型推理
results=self.inference(tensors)
# 调用当前子类的postprocess方法进行自定义后处理
outputs=self.postprocess(results)
return outputs
# 绘制结果到画面上,需要根据任务自己写
def draw_result(self, pl, dets):
with ScopedTiming("display_draw", self.debug_mode > 0):
pass
if __name__ == "__main__":
# 显示模式,默认"hdmi",可以选择"hdmi"和"lcd"
display_mode="hdmi"
if display_mode=="hdmi":
display_size=[1920,1080]
else:
display_size=[800,480]
# 设置模型路径,这里要替换成当前任务模型
kmodel_path = "example_test.kmodel"
rgb888p_size = [1920, 1080]
###### 其它参数########
...
######################
# 初始化PipeLine,用于图像处理流程
pl = PipeLine(rgb888p_size=rgb888p_size, display_size=display_size, display_mode=display_mode)
pl.create() # 创建PipeLine实例
# 初始化自定义AI任务实例
my_ai = MyAIApp(kmodel_path, model_input_size=[320, 320],rgb888p_size=rgb888p_size, display_size=display_size, debug_mode=0)
my_ai.config_preprocess() # 配置预处理
while True:
with ScopedTiming("total",1):
img = pl.get_frame() # 获取当前帧数据
res = my_ai.run(img) # 推理当前帧
my_ai.draw_result(pl, res) # 绘制结果
pl.show_image() # 显示结果
gc.collect() # 垃圾回收
my_ai.deinit() # 反初始化
pl.destroy() # 销毁PipeLine实例
```
For example, the tracking module in single object tracking (nanotracker.py) only needs the output of the template model and the real-time inference model as the input of the tracking model, and does not require preprocessing:
```python
class TrackerApp(AIBase):
def __init__(self,kmodel_path,crop_input_size,thresh,rgb888p_size=[1280,720],display_size=[1920,1080],debug_mode=0):
super().__init__(kmodel_path,rgb888p_size,debug_mode)
# kmodel路径
self.kmodel_path=kmodel_path
# crop模型的输入尺寸
self.crop_input_size=crop_input_size
# 跟踪框阈值
self.thresh=thresh
# 跟踪框宽、高调整系数
self.CONTEXT_AMOUNT = 0.5
# sensor给到AI的图像分辨率,宽16字节对齐
self.rgb888p_size=[ALIGN_UP(rgb888p_size[0],16),rgb888p_size[1]]
# 视频输出VO分辨率,宽16字节对齐
self.display_size=[ALIGN_UP(display_size[0],16),display_size[1]]
# debug模式
self.debug_mode=debug_mode
# 可以不定义
self.ai2d=Ai2d(debug_mode)
self.ai2d.set_ai2d_dtype(nn.ai2d_format.NCHW_FMT,nn.ai2d_format.NCHW_FMT,np.uint8, np.uint8)
# 可以不定义
def config_preprocess(self,input_image_size=None):
with ScopedTiming("set preprocess config",self.debug_mode > 0):
pass
# 重写run函数,因为没有预处理过程,所以原来run操作中包含的preprocess->inference->postprocess不合适,这里只包含inference->postprocess
def run(self,input_np_1,input_np_2,center_xy_wh):
input_tensors=[]
input_tensors.append(nn.from_numpy(input_np_1))
input_tensors.append(nn.from_numpy(input_np_2))
results=self.inference(input_tensors)
return self.postprocess(results,center_xy_wh)
# 自定义后处理,results是模型输出array的列表,这里使用了aidemo的nanotracker_postprocess列表
def postprocess(self,results,center_xy_wh):
with ScopedTiming("postprocess",self.debug_mode > 0):
det = aidemo.nanotracker_postprocess(results[0],results[1],[self.rgb888p_size[1],self.rgb888p_size[0]],self.thresh,center_xy_wh,self.crop_input_size[0],self.CONTEXT_AMOUNT)
return det
```
#### Multi-model Task
Taking dual-model cascaded inference as an example, the pseudocode is given as follows:
```python
from libs.PipeLine import PipeLine
from libs.AIBase import AIBase
from libs.AI2D import Ai2d
from libs.Utils import *
import os
from media.media import *
import nncase_runtime as nn
import ulab.numpy as np
import image
import gc
import sys
# 自定义AI任务类,继承自AIBase基类
class MyAIApp_1(AIBase):
def __init__(self, kmodel_path, model_input_size, rgb888p_size=[224,224], display_size=[1920,1080], debug_mode=0):
# 调用基类的构造函数
super().__init__(kmodel_path, model_input_size, rgb888p_size, debug_mode)
# 模型文件路径
self.kmodel_path = kmodel_path
# 模型输入分辨率
self.model_input_size = model_input_size
# sensor给到AI的图像分辨率,并对宽度进行16的对齐
self.rgb888p_size = [ALIGN_UP(rgb888p_size[0], 16), rgb888p_size[1]]
# 显示分辨率,并对宽度进行16的对齐
self.display_size = [ALIGN_UP(display_size[0], 16), display_size[1]]
# 是否开启调试模式
self.debug_mode = debug_mode
# 实例化Ai2d,用于实现模型预处理
self.ai2d = Ai2d(debug_mode)
# 设置Ai2d的输入输出格式和类型
self.ai2d.set_ai2d_dtype(nn.ai2d_format.NCHW_FMT, nn.ai2d_format.NCHW_FMT, np.uint8, np.uint8)
# 配置预处理操作,这里使用了resize,Ai2d支持crop/shift/pad/resize/affine,具体代码请打开/sdcard/libs/AI2D.py查看
def config_preprocess(self, input_image_size=None):
with ScopedTiming("set preprocess config", self.debug_mode > 0):
# 初始化ai2d预处理配置,默认为sensor给到AI的尺寸,可以通过设置input_image_size自行修改输入尺寸
ai2d_input_size = input_image_size if input_image_size else self.rgb888p_size
# 配置resize预处理方法
self.ai2d.resize(nn.interp_method.tf_bilinear, nn.interp_mode.half_pixel)
# 构建预处理流程
self.ai2d.build([1,3,ai2d_input_size[1],ai2d_input_size[0]],[1,3,self.model_input_size[1],self.model_input_size[0]])
# 自定义当前任务的后处理,results是模型输出array列表,需要根据实际任务重写
def postprocess(self, results):
with ScopedTiming("postprocess", self.debug_mode > 0):
pass
# 自定义AI任务类,继承自AIBase基类
class MyAIApp_2(AIBase):
def __init__(self, kmodel_path, model_input_size, rgb888p_size=[224,224], display_size=[1920,1080], debug_mode=0):
# 调用基类的构造函数
super().__init__(kmodel_path, model_input_size, rgb888p_size, debug_mode)
# 模型文件路径
self.kmodel_path = kmodel_path
# 模型输入分辨率
self.model_input_size = model_input_size
# sensor给到AI的图像分辨率,并对宽度进行16的对齐
self.rgb888p_size = [ALIGN_UP(rgb888p_size[0], 16), rgb888p_size[1]]
# 显示分辨率,并对宽度进行16的对齐
self.display_size = [ALIGN_UP(display_size[0], 16), display_size[1]]
# 是否开启调试模式
self.debug_mode = debug_mode
# 实例化Ai2d,用于实现模型预处理
self.ai2d = Ai2d(debug_mode)
# 设置Ai2d的输入输出格式和类型
self.ai2d.set_ai2d_dtype(nn.ai2d_format.NCHW_FMT, nn.ai2d_format.NCHW_FMT, np.uint8, np.uint8)
# 配置预处理操作,这里使用了resize,Ai2d支持crop/shift/pad/resize/affine,具体代码请打开/sdcard/libs/AI2D.py查看
def config_preprocess(self, input_image_size=None):
with ScopedTiming("set preprocess config", self.debug_mode > 0):
# 初始化ai2d预处理配置,默认为sensor给到AI的尺寸,可以通过设置input_image_size自行修改输入尺寸
ai2d_input_size = input_image_size if input_image_size else self.rgb888p_size
# 配置resize预处理方法
self.ai2d.resize(nn.interp_method.tf_bilinear, nn.interp_mode.half_pixel)
# 构建预处理流程
self.ai2d.build([1,3,ai2d_input_size[1],ai2d_input_size[0]],[1,3,self.model_input_size[1],self.model_input_size[0]])
# 自定义当前任务的后处理,results是模型输出array列表,需要根据实际任务重写
def postprocess(self, results):
with ScopedTiming("postprocess", self.debug_mode > 0):
pass
class MyApp:
def __init__(kmodel1_path,kmodel2_path,kmodel1_input_size,kmodel2_input_size,rgb888p_size,display_size,debug_mode):
# 创建两个模型推理的实例
self.app_1=MyApp_1(kmodel1_path,kmodel1_input_size,rgb888p_size,display_size,debug_mode)
self.app_2=MyApp_2(kmodel2_path,kmodel2_input_size,rgb888p_size,display_size,debug_mode)
self.app_1.config_preprocess()
# 编写run函数,具体代码根据AI任务的需求编写,此处只是给出一个示例
def run(self,input_np):
outputs_1=self.app_1.run(input_np)
outputs_2=[]
for out in outputs_1:
self.app_2.config_preprocess(out)
out_2=self.app_2.run(input_np)
outputs_2.append(out_2)
return outputs_1,outputs_2
# 绘制
def draw_result(self,pl,outputs_1,outputs_2):
pass
######其他函数########
# 省略
####################
if __name__ == "__main__":
# 显示模式,默认"hdmi",可以选择"hdmi"和"lcd"
display_mode="hdmi"
if display_mode=="hdmi":
display_size=[1920,1080]
else:
display_size=[800,480]
rgb888p_size = [1920, 1080]
# 设置模型路径,这里要替换成当前任务模型
kmodel1_path = "test_kmodel1.kmodel"
kmdoel1_input_size=[320,320]
kmodel2_path = "test_kmodel2.kmodel"
kmodel2_input_size=[48,48]
###### 其它参数########
# 省略
######################
# 初始化PipeLine,用于图像处理流程
pl = PipeLine(rgb888p_size=rgb888p_size, display_size=display_size, display_mode=display_mode)
pl.create() # 创建PipeLine实例
# 初始化自定义AI任务实例
my_ai = MyApp(kmodel1_path,kmodel2_path, kmodel1_input_size,kmodel2_input_size,rgb888p_size=rgb888p_size, display_size=display_size, debug_mode=0)
my_ai.config_preprocess() # 配置预处理
while True:
with ScopedTiming("total",1):
img = pl.get_frame() # 获取当前帧数据
outputs_1,outputs_2 = my_ai.run(img) # 推理当前帧
my_ai.draw_result(pl, outputs_1,outputs_2) # 绘制结果
pl.show_image() # 显示结果
gc.collect() # 垃圾回收
my_ai.app_1.deinit() # 反初始化
my_ai.app_2.deinit()
pl.destroy() # 销毁PipeLine实例
```
For example code, please refer to license plate detection and recognition: flash the firmware, open the IDE, select File -> Open File, and select the corresponding script according to the following path: **This PC -> CanMV -> sdcard -> examples -> 05-AI-Demo -> licence_det_rec.py**.
### Reference Documentation
#### k230 canmv Documentation
Documentation link: [Welcome to K230 CanMV's documentation! — K230 CanMV Documentation (canaan-creative.com)](https://www.kendryte.com/zh/sdkResource/230canmv)
#### Ulab Library Support
Link: [ulab – Manipulate numeric data similar to numpy — Adafruit CircuitPython 9.1.0-beta.3 documentation](https://docs.circuitpython.org/en/latest/shared-bindings/ulab/index.html)
github link: [v923z/micropython-ulab: a numpy-like fast vector module for micropython, circuitpython, and their derivatives (github.com)](https://github.com/v923z/micropython-ulab)
## AI Demo
```{admonition} Tip
The development board with the K230D chip needs to change the `display_mode` in `__main__` to `lcd` to adapt the display output when running the above demos, and also needs to reduce the resolution according to the comments. At the same time, some demos cannot run on K230D. For details, see the table above.
```
Please download the latest version of the image according to the type of development board you have from [K230 MicroPython Image Download List](https://www.kendryte.com/resource?selected=0-0-3-0) and [K230D MicroPython Image Download List](https://www.kendryte.com/resource?selected=1-0-2-0), and complete the burning. For the burning method, please refer to the document: [Burn Firmware](../../../zh/userguide/how_to_burn_firmware.md).
After the image burning is complete, connect to the IDE. For instructions on how to use the IDE, please refer to the document: [How to Use IDE](../../../zh/userguide/how_to_use_ide.md).
### Dynamic Gesture Recognition
#### Demo Description
Dynamic gesture recognition implements the recognition of five dynamic gestures, which include: waving up, waving down, waving left, waving right, and finger pinching.
#### Code
Open the IDE, select File->Open File, and select the corresponding script according to the following path: **This PC->CanMV->sdcard->examples->05-AI-Demo->dynamic_gesture.py**. You can refer to the source code displayed by the IDE. Click the run button in the lower left corner of the IDE to demonstrate the demo.
#### Demonstration Effect
Please point your palm at the camera. After the corresponding direction palm appears in the upper left corner of the screen, make the actions of left, right, up, down, and five-finger pinching. After the action is recognized, the category of the dynamic gesture will be displayed and marked with an arrow.
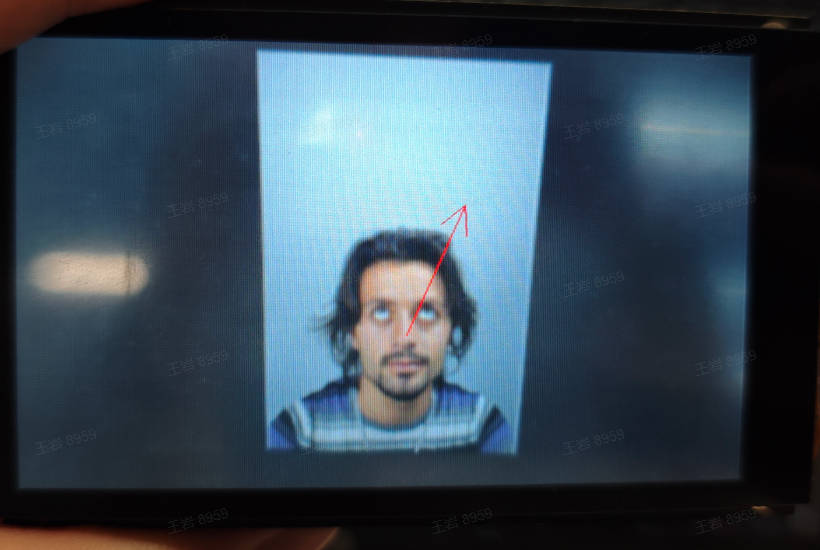
### Gaze Estimation
#### Demo Description
Gaze estimation predicts the direction of human eye gaze based on facial features. This application is a dual-model application. It first performs face detection, then predicts the gaze direction of the detected face, and marks it on the screen with arrows.
#### Code
Open the IDE, select File->Open File, and choose the corresponding script according to the following path: **This PC->CanMV->sdcard->examples->05-AI-Demo->eye_gaze.py**. You can refer to the source code displayed in the IDE. Click the run button in the lower left corner of the IDE to demonstrate the demo.
#### Demonstration Effect
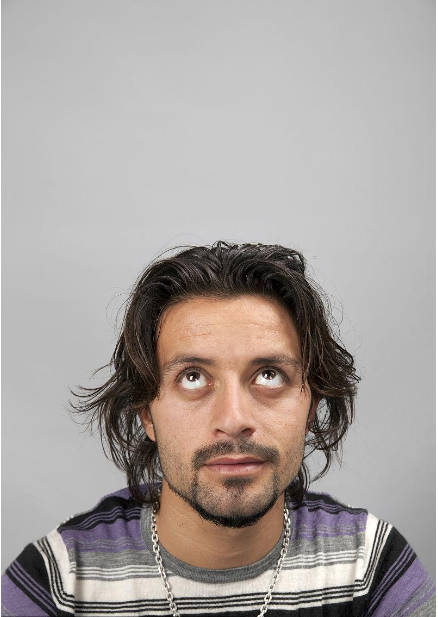
The original image is as follows:
Here, taking the 01studio LCD screen (800*480) as an example to show the demonstration effect, please change `display_mode` in the `__main__` function to `lcd` and then run it. The hdmi effect is similar.
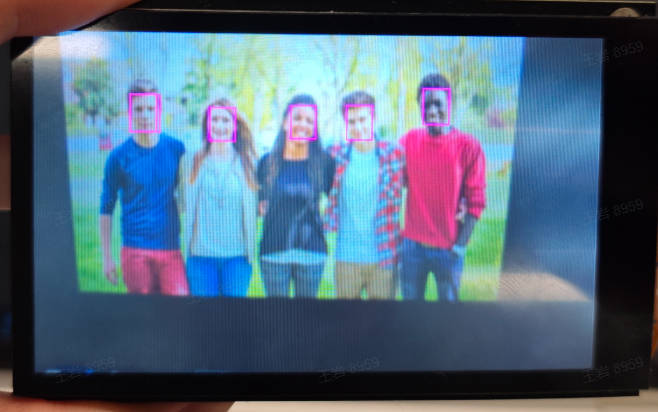
### Face Detection
#### Demo Description
The face detection application detects every face in the video and marks them with detection boxes. At the same time, it marks the positions of five key points for each face: the left eye, right eye, nose tip, left mouth corner, and right mouth corner.
#### Code
Open the IDE, select File->Open File, and choose the corresponding script according to the following path: **This PC->CanMV->sdcard->examples->05-AI-Demo->face_detection.py**. You can refer to the source code displayed in the IDE. Click the run button in the lower left corner of the IDE to run the demo.
#### Demonstration Effect
The original image is as follows:
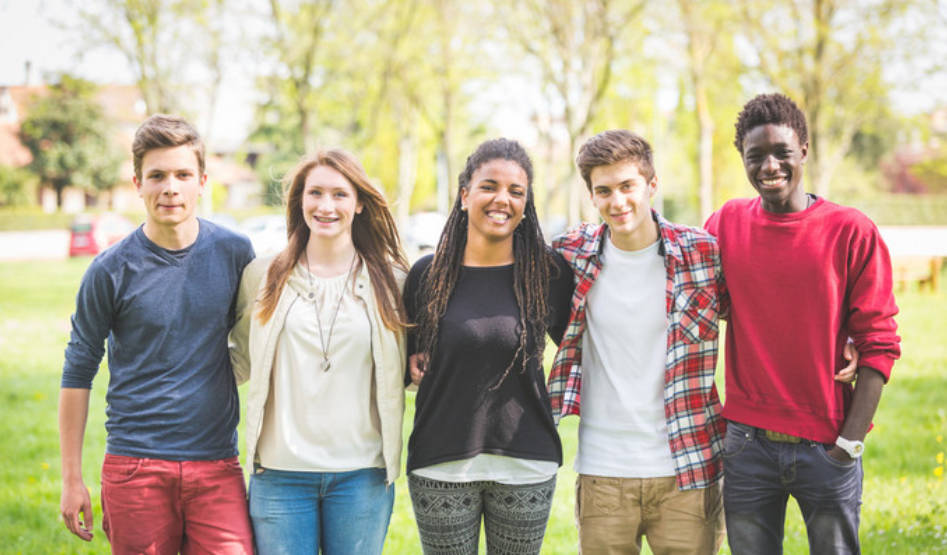
Here, the LCD screen of 01studio (800*480) is used as an example to show the demonstration effect. Please change `display_mode` in the `__main__` function to `lcd` and then run it. The HDMI effect is similar.
### Face Key Parts
#### Demo Description
The face key parts application is a dual-model application. It first performs face detection on each frame of the video, then identifies 106 key points on each detected face, and draws the contours of the face, mouth, eyes, nose, and eyebrow areas based on the 106 key points.
#### Code
Open the IDE, select File->Open File, and choose the corresponding script according to the following path: **This PC->CanMV->sdcard->examples->05-AI-Demo->face_landmark.py**. You can refer to the source code displayed in the IDE. Click the run button in the lower left corner of the IDE to perform the demo.
#### Demo Effect
The original image is as follows:
Here, the 01studio LCD screen (800*480) is used as an example to show the demo effect. Please change `display_mode` to `lcd` in the `__main__` function before running. The hdmi effect is similar.

### Face Liveness Detection
#### Demo Description
Face liveness detection is a single-model liveness detection example based on RGB images. The application first performs face detection on each frame of the video, and then performs liveness detection on each detected face to determine whether it is a live face.
#### Code
Open the IDE, select File->Open File, and choose the corresponding script according to the following path: **This PC->CanMV->sdcard->examples->05-AI-Demo->face_.py**. You can refer to the source code displayed in the IDE. Click the run button in the lower left corner of the IDE to perform the demo demonstration.
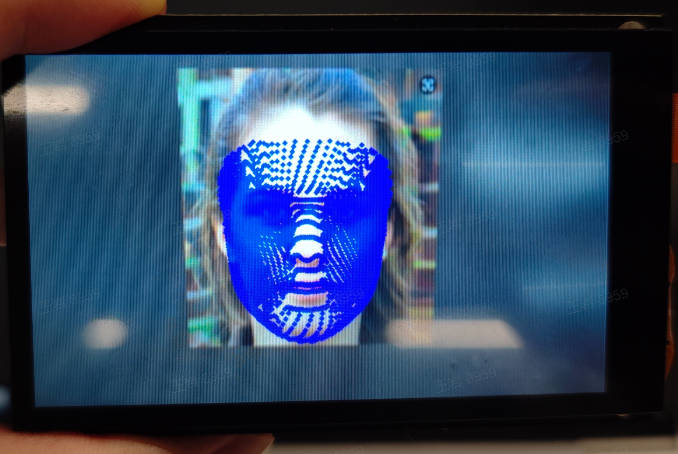
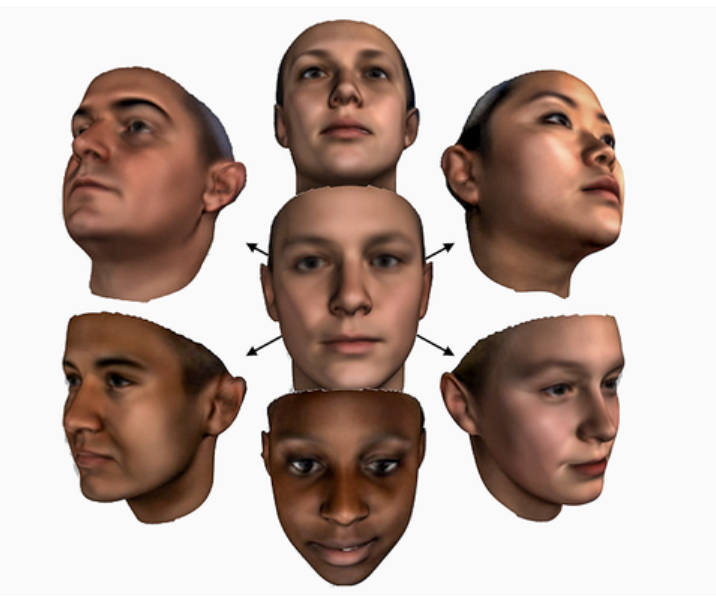
### Face 3D Mesh
#### Demo Description
Face 3D Mesh is a multi-model application. First, face detection is performed on each frame of the video, then face alignment is performed using the face alignment model (3DDFA, 3D Dense Face Alignment), and finally the face mesh model is used to reconstruct the 3D mesh of each face in the image, obtaining the mesh of each face.
#### Code
Open the IDE, select File->Open File, and choose the corresponding script according to the following path: **This PC->CanMV->sdcard->examples->05-AI-Demo->face_mesh.py**. You can refer to the source code displayed in the IDE. Click the run button in the lower left corner of the IDE to perform the demo.
#### Demo Effect
The original image is as follows:

Taking the 01studio LCD screen (800*480) as an example, the demo effect is shown below. Please change `display_mode` to `lcd` in the `__main__` function before running. The hdmi effect is similar.
### Face Parsing
#### Demo Description
The Face Parsing (also known as Face Segmentation) application is a dual-model application. It first performs face detection, and then achieves segmentation of different parts of the face. Face segmentation includes pixel-level classification of regions such as eyes, nose, and mouth, with different areas marked in different colors on the screen.
#### Code
Open the IDE, select File->Open File, and choose the corresponding script according to the following path: **This PC->CanMV->sdcard->examples->05-AI-Demo->face_parse.py**. You can refer to the source code displayed in the IDE. Click the run button in the lower left corner of the IDE to perform the demo demonstration.
#### Demo Effect
The original image is as follows:

Here, the 01studio LCD screen (800*480) is taken as an example to show the demo effect. Please change `display_mode` in the `__main__` function to `lcd` before running. The hdmi effect is similar.
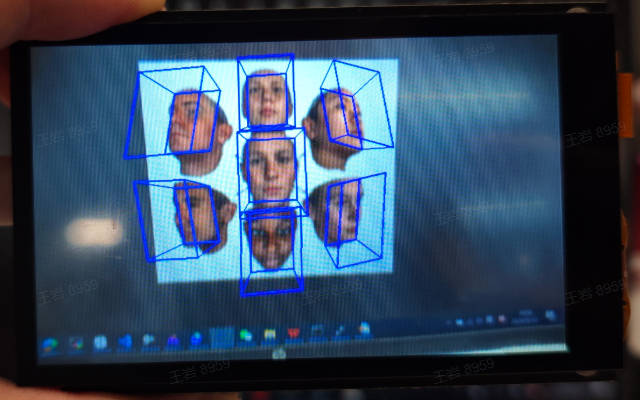
### Face Pose
#### Demo Description
Face pose is a dual-model application. First, face detection is performed on each frame of the video, and then the face orientation is predicted for each detected face. Face orientation is represented using Euler angles (roll/yaw/pitch), where roll represents the degree of face tilting left and right, yaw represents the degree of face rotating left and right, and pitch represents the degree of face looking down and up. This application visualizes the face orientation on the screen by constructing a projection matrix.
#### Code
Open the IDE, select File->Open File, and choose the corresponding script according to the following path: **This PC->CanMV->sdcard->examples->05-AI-Demo->face_pose.py**. You can refer to the source code displayed in the IDE. Click the run button in the lower left corner of the IDE to perform the demo demonstration.
#### Demo Effect
The original image is as follows:
Here, taking the 01studio LCD screen (800*480) as an example, the demo effect is given. Please change `display_mode` in the `__main__` function to `lcd` and run it. The HDMI effect is similar.
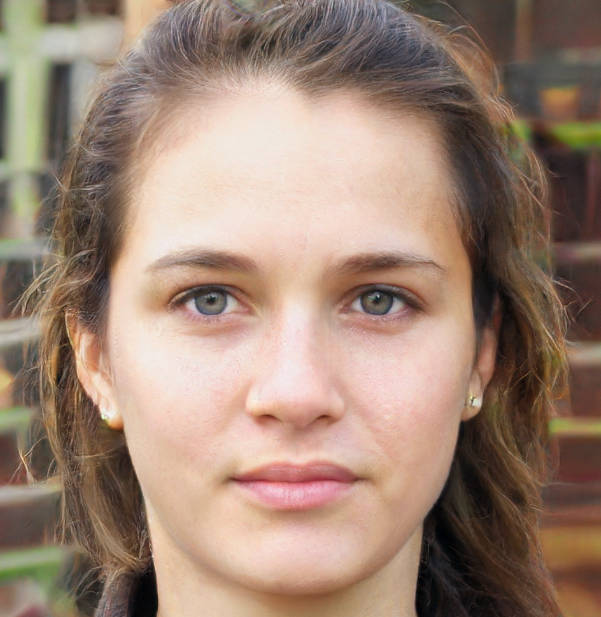
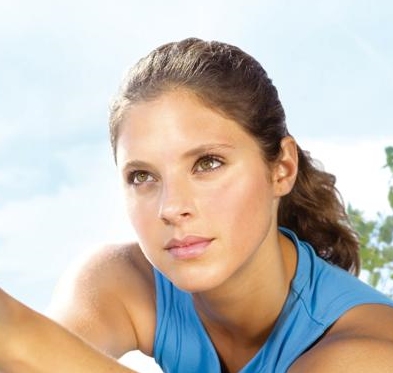
### Face Registration
#### Demo Description
Face registration is a prerequisite task for face recognition. It performs feature extraction on each image containing a face in the face database, and writes the face features to the face database directory in the form of a bin file, ready to be called by the face recognition program. The face feature dimension output by face registration is 512.
#### Code
Open the IDE, select File -> Open File, and choose the corresponding script according to the following path: **This PC -> CanMV -> sdcard -> examples -> 05-AI-Demo -> face_registration.py**. You can refer to the source code displayed in the IDE. Click the run button in the lower left corner of the IDE for demo demonstration.
#### Demonstration Effect
Register the image containing a face as face features and store them in the face feature database. The image below is one of the face images:
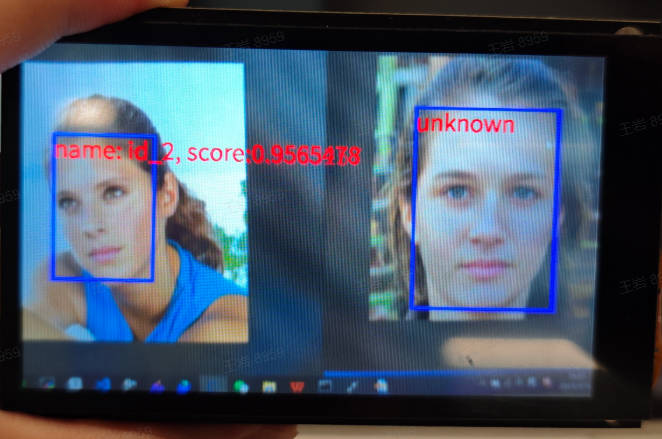
### Face Recognition
#### Demo Description
The face recognition application identifies the identity of faces in each frame of the video based on registered face information. If the recognized face is found in the registration database, the identity information of the recognized face is annotated; otherwise, it is displayed as unknown.
#### Code
Open the IDE, select File->Open File, and choose the corresponding script according to the following path: **This PC->CanMV->sdcard->examples->05-AI-Demo->face_recognition.py**. You can refer to the source code displayed in the IDE. Click the run button in the lower left corner of the IDE to perform the demo.
#### Demonstration Effect
The registered face original image is as follows:

Here is a demonstration effect using the 01studio LCD screen (800*480) as an example. Please change the `display_mode` in the `__main__` function to `lcd` and then run it. The HDMI effect is similar.
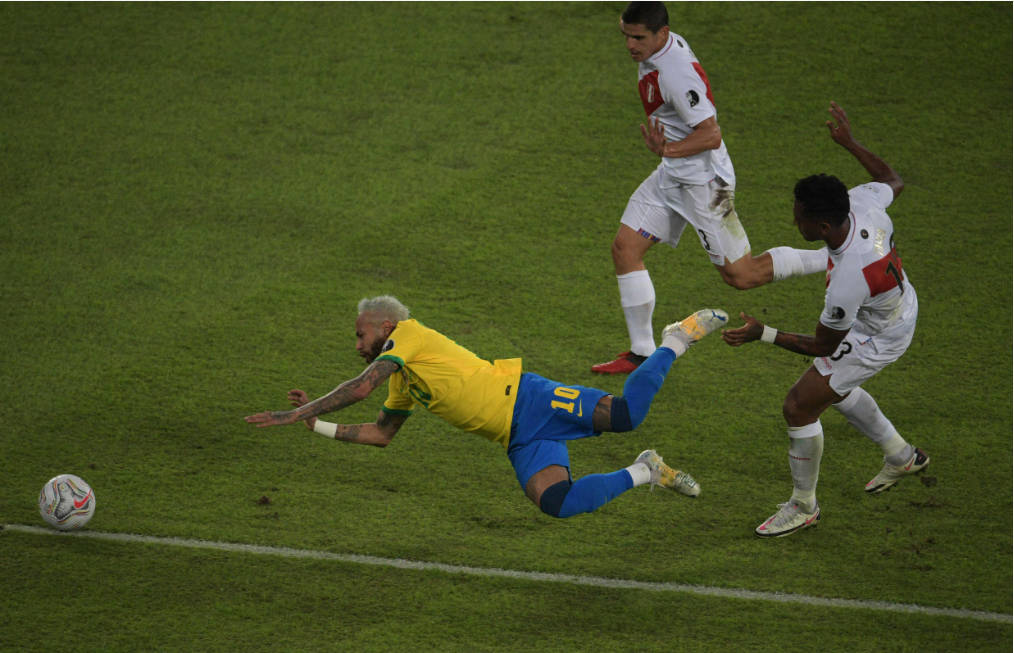
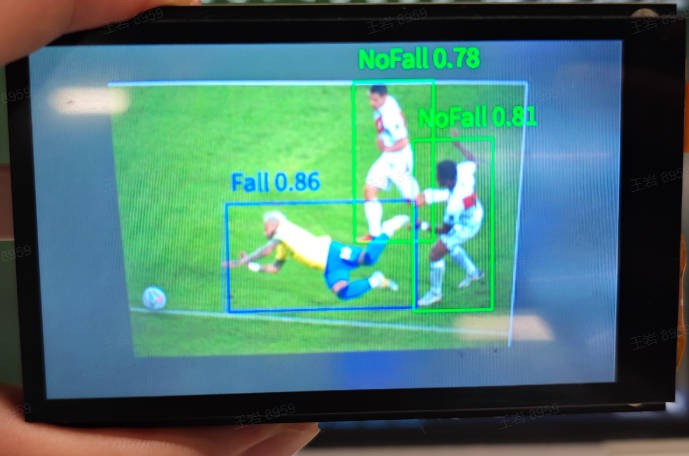
### Fall Detection
#### Demo Description
The fall detection application checks whether there is a human in each frame of the video and detects the human's fall status. It labels the status as `NoFall` if not falling, and `Fall` if a fall is detected.
#### Code
Open the IDE, select File->Open File, and choose the corresponding script following this path: **This PC->CanMV->sdcard->examples->05-AI-Demo->falldown_detect.py**. You can refer to the source code displayed in the IDE. Click the run button in the lower left corner of the IDE to perform the demo demonstration.
#### Demonstration Effect
The original image is as follows:
Here is a demonstration using the 01studio LCD screen (800*480) as an example. Please change `display_mode` to `lcd` in the `__main__` function before running. The HDMI effect is similar.
### Rock-Paper-Scissors Game
#### Demo Description
The Rock-Paper-Scissors Game is an entertaining game based on hand applications. First, keep no other palms in the screen, then one hand enters the camera to show rock/paper/scissors, while the machine will randomly show rock/paper/scissors at the same time. Finally, the winner is determined based on the best-of-three principle.
#### Code
Open the IDE, select File -> Open File, and choose the corresponding script according to the following path: **This PC->CanMV->sdcard->examples->05-AI-Demo->finger_guessing.py**. You can refer to the source code displayed in the IDE. Click the run button at the bottom left of the IDE to perform the demo.
#### Demonstration Effect
Initially, please ensure the camera range is empty. When one hand enters the camera, show rock/paper/scissors. The rule follows a best-of-three system. Please experience it yourself.
### Palm Detection
#### Demo Description
The palm detection application detects palms present in each frame of the video and marks palm detection boxes on the screen.
#### Code
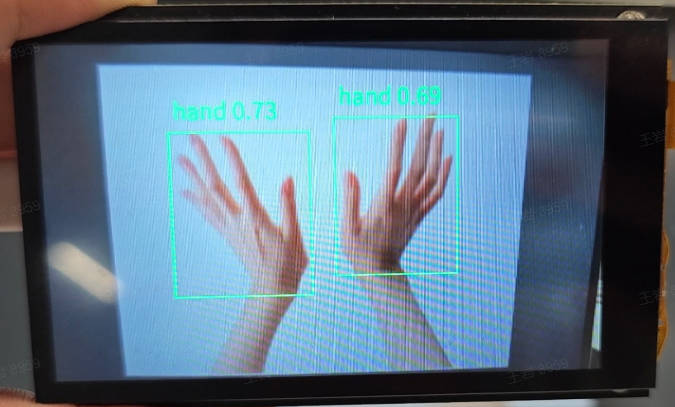
Open the IDE, select File->Open File, and select the corresponding script according to the following path: **This PC->CanMV->sdcard->examples->05-AI-Demo->hand_detection.py**. You can refer to the source code displayed in the IDE. Click the run button in the lower left corner of the IDE to run the demo.
#### Demonstration Effect
The original image is as follows:
Here, the LCD screen of 01studio (800*480) is used as an example to show the demonstration effect. Please change `display_mode` in the `__main__` function to `lcd` before running. The HDMI effect is similar.
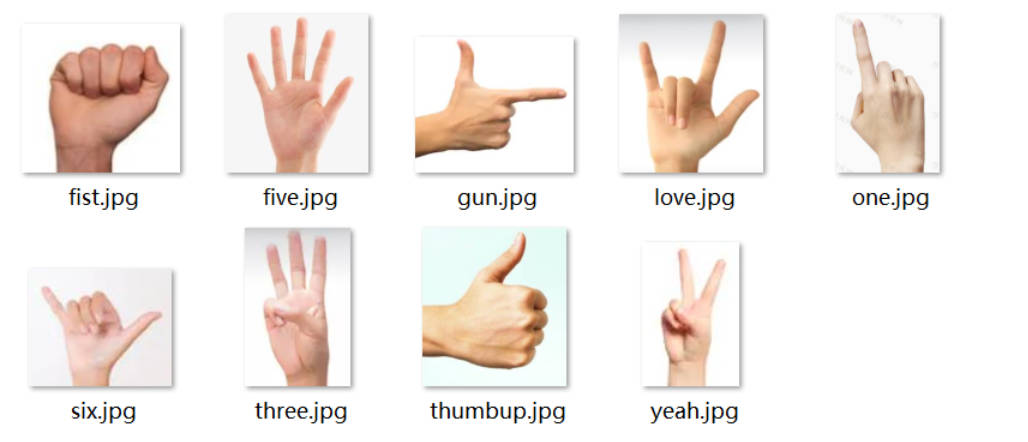
### Hand Keypoint Classification
#### Demo Description
The hand keypoint classification application is a dual-model task. First, it detects the hands present in the video, then performs keypoint regression on the detected hands. After obtaining the keypoint information, it distinguishes different gestures by calculating the angle information between fingers. Currently, 9 gestures are supported as shown in the figure below.
#### Code
Open the IDE, select File->Open File, and choose the corresponding script according to the following path: **This PC->CanMV->sdcard->examples->05-AI-Demo->hand_keypoint_class.py**. You can refer to the source code displayed in the IDE. Click the run button in the lower left corner of the IDE to perform the demo demonstration.
#### Demo Effect
The original image is as follows:
Here, the 01studio LCD screen (800*480) is used as an example to show the demo effect. Please change `display_mode` in the `__main__` function to `lcd` before running. The HDMI effect is similar.
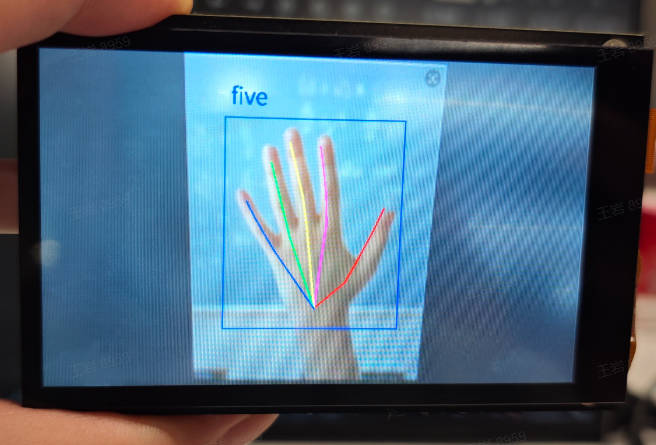
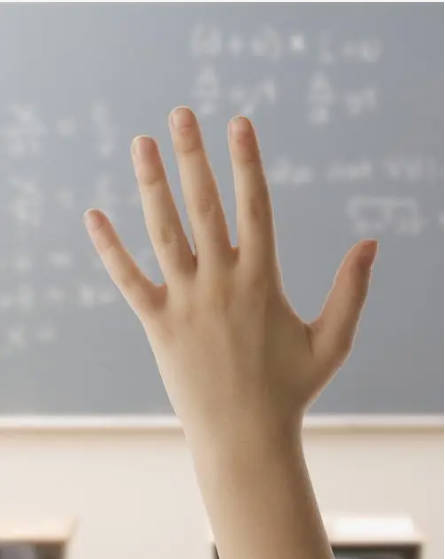
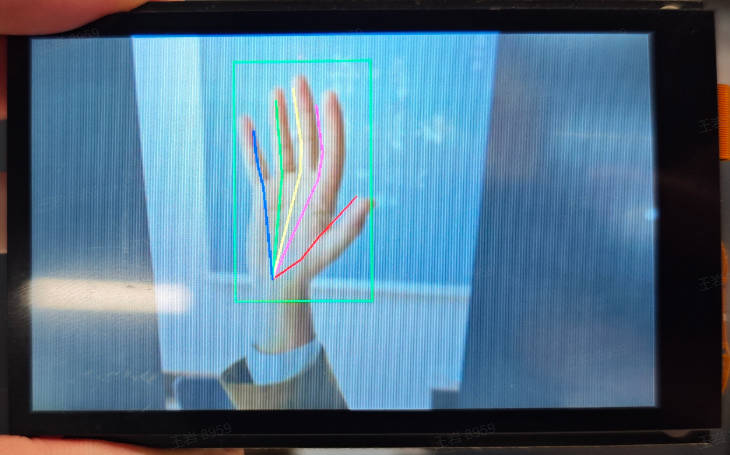
### Hand Keypoint Detection
#### Demo Description
Hand keypoint detection is a dual-model task. First, palm detection is performed on each frame of the video. Then, keypoint regression is applied to each detected palm to obtain 21 palm skeletal keypoint positions. The keypoints and the lines connecting them are marked on the screen.
#### Code
Open the IDE, select File -> Open File, and choose the corresponding script according to the following path: **This PC -> CanMV -> sdcard -> examples -> 05-AI-Demo -> hand_keypoint_detection.py**. You can refer to the source code displayed in the IDE. Click the run button in the lower left corner of the IDE to perform the demo demonstration.
#### Demo Effect
The original image is as follows:

Here is a demonstration using the 01studio LCD screen (800*480) as an example. Please change `display_mode` in the `__main__` function to `lcd` before running; the HDMI effect is similar.
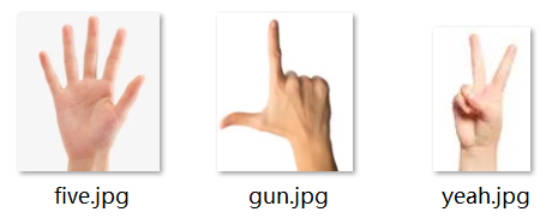
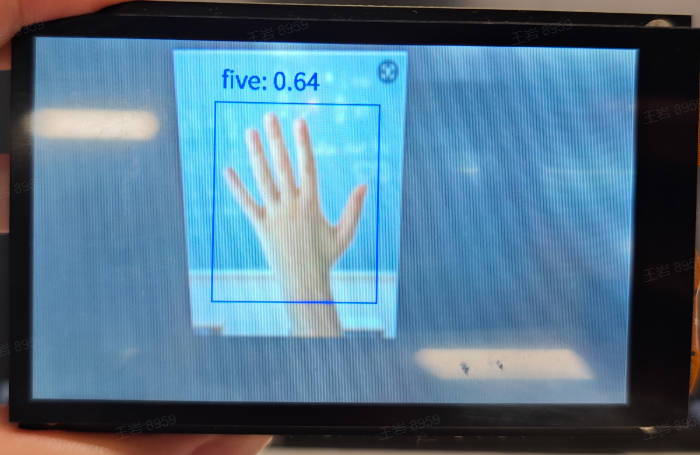
### Gesture Recognition
#### Demo Description
The gesture recognition application is a classification-based gesture recognition task. First, palm detection is performed on each frame of the video, and then the detected palm is fed into a classification model to obtain the recognized gesture. This is just an example, supporting 3 types of gestures as shown in the figure below.
#### Code
Open the IDE, select File->Open File, and choose the corresponding script according to the following path: **This PC->CanMV->sdcard->examples->05-AI-Demo->hand_recognition.py**, you can refer to the source code displayed in the IDE. Click the run button in the lower left corner of the IDE to perform the demo.
#### Demo Effect
The original image is as follows:

Taking the 01studio LCD screen (800*480) as an example, the demo effect is shown. Please change `display_mode` to `lcd` in the `__main__` function before running. The hdmi effect is similar.
### Keyword Wake-up
#### Demo Description
The keyword wake-up application is a typical audio application. After the application starts, please wake it up by saying "小楠小楠" near the microphone. After the application recognizes the wake word, it will respond with "我在". Other applications that need to collect audio data can also refer to this application.
#### Code
Open the IDE, select File->Open File, and choose the corresponding script according to the following path: **This PC->CanMV->sdcard->examples->05-AI-Demo->keyword_spotting.py**. You can refer to the source code displayed in the IDE. Click the run button in the lower left corner of the IDE to demonstrate the demo.
#### Demonstration Effect
Please get close to the microphone and wake it up with "小楠小楠". After being woken up, the k230 will reply "我在"!
### License Plate Detection
#### Demo Description
The license plate detection application detects license plates appearing in the video and marks them with a detection box on the screen.
#### Code
Open the IDE, select File->Open File, and choose the corresponding script according to the following path: **This PC->CanMV->sdcard->examples->05-AI-Demo->license_plate_det.py**. You can refer to the source code displayed in the IDE. Click the run button in the lower left corner of the IDE to perform the demo demonstration.
#### Demonstration Effect
Please find your own license plate images for detection. This example involves license plate privacy, so no demonstration effect is provided.
### License Plate Recognition
#### Demo Description
The license plate recognition application is a dual-model task. First, it detects license plates appearing in the video, then it performs recognition on each detected license plate, and annotates the recognized license plate content near the corresponding detection box.
#### Code
Open the IDE, select File->Open File, and choose the corresponding script according to the following path: **This PC->CanMV->sdcard->examples->05-AI-Demo->license_plate_det_rec.py**, you can refer to the source code displayed in the IDE. Click the run button in the lower left corner of the IDE to perform the demo demonstration.
#### Demonstration Effect
Please find license plate images yourself for recognition. This example involves license plate privacy, so no demonstration effect is provided.
### YOLO License Plate Detection
#### Demo Description
The license plate detection application detects license plates appearing in videos and marks them with detection boxes on the screen. Different from the similar tasks above, the model for this task is trained using the CCPD2019 and CCPD2020 datasets, and the detection model uses the yolo11n pose model.
#### Code
Open the IDE, select File->Open File, and choose the corresponding script according to the following path: **This PC->CanMV->sdcard->examples->05-AI-Demo->license_plate_det_yolo.py**. You can refer to the source code displayed in the IDE. Click the run button in the lower left corner of the IDE to perform the demo demonstration.
#### Demo Effect
Please find license plate images on your own for detection. This example involves license plate privacy, so no demo effect is provided.
### YOLO License Plate Detection and Recognition
#### Demo Description
The license plate recognition application is a dual-model task. It first detects license plates appearing in the video, then recognizes each detected license plate, and marks the recognized license plate content near the corresponding detection box. Different from the similar tasks mentioned above, the models used in this task are trained with the CCPD2019 and CCPD2020 datasets, and the detection model uses the yolo11n pose model.
#### Code
Open the IDE, select File->Open File, and choose the corresponding script according to the following path: **This PC->CanMV->sdcard->examples->05-AI-Demo->license_plate_det_rec_yolo.py**. You can refer to the source code displayed in the IDE. Click the run button at the bottom left of the IDE to perform the demo demonstration.
#### Demonstration Effect
Please find license plate images by yourself for recognition. This example involves license plate privacy, so no demonstration effect is provided.
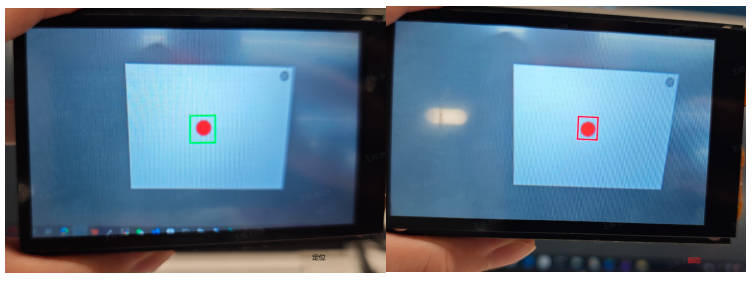
### Single Object Tracking
#### Demo Description
The single object tracking application tracks and recognizes the object registered in the object box. After the application starts, it will wait for a period of time. During this period, place the object to be tracked (preferably with a color different from the background) into the object box. Once registration is complete, it will automatically enter the tracking state, and the object tracking box will move along with the object.
#### Code
Open the IDE, select File->Open File, and choose the corresponding script according to the following path: **This PC->CanMV->sdcard->examples->05-AI-Demo->nanotracker.py**. You can refer to the source code displayed in the IDE. Click the run button in the lower left corner of the IDE to perform the demo demonstration.
#### Demonstration Effect
The original image is as follows:

Here, taking the 01studio LCD screen (800*480) as an example, the demonstration effect is shown. Please change `display_mode` in the `__main__` function to `lcd` before running. The HDMI effect is similar.
### yolov8n Object Detection
#### Demo Description
The yolov8n object detection application uses the yolov8n model to detect the 80 categories of COCO, and the detection results are marked on the screen in the form of detection boxes.
#### Code
Open the IDE, select File -> Open File, and choose the corresponding script according to the following path: **This PC->CanMV->sdcard->examples->05-AI-Demo->object_detect_yolov8n.py**, you can refer to the source code displayed by the IDE. Click the run button in the lower left corner of the IDE to perform the demo demonstration.
#### Demonstration Effect
The original image is as follows:

Here, taking the 01studio LCD screen (800*480) as an example, the demonstration effect is given. Please change the `display_mode` in the `__main__` function to `lcd` and run it. The hdmi effect is similar.
### OCR Detection
#### Demo Description
The OCR detection application detects text appearing in the video, and the detection results are marked on the screen in the form of detection boxes.
#### Code
Open the IDE, select File->Open File, and choose the corresponding script according to the following path: **This PC->CanMV->sdcard->examples->05-AI-Demo->ocr_det.py**. You can refer to the source code displayed in the IDE. Click the run button in the lower left corner of the IDE to perform the demo demonstration.
#### Demonstration Effect
The original image is as follows:
Here, taking the 01studio LCD screen (800*480) as an example to give the demonstration effect, please change `display_mode` to `lcd` in the `__main__` function and run it. The hdmi effect is similar.
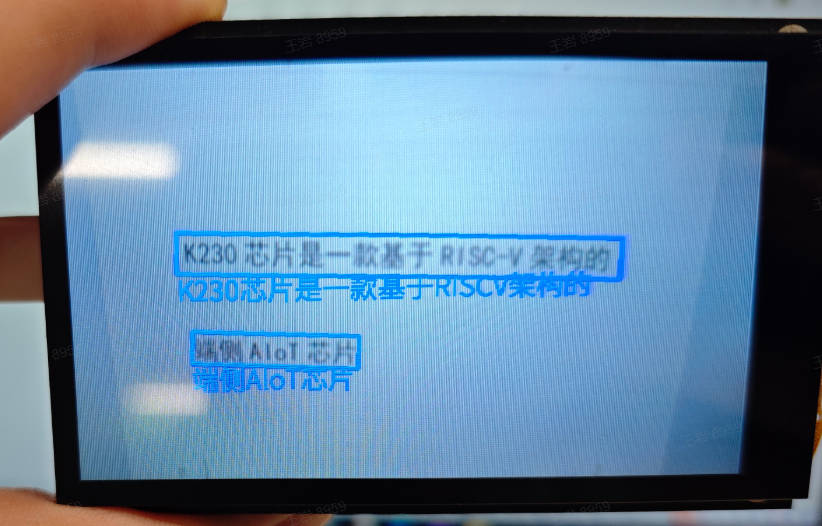
### OCR Recognition
#### Demo Description
The OCR recognition application is a dual-model task. First, it detects the text in each frame of the video, then recognizes the detected text. Finally, the detection boxes are marked on the screen and the recognized text content is added near the detection boxes.
#### Code
Open the IDE, select File->Open File, and select the corresponding script according to the following path: **This PC->CanMV->sdcard->examples->05-AI-Demo->ocr_rec.py**, you can refer to the source code displayed in the IDE. Click the run button in the lower left corner of the IDE to perform the demo.
#### Demo Effect
The original image is as follows:

Here, the 01studio LCD screen (800*480) is taken as an example to show the demo effect. Please change `display_mode` in the `__main__` function to `lcd` and then run it. The hdmi effect is similar.
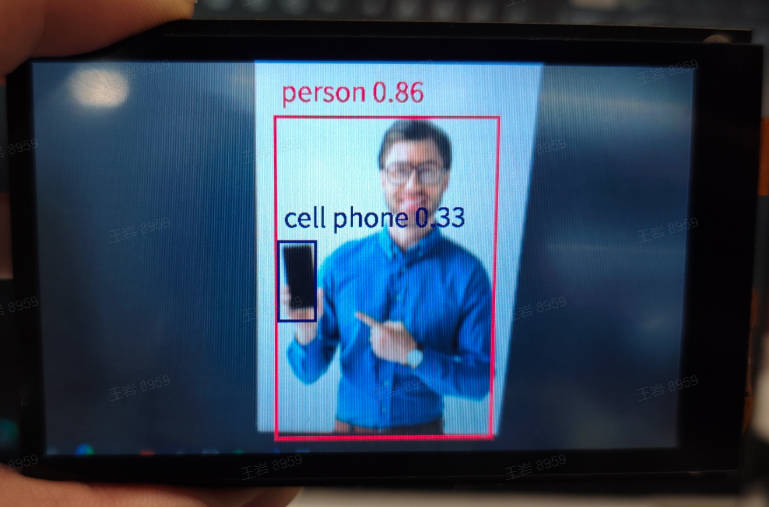
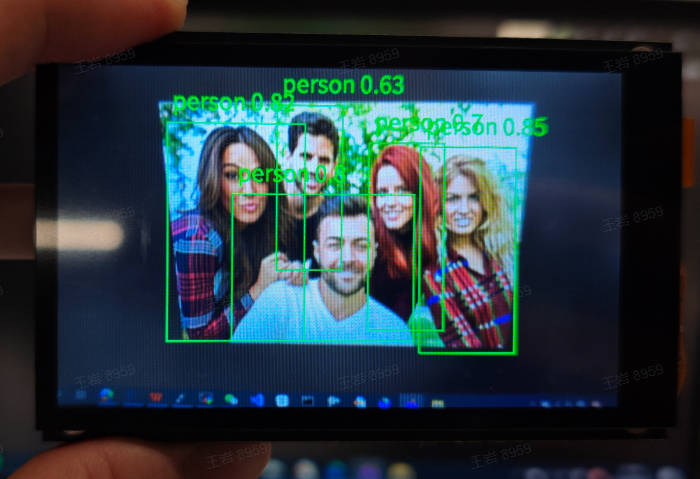
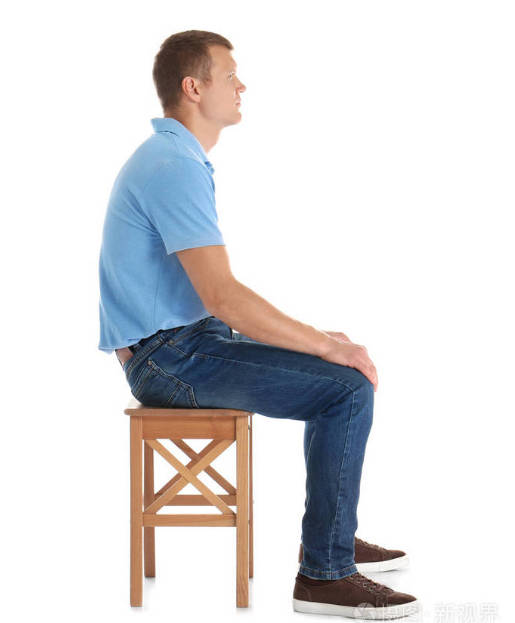
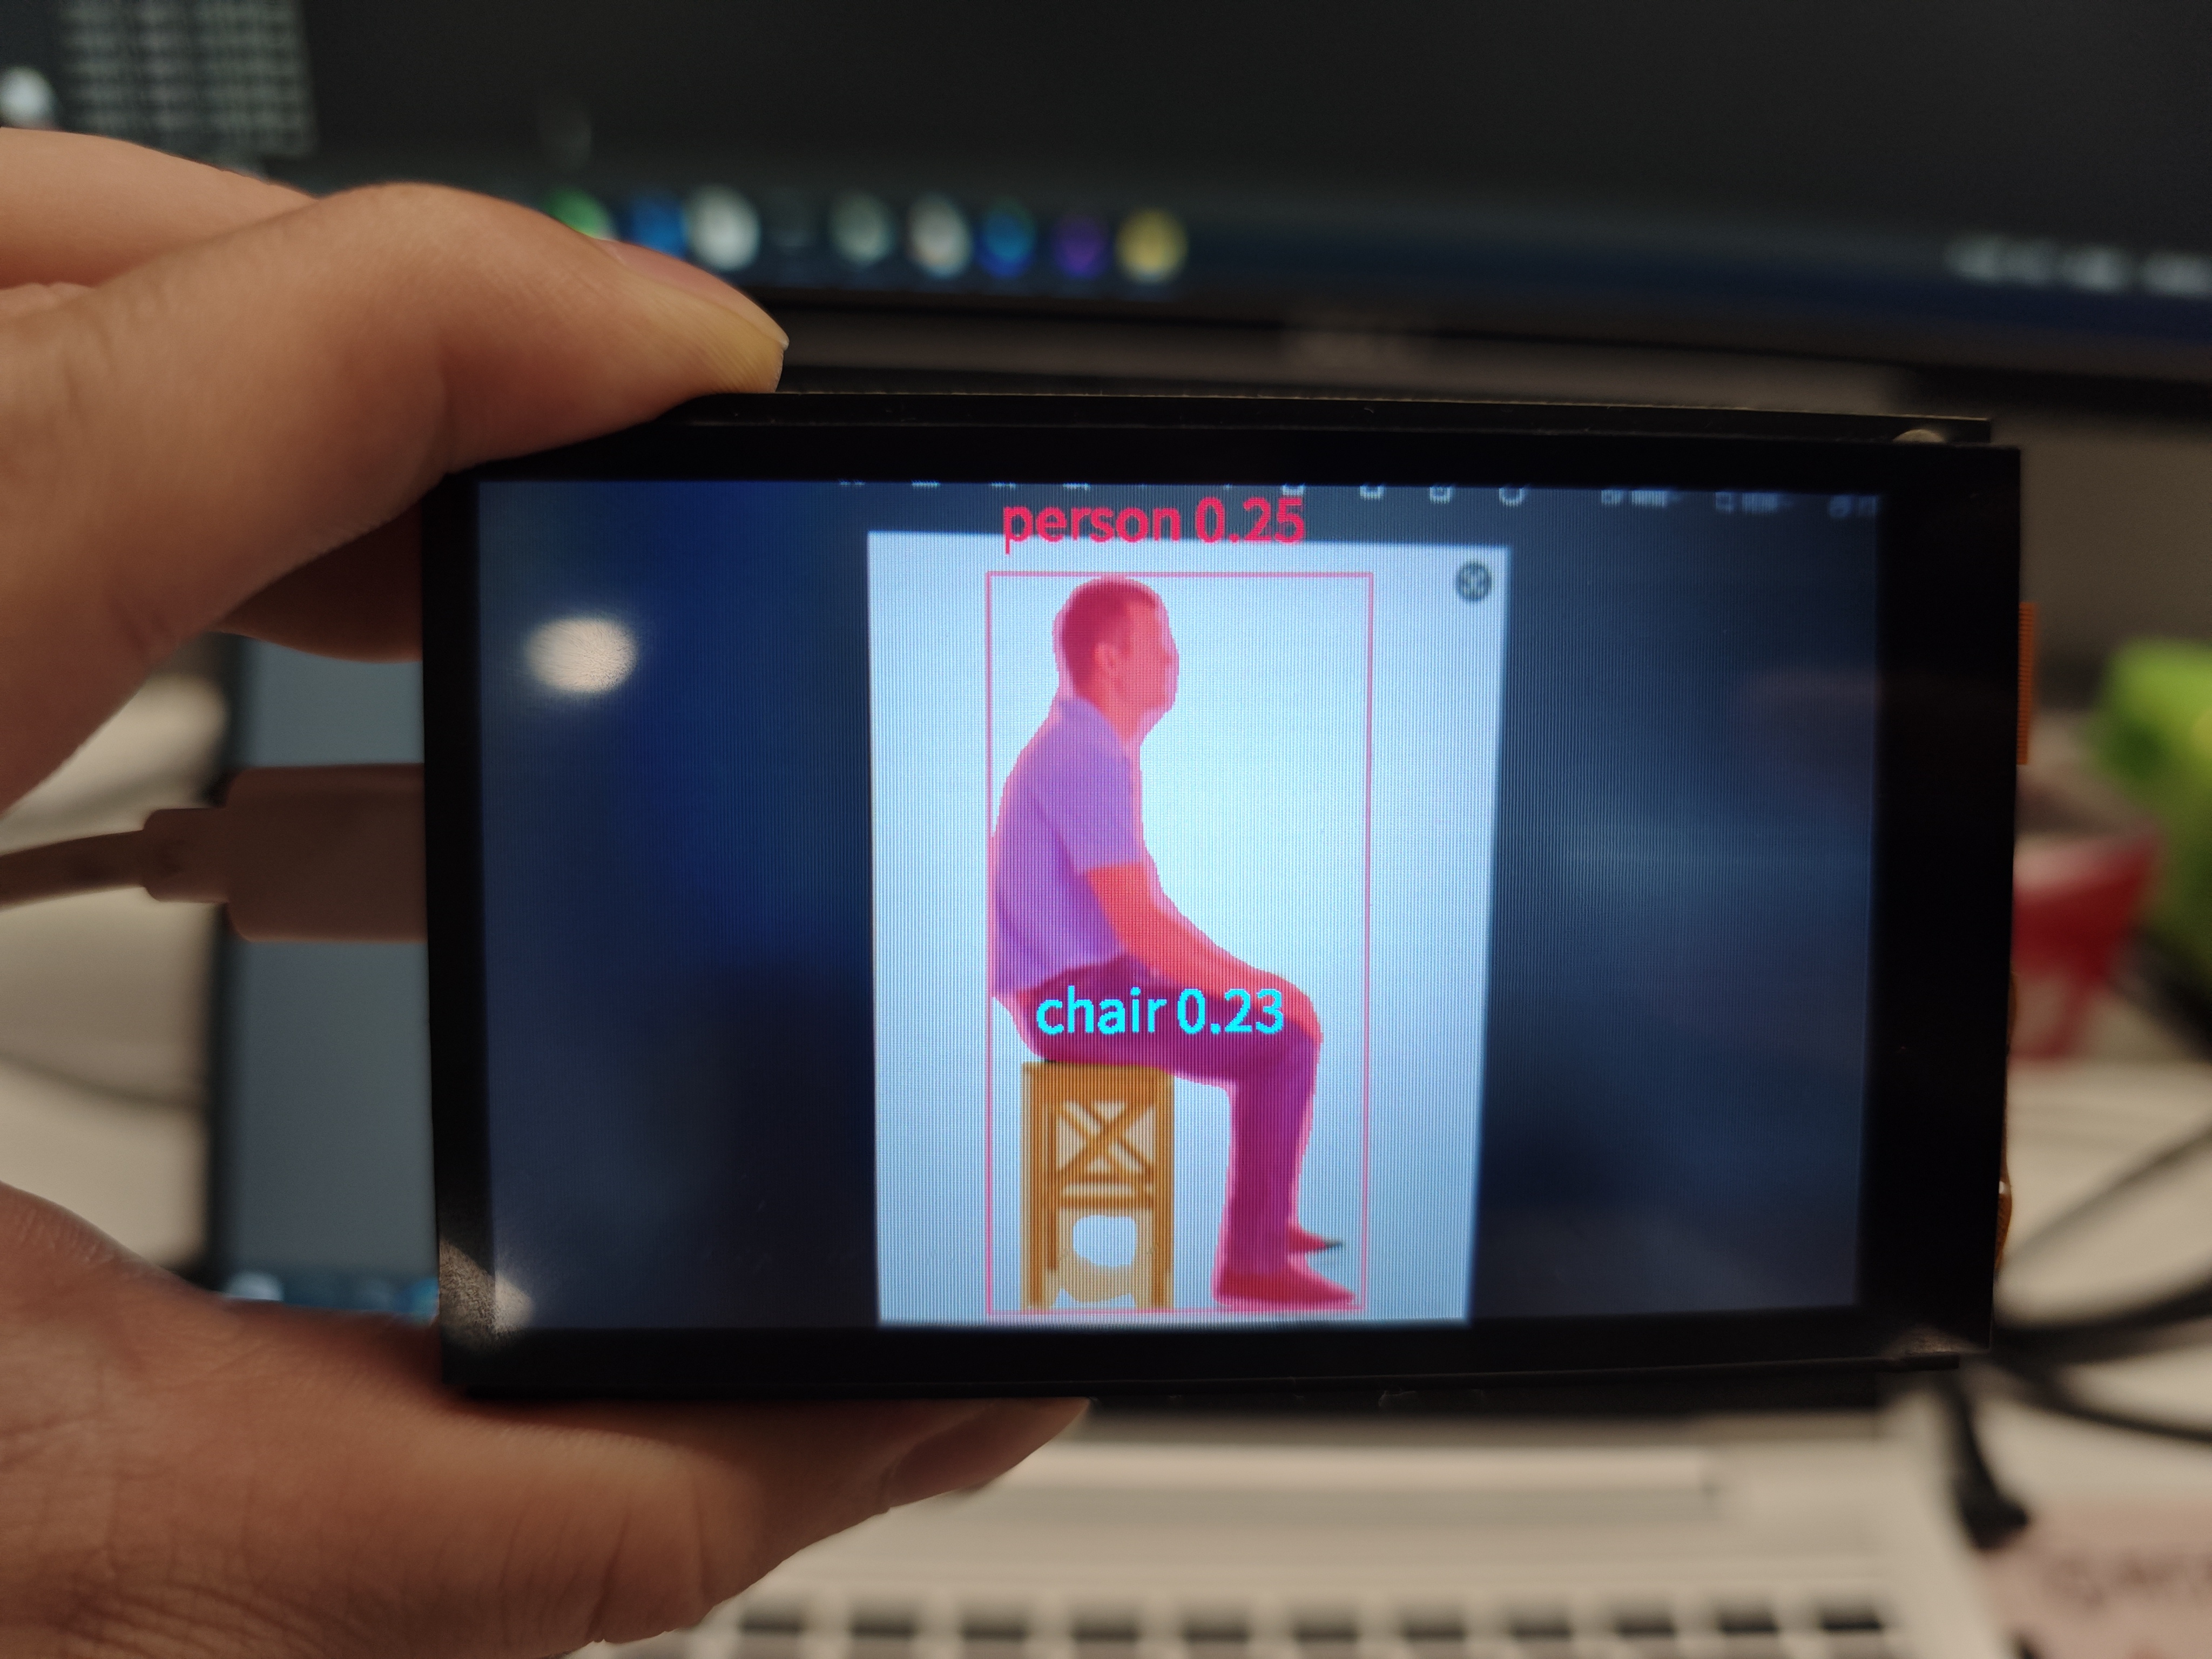
### Human Body Detection
#### Demo Description
The human body detection application detects people in the video and marks them on the screen in the form of detection boxes.
#### Code
Open the IDE, select File->Open File, and choose the corresponding script according to the following path: **This PC->CanMV->sdcard->examples->05-AI-Demo->person_detection.py**. You can refer to the source code displayed in the IDE. Click the Run button in the lower left corner of the IDE to perform the demo demonstration.
#### Demonstration Effect
The original image is as follows:
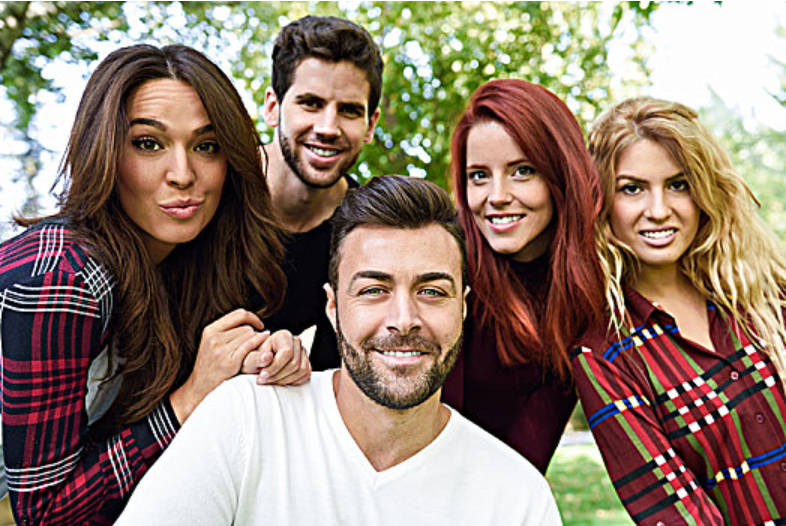
Here is an example of the demonstration effect using a 01studio LCD screen (800*480). Please change `display_mode` in the `__main__` function to `lcd` before running. The HDMI effect is similar.
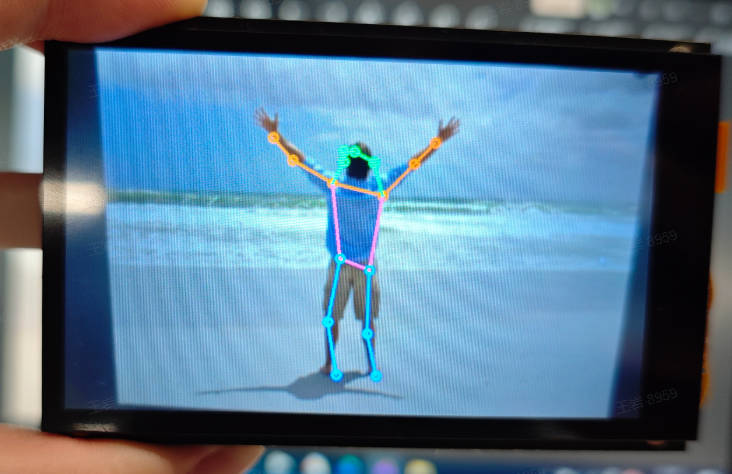
### Human Body Keypoint Detection
#### Demo Description
The human body keypoint detection application uses the yolov8n-pose model to detect human posture. The detection results obtain the positions of 17 human skeletal keypoints and connect them with lines of different colors to display on the screen.
#### Code
Open the IDE, select File->Open File, and choose the corresponding script according to the following path: **This PC->CanMV->sdcard->examples->05-AI-Demo->person_keypoint_detect.py**. You can refer to the source code displayed in the IDE. Click the run button in the lower left corner of the IDE to perform the demo demonstration.
#### Demo Effect
The original image is as follows:

Here is a demonstration effect using 01studio's LCD screen (800*480) as an example. Please change `display_mode` to `lcd` in the `__main__` function and run it. The HDMI effect is similar.
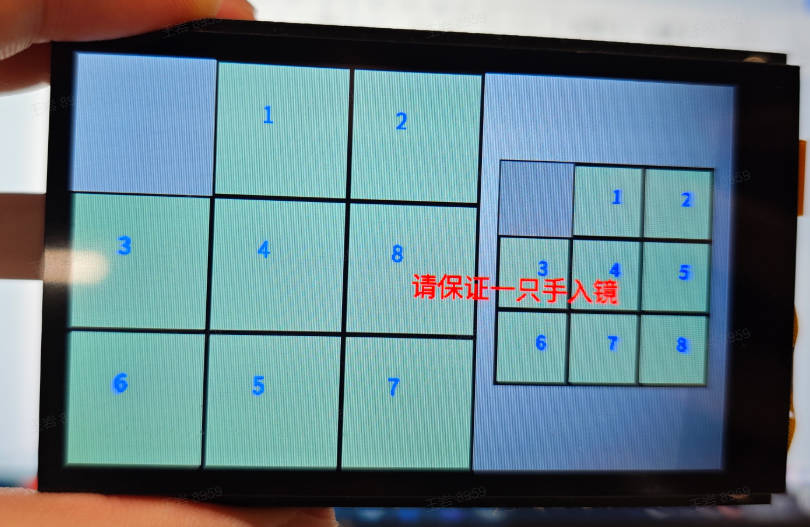
### Puzzle Game
#### Demo Description
The puzzle game is an entertaining hand-based game. When the application starts, keep the hand out of the camera's view and wait for the screen to initialize. The left side shows the randomly shuffled puzzle, and the right side shows the target puzzle. Once the hand enters the frame, spread the thumb and middle finger apart; the yellow point between the two fingers is used to locate the moving block. Quickly pinch the two fingers together and then open them again, and the yellow point turns into a blue point. Then the corresponding block moves to the adjacent empty space.
#### Code
Open the IDE, select File -> Open File, and choose the corresponding script to open following the path below: **This PC->CanMV->sdcard->examples->05-AI-Demo->puzzle_game.py**. You can refer to the source code displayed in the IDE. Click the Run button at the bottom-left corner of the IDE to perform the demo.
#### Demo Effect
Here, we use the 01studio LCD screen (800*480) as an example to show the demo effect. Please change `display_mode` in the `__main__` function to `lcd` before running; the HDMI effect is similar. Keep a certain distance from the camera, spread the thumb and middle finger apart, and pinch the thumb and middle finger together on a block adjacent to the empty space. The empty block and the current block will swap positions.
### yolov8n Segmentation
#### Demo Description
The yolov8n segmentation application uses the yolov8n model to segment the 80 categories of objects from the COCO dataset that appear in the video, and displays them on the screen in the form of masks.
#### Code
Open the IDE, select File->Open File, and select the corresponding script according to the following path: **This PC->CanMV->sdcard->examples->05-AI-Demo->segment_yolov8n.py**, you can refer to the source code displayed in the IDE. Click the run button in the lower left corner of the IDE for demo demonstration.
#### Demonstration Effect
The original image is as follows:
Here is a demonstration effect using the 01studio LCD screen (800*480) as an example, please change `display_mode` in the `__main__` function to `lcd` before running, the hdmi effect is similar.
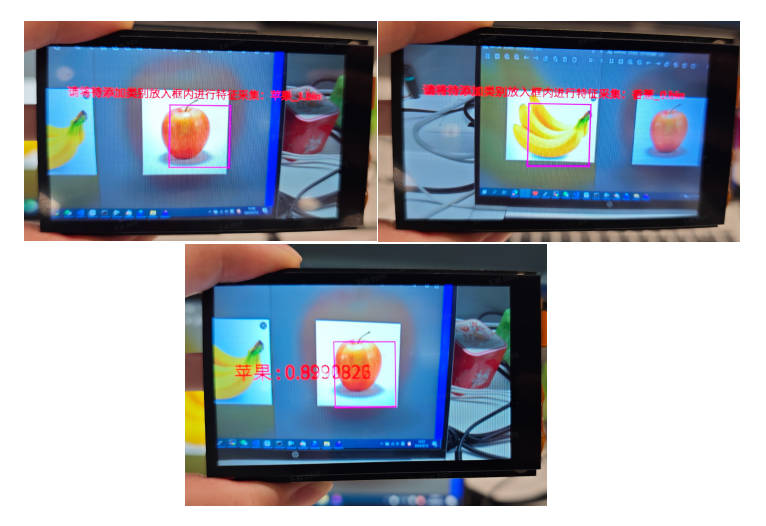
### Self Learning
#### Demo Description
Self learning is a feature-based classification method. First, set labels in the code to specify the names of the items to be collected, then start the application. Follow the on-screen prompts to place the items to be collected into the feature collection box. After feature collection is complete, it will automatically enter the recognition state. Place the items to be recognized into the collection box, and the features of the items will be compared with those of the registered items. Classification is completed based on the similarity.
#### Code
Open the IDE, select File -> Open File, and choose the corresponding script according to the following path: **This PC -> CanMV -> sdcard -> examples -> 05-AI-Demo -> self_learning.py**. You can refer to the source code displayed in the IDE. Click the run button in the lower left corner of the IDE to perform the demo demonstration.
#### Demo Effect
The pictures of apples and bananas to be learned are as follows:
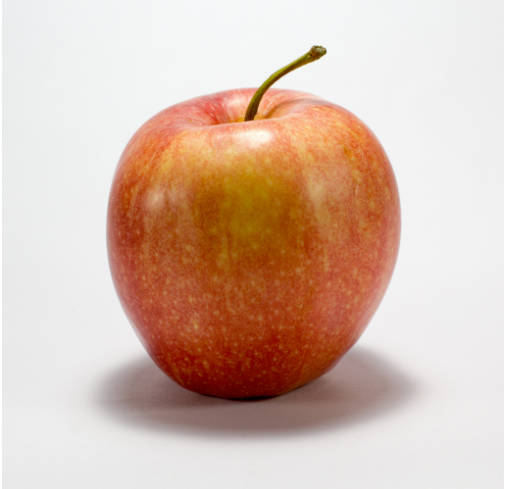
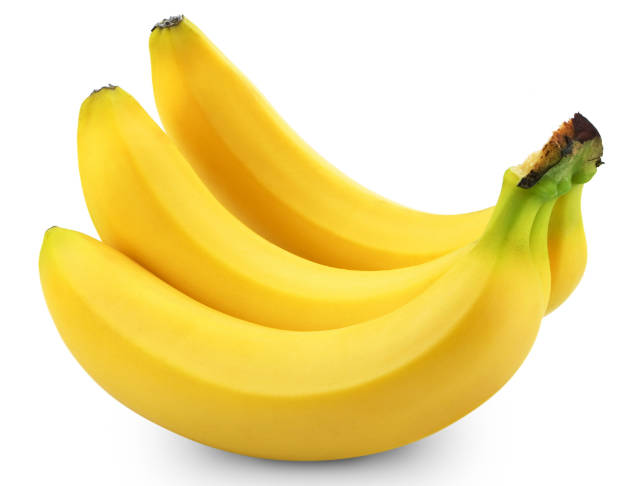
Here, the LCD screen of 01studio (800*480) is taken as an example to show the demo effect. Please change `display_mode` in the `__main__` function to `lcd` before running. The hdmi effect is similar. Follow the on-screen prompts to place the apples and bananas into the box for learning, then it will automatically enter the recognition state. The objects in the box will be recognized as apples and bananas, and a similarity score will be given.
### Magnifier
#### Demo Description
The magnifier is a fun application based on hand features. After launching the application, ensure one hand is within the camera frame. Pinch your thumb and middle finger, position them at a certain location, then spread the two fingers apart. The magnified image of that area will be displayed near the two fingers.
#### Code
Open the IDE, select File->Open File, and choose the corresponding script according to the following path: **This PC->CanMV->sdcard->examples->05-AI-Demo->space_resize.py**. You can refer to the source code displayed in the IDE. Click the run button in the lower left corner of the IDE to perform the demo demonstration.
#### Demo Effect
Here we use the 01studio LCD screen (800*480) as an example to show the demo effect. Please change `display_mode` in the `__main__` function to `lcd` before running. The HDMI effect is similar. Pinch your thumb and middle finger, put them into the camera, then open and close the thumb and middle finger, and a small surrounding area will be zoomed and displayed.
### Text-to-Speech (Chinese)
#### Demo Description
Text-to-Speech (TTS, Chinese) is a typical audio application. You can modify the text in the main function. After the audio is generated, you can hear the generated audio through earphones. This application is relatively time-consuming, and the complete audio playback time is also relatively long, with the duration limited by the length of the generated text.
#### Code
Open the IDE, select File->Open File, and choose the corresponding script according to the following path: **此电脑->CanMV->sdcard->examples->05-AI-Demo->tts_zh.py**. You can refer to the source code displayed in the IDE. Click the run button at the bottom left corner of the IDE to perform the demo.
#### Demonstration Effect
Please insert earphones or speakers, run the program, and the generated audio will be played after the generation is complete. Please experience it yourself!
### Human Body Segmentation
#### Demo Description
The human body segmentation task divides the entire human body into 15 parts and represents them with different colors.
#### Code
Open the IDE, select File->Open File, and choose the corresponding script according to the following path: **This PC->CanMV->sdcard->examples->05-AI-Demo->body_seg.py**. You can refer to the source code displayed in the IDE. Click the run button in the lower left corner of the IDE to perform the demo demonstration.
### Multi-command Word Wake-up
#### Demo Description
Multi-command word wake-up is an extended version of keyword wake-up. It supports wake-up with four keywords: `xiaonanxiaonan`, `go`, `stop`, and `wow`, making it suitable for voice command control scenarios.
#### Code
Open the IDE, select File->Open File, and choose the corresponding script according to the following path: **This PC->CanMV->sdcard->examples->05-AI-Demo->multi_kws.py**. You can refer to the source code displayed in the IDE. Click the run button at the bottom left corner of the IDE to start the demo.
### Lightweight Face Registration
#### Demo Description
The lightweight face registration uses a new face recognition model. Compared to the heavyweight model (44M), its model is less than 3M, making it suitable for the K230D face recognition registration process!
#### Code
Open the IDE, select File->Open File, and choose the corresponding script according to the following path: **This PC->CanMV->sdcard->examples->05-AI-Demo->face_registration_lite.py**. You can refer to the source code displayed in the IDE. Click the run button in the lower-left corner of the IDE to perform the demo.
### Lightweight Face Recognition
#### Demo Description
The lightweight face recognition uses a new face recognition model. Compared to the heavyweight model (44M), its model size is less than 3M, making it suitable for face recognition processes that require frame rate performance or run on K230D!
#### Code
Open the IDE, select File->Open File, and choose the corresponding script according to the following path: **This PC->CanMV->sdcard->examples->05-AI-Demo->face_recognition_lite.py**. You can refer to the source code displayed in the IDE. Click the run button in the lower left corner of the IDE to run the demo.
### YOLO11n Rotating Object Detection
#### Demo Description
YOLO11n rotating object detection implements the detection of 15 types of objects with angles, including airplanes, ships, and more.
#### Code
Open the IDE, select File->Open File, and choose the corresponding script according to the following path: **This PC->CanMV->sdcard->examples->05-AI-Demo->yolo11n_obb.py**. You can refer to the source code displayed in the IDE. Click the run button in the lower left corner of the IDE to perform the demo demonstration.
### YOLOv8n Rotating Object Detection
#### Demo Description
YOLOv8n Rotating Object Detection implements 15 types of object detection with angle, including airplanes, ships, etc.
#### Code
Open the IDE, select File->Open File, and choose the corresponding script according to the following path: **This PC->CanMV->sdcard->examples->05-AI-Demo->yolov8n_obb.py**. You can refer to the source code displayed in the IDE. Click the run button in the lower left corner of the IDE to perform the demo demonstration.