# Sensor ISP Calibration Workflow
> Note: This document is the hands-on calibration manual for BLC/LSC/CC.
> For the complete ISP tuning framework and module parameter descriptions, see: [`how_to_tune_isp.md`](./how_to_tune_isp.md).
## Software Download and Installation
- MATLAB Runtime: [MATLAB Runtime R2023a (Windows 64-bit)](https://ssd.mathworks.com/supportfiles/downloads/R2023a/Release/0/deployment_files/installer/complete/win64/MATLAB_Runtime_R2023a_win64.zip)
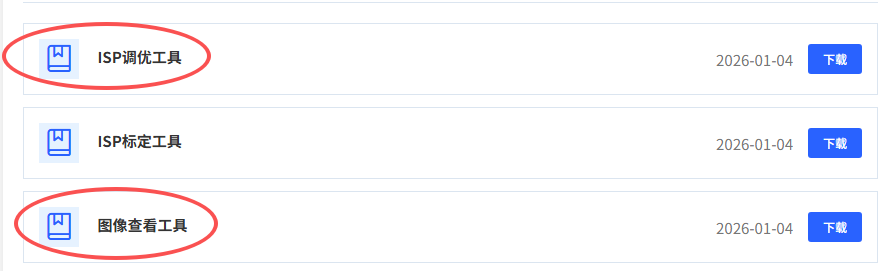
- ISP Calibration Tool: [K230 ISP Calibration Tool](https://www.kendryte.com/zh/resource/isp_tool,k230)
- Image viewer: used to verify captured RAW images
The three modules to calibrate are: **BLC**, **LSC**, and **CC**.
---
## Black Level Correction (BLC) Calibration
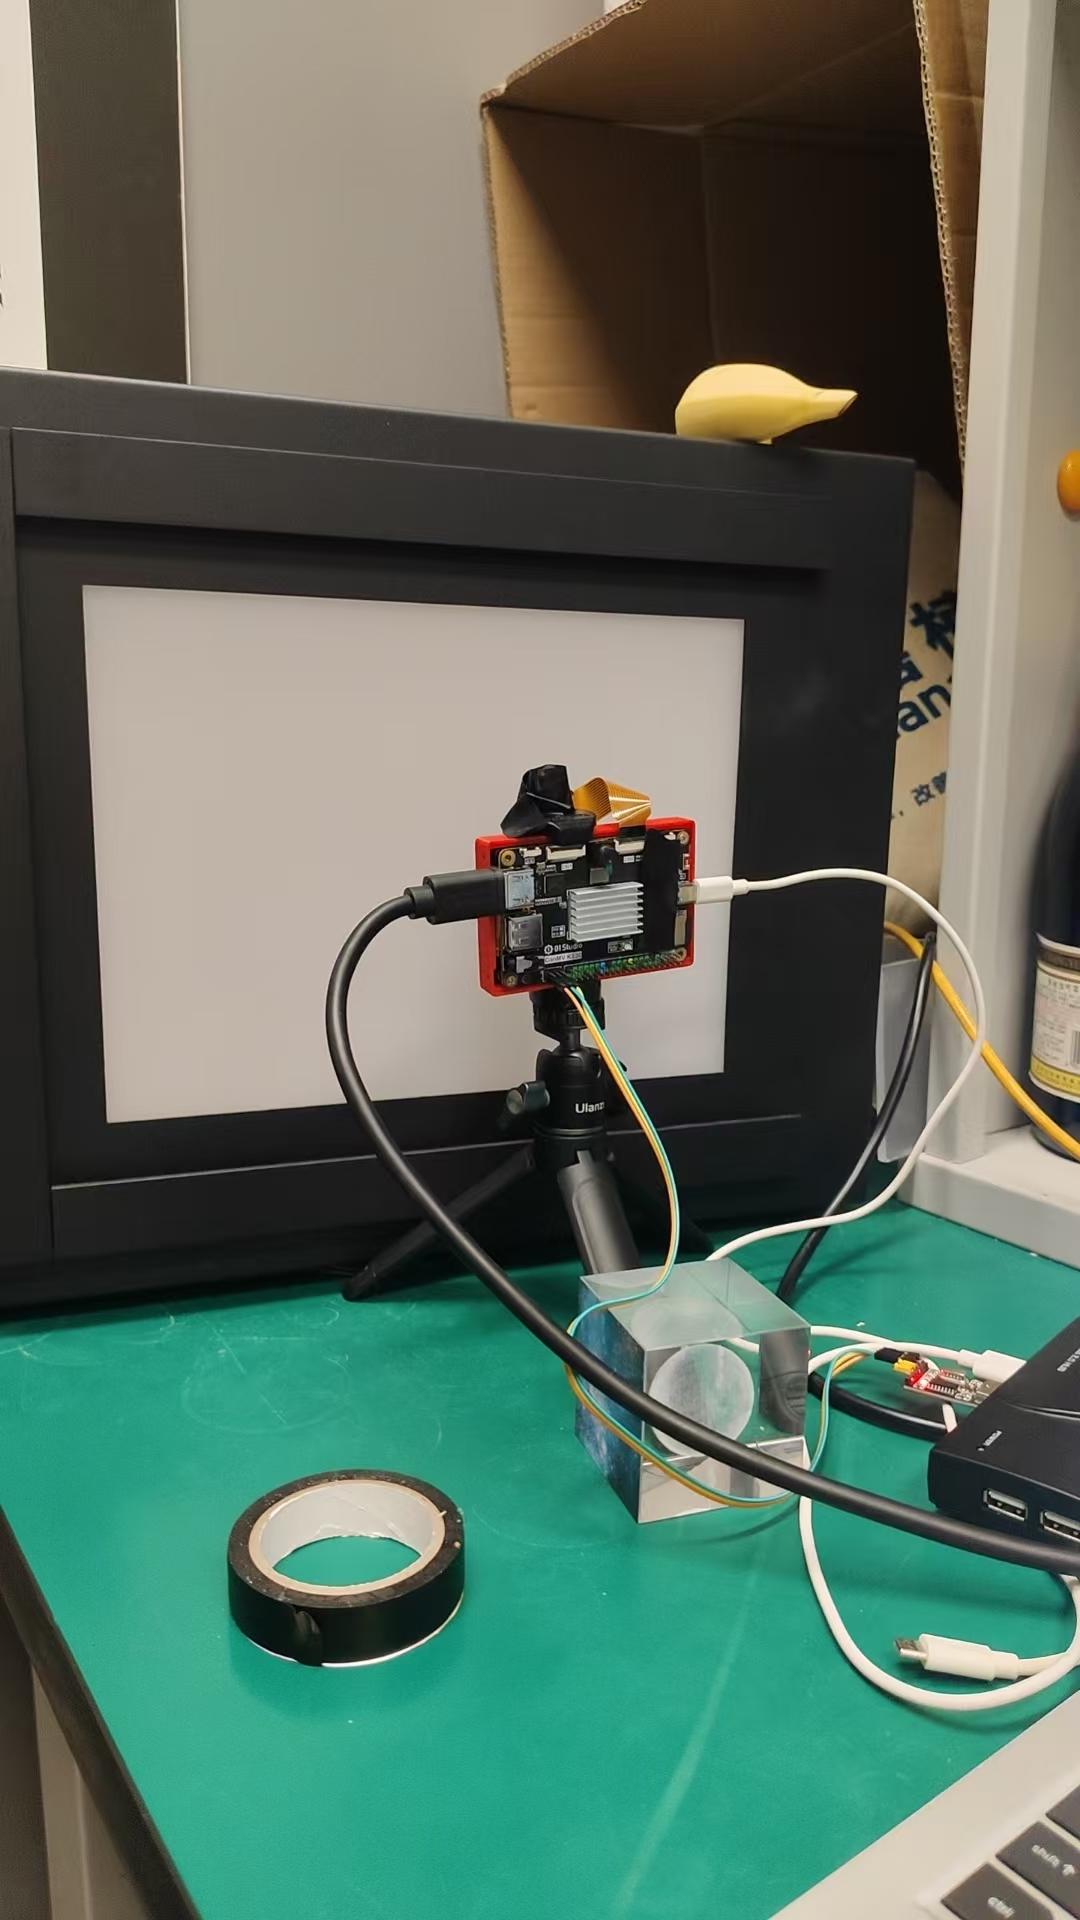
### Environment
- Dark room
- K230 development board
- Serial console
- IMX219 camera
> Note: Cover both the camera lens and any LEDs on the board to prevent light leakage that could affect calibration accuracy.
### Capture RAW Images
Capture code: `SDK/src/rtsmart/mpp/userapps/sample/sample_vicap` — compile separately in the RTOS environment.
Build commands:
```shell
cd ~/src/rtsmart/mpp/userapps/sample/sample_vicap
make
cd ../elf
# Copy the binary to the board
cp sample_vicap.elf **
```
Capture steps:
1. In a dark room with all light sources off, boot into the RTOS system.
1. Run the capture command:
```shell
./sample_vicap.elf -mode 0 -conn 1 -dev 0 -sensor 45 -chn 0 -ofmt 3 -preview 0 -chn 1
```
1. When the interactive menu appears, enter `d` to capture a RAW frame:
```shell
---------------------------------------
Input character to select test option
---------------------------------------
d: dump data addr test
h: dump hdr ddr buffer.
s: set isp ae roi test
g: get isp ae roi test
t: toggle TPG
r: dump register config to file.
q: to exit
---------------------------------------
please Input:
# Enter d to capture one RAW frame
d
sample_vicap... dump frame.
sample_vicap, dev(0) chn(0) dump frame.
dump cost 4 us
save dump data to file(dev_00_chn_00_1920x1080_0010.raw10)
sample_vicap, release dev(0) chn(0) dump frame.
sample_vicap, dev(0) chn(1) dump frame.
dump cost 3 us
save dump data to file(dev_00_chn_01_1920x1080_0011.yuv420sp)
sample_vicap, release dev(0) chn(1) dump frame.
```
Output files:
- `dev_00_chn_00_1920x1080_0010.raw10` — RAW image
- `dev_00_chn_01_1920x1080_0011.yuv420sp` — YUV image
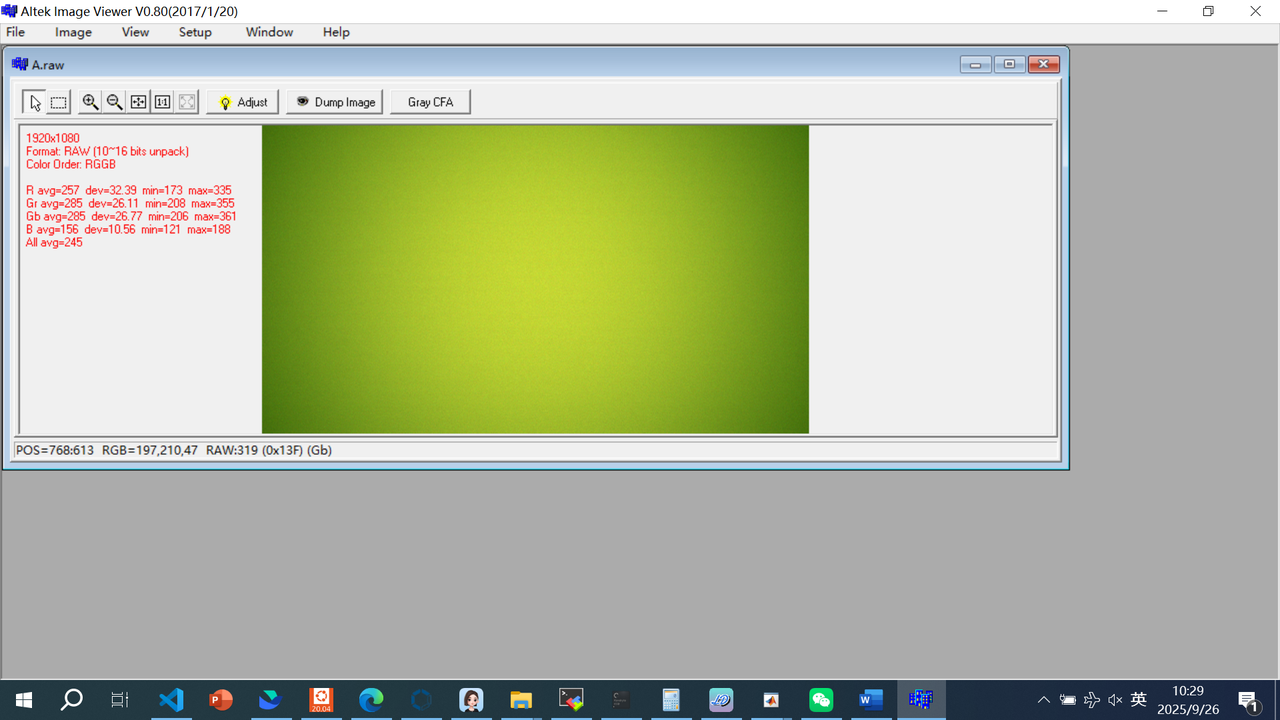
Inspect the RAW image with an image viewer using the parameters shown below:

### Prepare Calibration Data
Capture RAW images at different gain and exposure combinations. (Black level is not sensitive to small parameter changes, so a single image can represent multiple conditions.) Directory structure:
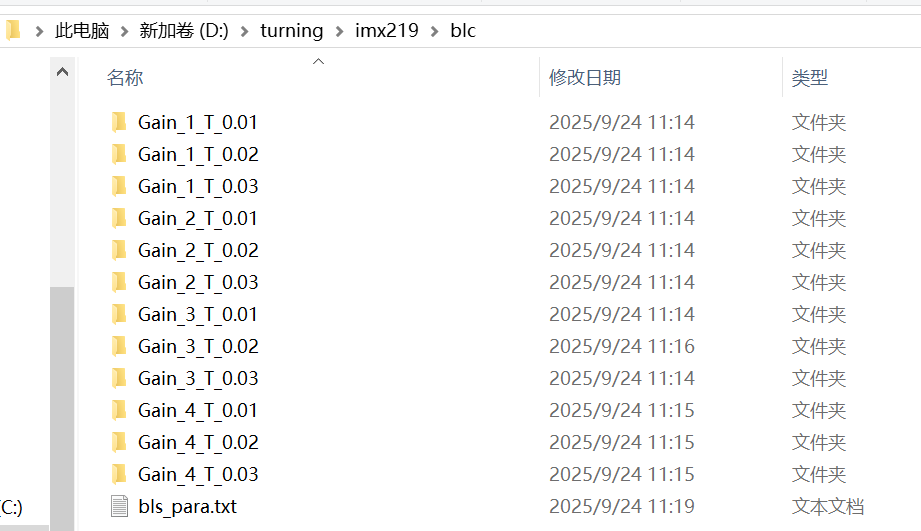
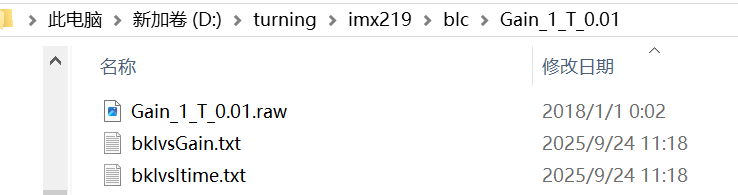
```text
imx219/blc/
├─ Gain_1_T_0.01/
│ ├─ Gain_1_T_0.01.raw
│ ├─ bklvsGain.txt
│ └─ bklvsltime.txt
├─ Gain_1_T_0.02/
├─ Gain_1_T_0.03/
├─ Gain_2_T_0.01/
└─ ... (other gain/exposure combinations)
```
### Run Calibration
1. Open the ISP calibration tool and configure parameters:
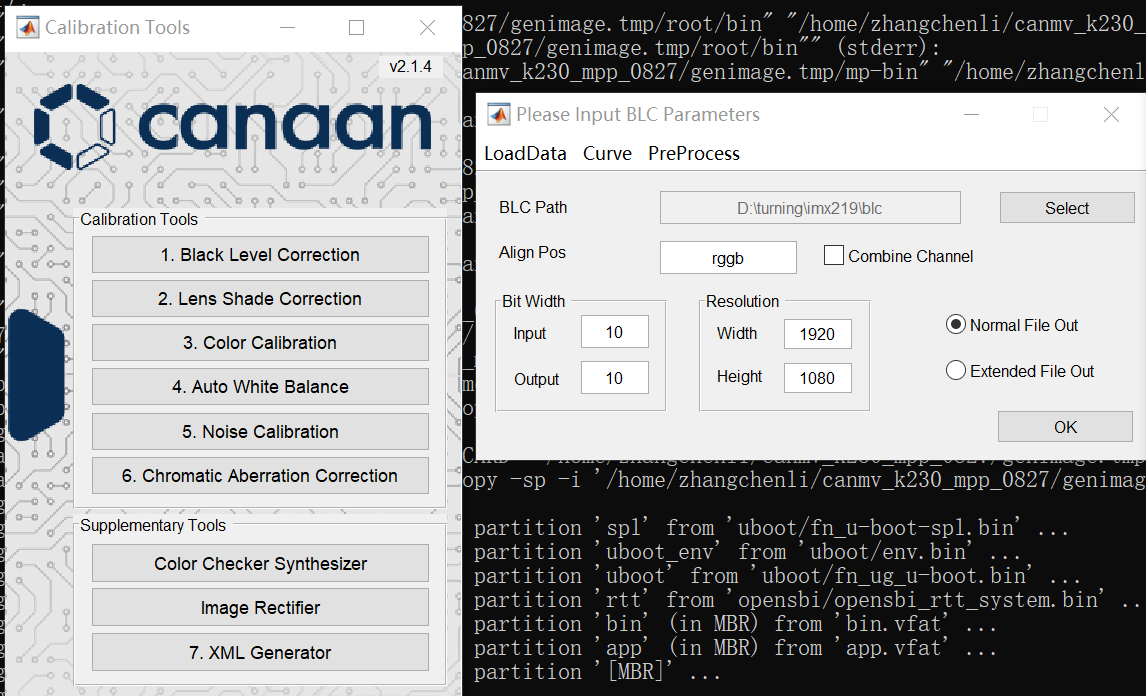
1. Click **OK**. The tool generates `bls_para.txt` in the BLC root directory:
```text
ResolutionX = 1920
ResolutionY = 1080
BLS_R = 65
BLS_Gr = 65
BLS_Gb = 65
BLS_B = 65
```
### Update ISP Configuration Files
> Note: For 12-bit sensors use the calibrated value directly (64). For 10-bit sensors multiply by 4 (e.g. 65 × 4 = 260).
**XML file** (`imx219-1920x1080.xml`) — update resolution and `blsData`:
```xml
|
1920x1080
1920x1080
[260, 260, 260, 260]
|
```
**JSON file** (`imx219-1920x1080_manual.json`) — update `bls`:
```json
{
"class": "Bls",
"bls": [260, 260, 260, 260]
},
```
---
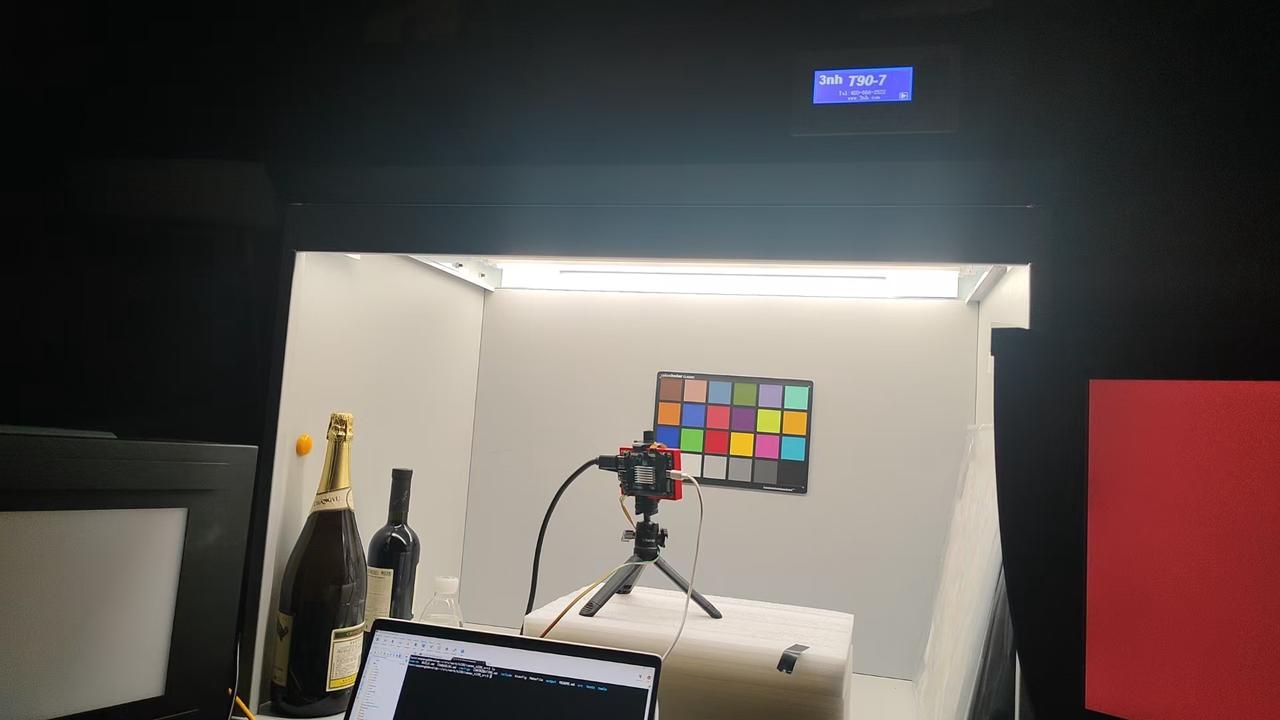
## Lens Shading Correction (LSC) Calibration
### Environment
- DNP light box
- K230 development board
- Serial console
- IMX219 camera
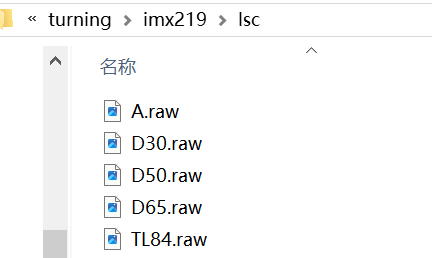
### Capture RAW Images
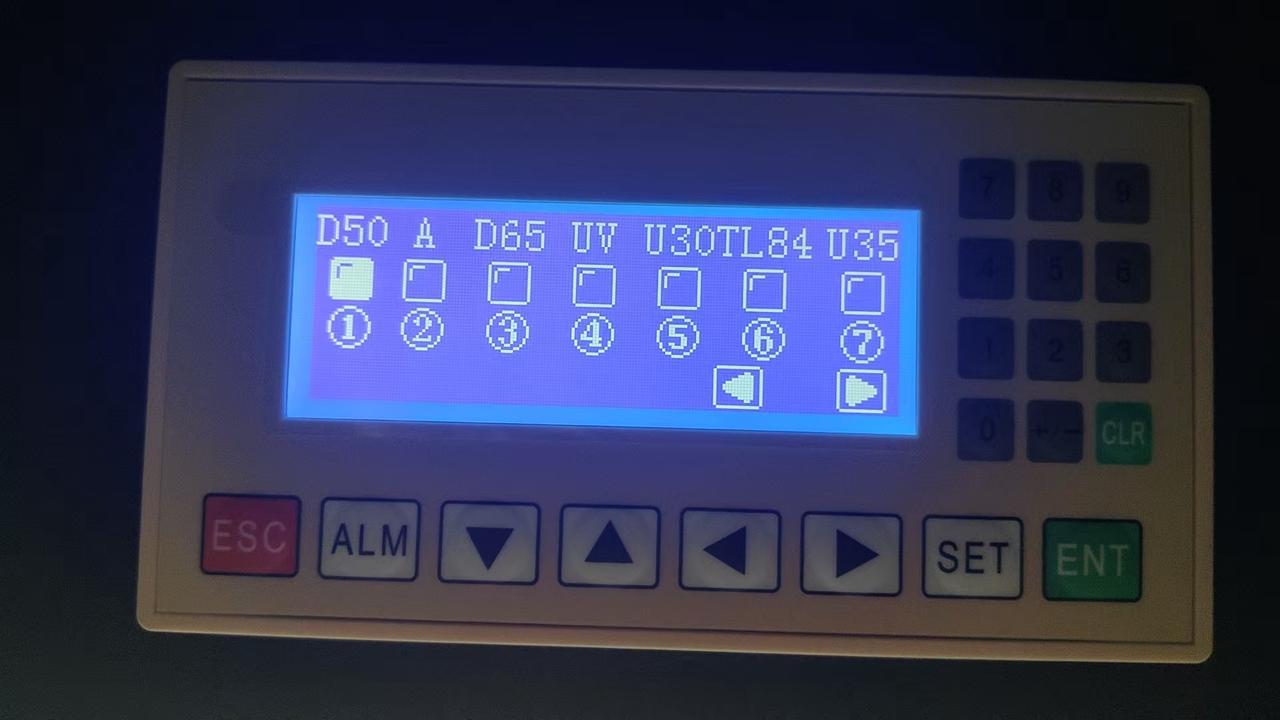
Required light sources: A/A_100 (2850 K), U30/F12 (3000 K), TL84/F11 (4000 K), D50 (5000 K), D65 (6500 K)
Capture steps:
1. Turn on the DNP light box, select the target light source, turn off all fluorescent lights, and position the camera as parallel and close to the light box as possible.
1. Run the fixed-exposure capture command. If auto-exposure has issues, specify exposure and gain manually:
```shell
./sample_vicap.elf -mode 0 -conn 1 -dev 0 -sensor 45 -ae 0 -again 1 -exp 429 \
-chn 0 -ofmt 3 -preview 0 -chn 1
```
Adjusting exposure:
- If the image is too bright or too dark, change the `-exp` value (higher = brighter).
- Or modify the `setPoint` value in the auto file (higher setPoint = darker image).
- Target: the center brightness average should be approximately 80% of the maximum (e.g. 204 out of 255 for 8-bit).
1. Switch to the next light source and repeat for all RAW captures.
### Run Calibration
1. Open the LSC calibration tool and configure parameters:
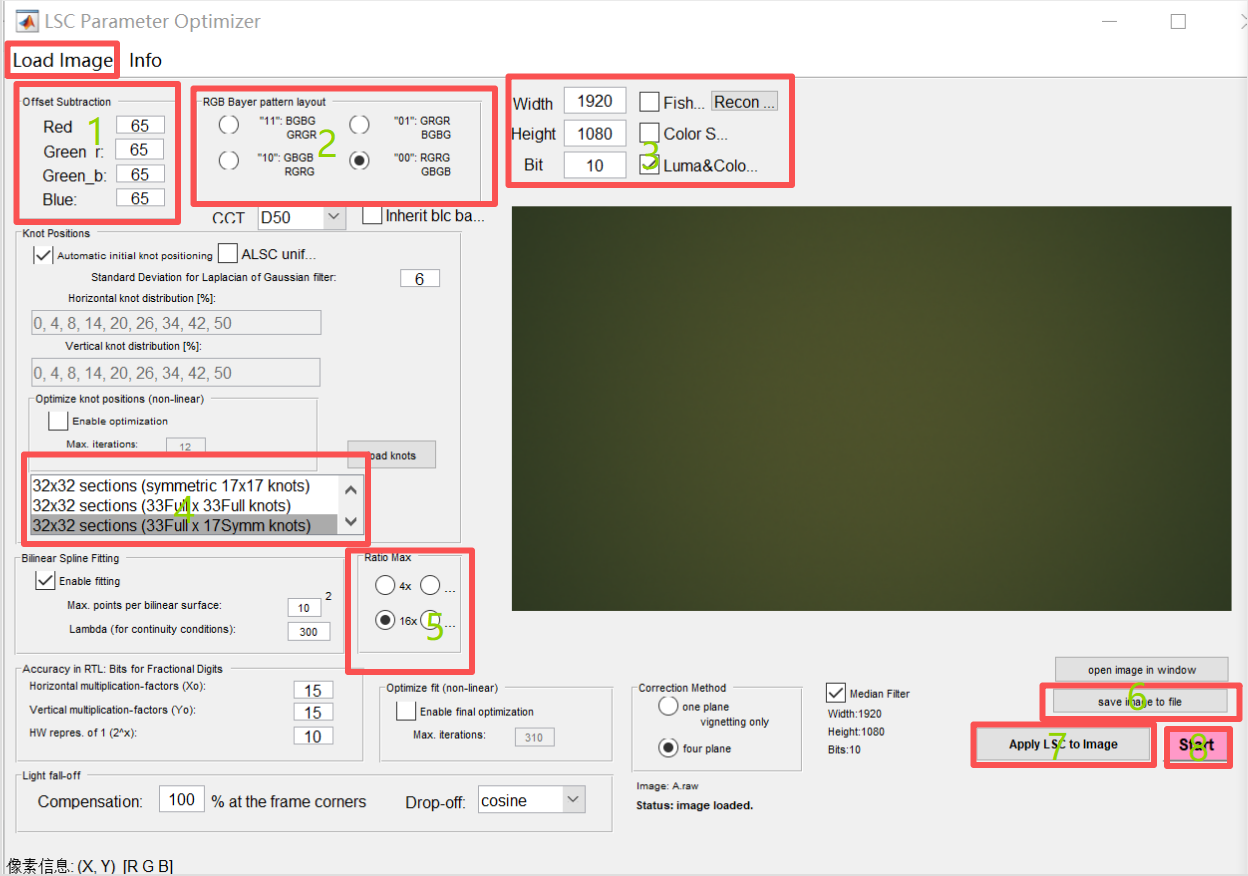
- Field 1: enter the BLS calibrated value (the raw value from the `.txt` file, not the ×4 value)
- Fields 2 & 3: set according to the image
- Fields 4 & 5: select as shown in the screenshot
1. Click **Load Image** and import the saved RAW image.
1. Click **Start** to run calibration; enter the output file name (e.g. `A_param`).
1. Click **Apply LSC to Image**, select `A_param.txt`, and verify the image has uniform color (no center-bright / edge-dark effect).
1. Click **Save Image to File** to save the corrected image.
1. Repeat for all light sources.
Example output (`A_param.txt`):
```text
LSC_CALIB_IMAGE_NAME = 'A.raw';
LSC_CALIB_IMAGE_BayerLayout = 'RGGB';
LSC_sectors = 32;
LSC_Compensation_Percentage = 100;
LSC_Compensation_Shape = 'cosine';
LSC_SECT_SIZE_X = [42 43 46 50 50 54 59 60 62 64 67 69 70 75 73 73
74 76 73 72 70 68 66 62 59 57 55 52 49 47 44 39];
LSC_SECT_SIZE_Y = [30 31 32 32 32 33 33 33 35 35 34 36 36 37 36 35];
LSC_RESOLUTION_X = 1920;
LSC_RESOLUTION_Y = 1080;
LSC_BLS_BIT_DEPTH = 10;
LSC_BLS_R = 65;
LSC_BLS_Gr = 65;
LSC_BLS_Gb = 65;
LSC_BLS_B = 65;
LSC_SAMPLES_red = [2201 2044 1949 1862 ... ];
LSC_SAMPLES_greenAtRedLine = [1782 1658 1589 ... ];
LSC_SAMPLES_greenAtBlueLine = [1734 1675 1606 ... ];
LSC_SAMPLES_blue = [1633 1568 1546 ... ];
```
### Update ISP Configuration Files
**XML file** (`imx219-1920x1080.xml`):
```xml
1920x1080_A_100
1920x1080
A
[ 32]
[ 10]
[ 15]
[ 15]
[42 43 47 49 51 54 58 61 62 64 66 69 71 74 73 73
74 76 72 73 69 68 66 63 59 57 55 51 50 46 45 39]
[30 31 32 32 32 33 33 34 34 35 34 36 36 37 36 35]
[ 100]
[2190 2035 ...]
[1776 1654 ...]
[1729 1671 ...]
[1624 1560 ...]
|
```
**JSON file** (`imx219-1920x1080_manual.json`) — use one natural-light source (TL84, D50, or D65):
```json
"class": "CLscv2",
"enable": true,
"matrix": [
[2063, 1934, 1885, ...],
[1673, 1633, 1564, ...],
[1653, 1607, 1554, ...],
[1611, 1536, 1538, ...]
],
"x_size": [41, 45, 46, 51, 51, 54, 58, 59, 63, 63, 68, 68, 70, 73, 73, 73,
73, 74, 74, 72, 70, 67, 66, 63, 61, 57, 54, 52, 49, 46, 45, 41],
"y_size": [30, 32, 32, 32, 33, 33, 33, 34, 34, 35, 35, 35, 35, 36, 36, 35]
```
---
## Color Correction (CC) Calibration
### Environment
- DNP light box
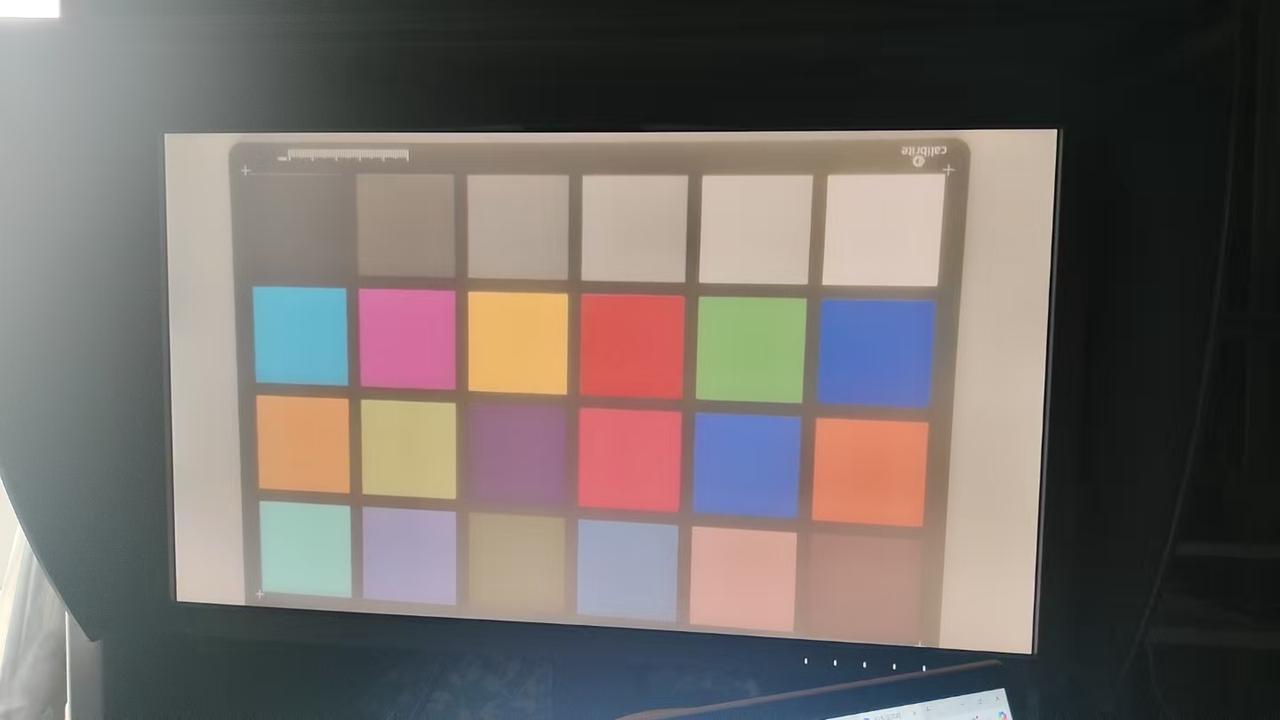
- 24-patch color checker (ColorChecker)
- K230 development board
- Serial console
- IMX219 camera
> The color checker must occupy more than 80% of the image and be positioned straight.
### Capture RAW Images
Light sources: same as LSC calibration (A/A_100, U30/F12, TL84/F11, D50, D65)
Capture steps:
1. Face the camera directly at the color checker; run the capture command to get the color checker RAW image.
1. Remove the color checker (camera position unchanged) and capture a background image for the same light source.
1. Switch to all other light sources and repeat both steps.
Final output:

### Run Calibration
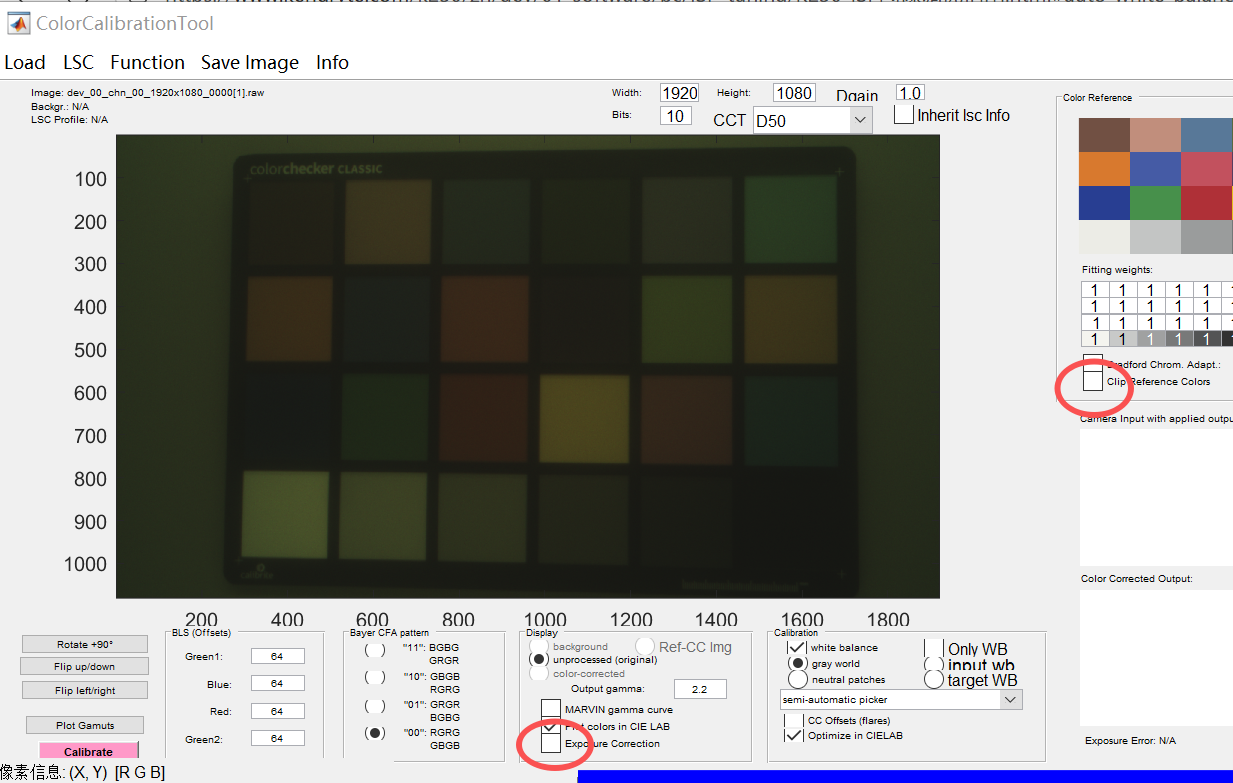
1. Open **ColorCalibrationTool** and set Width, Height, Bits, Bayer CFA pattern, and BLS offset.
1. Load files:
- **Load sRGB References** — select `CC_Standard.cxf`
- **Load Color Checker Image** — select the color checker RAW image
- **Load Background Image** — select the background RAW image
- **Load LSC Profile** — select the LSC parameter file for the matching light source
1. Uncheck **Clip Reference Colors** and **Camera Input with applied output gamma**.
1. Click **Calibrate** and select the four corner patches of the color checker.
1. Click **Save parameters** to export the white balance (wb) and color matrix (ctm) data.

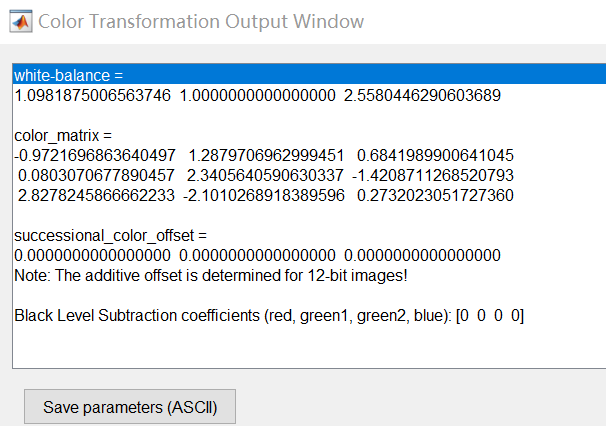
Example output:
```text
wb = [1.0981875006563746 1.0000000000000000 2.5580446290603689];
ctm = [-0.9721696863640497, 1.2879706962999451, 0.6841989900641045
0.0803070677890457, 2.3405640590630337, -1.4208711268520793
2.8278245866662233, -2.1010268918389596, 0.2732023051727360];
```
### Update ISP Configuration Files
Use the same light source as for the manual LSC.
**JSON file** (`imx219-1920x1080_manual.json`) — update `gain` and `ccmatrix`:
- `gain[0]` ← `wb[0]`, `gain[3]` ← `wb[2]`
```json
{
"class": "CManualWb",
"enable": true,
"gain": [1.620313, 1.0, 1.0, 1.64161]
},
{
"bit": 13,
"ccmatrix": [
2.31868, -0.935233, -0.383454,
-0.641832, 2.550007, -0.908175,
-0.283179, -0.977915, 2.26109
],
"ccoffset": [0, 0, 0],
"class": "CCcm",
"enable": true
},
```
**XML file** (`imx219-1920x1080.xml`):
```xml
A_100
[ 100]
[1.171875 0.2109375 -0.3828125 -0.1875 1.3125 -0.125 -0.0234375 -0.6640625 1.6875]
[0 0 0]
[0.951171875 1.0 1.0 2.952148438]
|
```
---
## Final Verification
- After all parameter changes, rebuild the MPP project to generate a new firmware image.
- Flash the image to the development board and boot the system.
- Run the capture command and verify that black level, color uniformity, and color accuracy meet expectations.
- If any anomalies are found, return to the corresponding step and adjust the calibration parameters or sensor configuration.