import os
import ujson
from media.sensor import *
from media.display import *
from media.media import *
from time import *
import nncase_runtime as nn
import ulab.numpy as np
import time
import utime
import image
import random
import gc

DISPLAY_WIDTH = ALIGN_UP(1920, 16)
DISPLAY_HEIGHT = 1080

OUT_RGB888P_WIDTH = ALIGN_UP(1024, 16)
OUT_RGB888P_HEIGH = 624

root_path="/sdcard/app/tests/mpcode/"
config_path="/sdcard/app/tests/mpcode/deploy_config.json"
deploy_conf={}
debug_mode=1

class ScopedTiming:
    def __init__(self, info="", enable_profile=True):
        self.info = info
        self.enable_profile = enable_profile

    def __enter__(self):
        if self.enable_profile:
            self.start_time = time.time_ns()
        return self

    def __exit__(self, exc_type, exc_value, traceback):
        if self.enable_profile:
            elapsed_time = time.time_ns() - self.start_time
            print(f"{self.info} took {elapsed_time / 1000000:.2f} ms")

def read_deploy_config(config_path):
    # 打开JSON文件以进行读取deploy_config
    with open(config_path, 'r') as json_file:
        try:
            # 从文件中加载JSON数据
            config = ujson.load(json_file)

            # 打印数据(可根据需要执行其他操作)
            #print(config)
        except ValueError as e:
            print("JSON 解析错误:", e)
    return config

# 任务后处理
def softmax(x):
    exp_x = np.exp(x - np.max(x))
    return exp_x / np.sum(exp_x)

def classification():
    print("start")

    # 使用json读取内容初始化部署变量
    deploy_conf=read_deploy_config(config_path)
    kmodel_name=deploy_conf["kmodel_path"]
    labels=deploy_conf["categories"]
    confidence_threshold=deploy_conf["confidence_threshold"]
    img_size=deploy_conf["img_size"]
    num_classes=deploy_conf["num_classes"]
    cls_idx=-1

    # init kpu and load kmodel
    kpu = nn.kpu()
    ai2d = nn.ai2d()
    kpu.load_kmodel("/sdcard/app/tests/mpcode/can2_10.0l_20241018054353.KMODEL")
    ai2d.set_dtype(nn.ai2d_format.NCHW_FMT,
                                   nn.ai2d_format.NCHW_FMT,
                                   np.uint8, np.uint8)
    ai2d.set_resize_param(True, nn.interp_method.tf_bilinear, nn.interp_mode.half_pixel )
    ai2d_builder = ai2d.build([1,3,OUT_RGB888P_HEIGH,OUT_RGB888P_WIDTH], [1,3,img_size[0],img_size[1]])
    # 初始化并配置sensor
    sensor = Sensor(id=2)
    sensor.reset()
    # 设置镜像
    sensor.set_hmirror(False)
    # 设置翻转
    sensor.set_vflip(False)
    # 通道0直接给到显示VO,格式为YUV420
    sensor.set_framesize(width = DISPLAY_WIDTH, height = DISPLAY_HEIGHT)
    sensor.set_pixformat(PIXEL_FORMAT_YUV_SEMIPLANAR_420)
    # 通道2给到AI做算法处理,格式为RGB888
    sensor.set_framesize(width = OUT_RGB888P_WIDTH , height = OUT_RGB888P_HEIGH, chn=CAM_CHN_ID_2)
    sensor.set_pixformat(PIXEL_FORMAT_RGB_888_PLANAR, chn=CAM_CHN_ID_2)
    # 绑定通道0的输出到vo
    sensor_bind_info = sensor.bind_info(x = 0, y = 0, chn = CAM_CHN_ID_0)
    Display.bind_layer(**sensor_bind_info, layer = Display.LAYER_VIDEO1)
    # 设置为LT9611显示,默认1920x1080
    Display.init(Display.LT9611, to_ide = True)

    #创建OSD图像
    osd_img = image.Image(DISPLAY_WIDTH, DISPLAY_HEIGHT, image.ARGB8888)

    try:
        # media初始化
        MediaManager.init()
        # 启动sensor
        sensor.run()
        # init
        rgb888p_img = None
        ai2d_input_tensor = None
        data = np.ones((1,3,img_size[0],img_size[1]),dtype=np.uint8)
        ai2d_output_tensor = nn.from_numpy(data)
        while  True:
            with ScopedTiming("total",debug_mode > 0):
                rgb888p_img = sensor.snapshot(chn=CAM_CHN_ID_2)
                if rgb888p_img == -1:
                    print("capture_image failed")
                    camera.release_image(CAM_DEV_ID_0, CAM_CHN_ID_2, rgb888p_img)
                    continue
                # for rgb888planar
                if rgb888p_img.format() == image.RGBP888:
                    ai2d_input = rgb888p_img.to_numpy_ref()
                    ai2d_input_tensor = nn.from_numpy(ai2d_input)
                    ai2d_builder.run(ai2d_input_tensor, ai2d_output_tensor)
                    # set input
                    kpu.set_input_tensor(0, ai2d_output_tensor)
                    # run kmodel
                    kpu.run()
                    # get output
                    results = []
                    for i in range(kpu.outputs_size()):
                        output_data = kpu.get_output_tensor(i)
                        result = output_data.to_numpy()
                        del output_data
                        results.append(result)
                    softmax_res=softmax(results[0][0])
                    res_idx=np.argmax(softmax_res)
                    if softmax_res[res_idx]>confidence_threshold:
                        cls_idx=res_idx
                        print("classification result:")
                        print(labels[res_idx])
                        print("score",softmax_res[res_idx])
                    else:
                        cls_idx=-1
                osd_img.clear()
                if cls_idx>=0:
                    osd_img.draw_string_advanced(5,5,32,labels[res_idx],color=(0,255,0))
                Display.show_image(osd_img, 0, 0, Display.LAYER_OSD3)
                rgb888p_img = None
                gc.collect() #用于需要调用gc.mem_alloc()的内存
    except Exception as e:
        print(f"An error occurred during buffer used: {e}")
    finally:
        os.exitpoint(os.EXITPOINT_ENABLE_SLEEP)
        del ai2d_input_tensor
        del ai2d_output_tensor
        #停止摄像头输出
        sensor.stop()
        #去初始化显示设备
        Display.deinit()
        #释放媒体缓冲区
        MediaManager.deinit()
        gc.collect()
        time.sleep(1)
        nn.shrink_memory_pool()
    print("end")
    return 0


if __name__=="__main__":
    classification()
重现步骤
通过图片,训练完之后,运行video.py。
训练过程和结果如下:
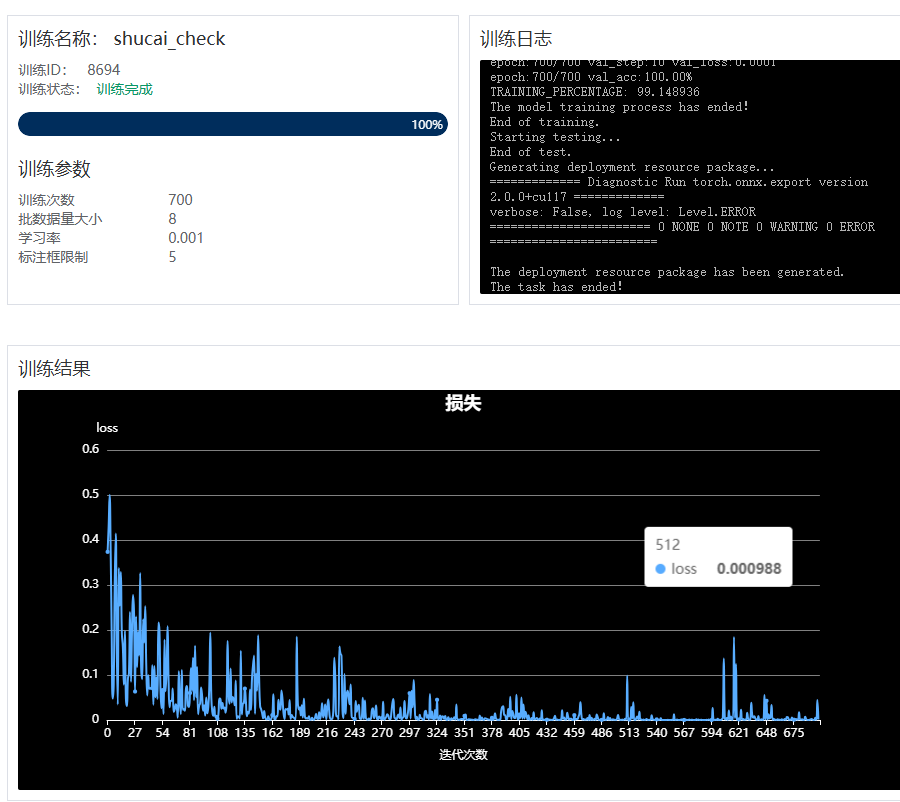
实际运行生成的video.py文件,产生的效果是如下
正常:
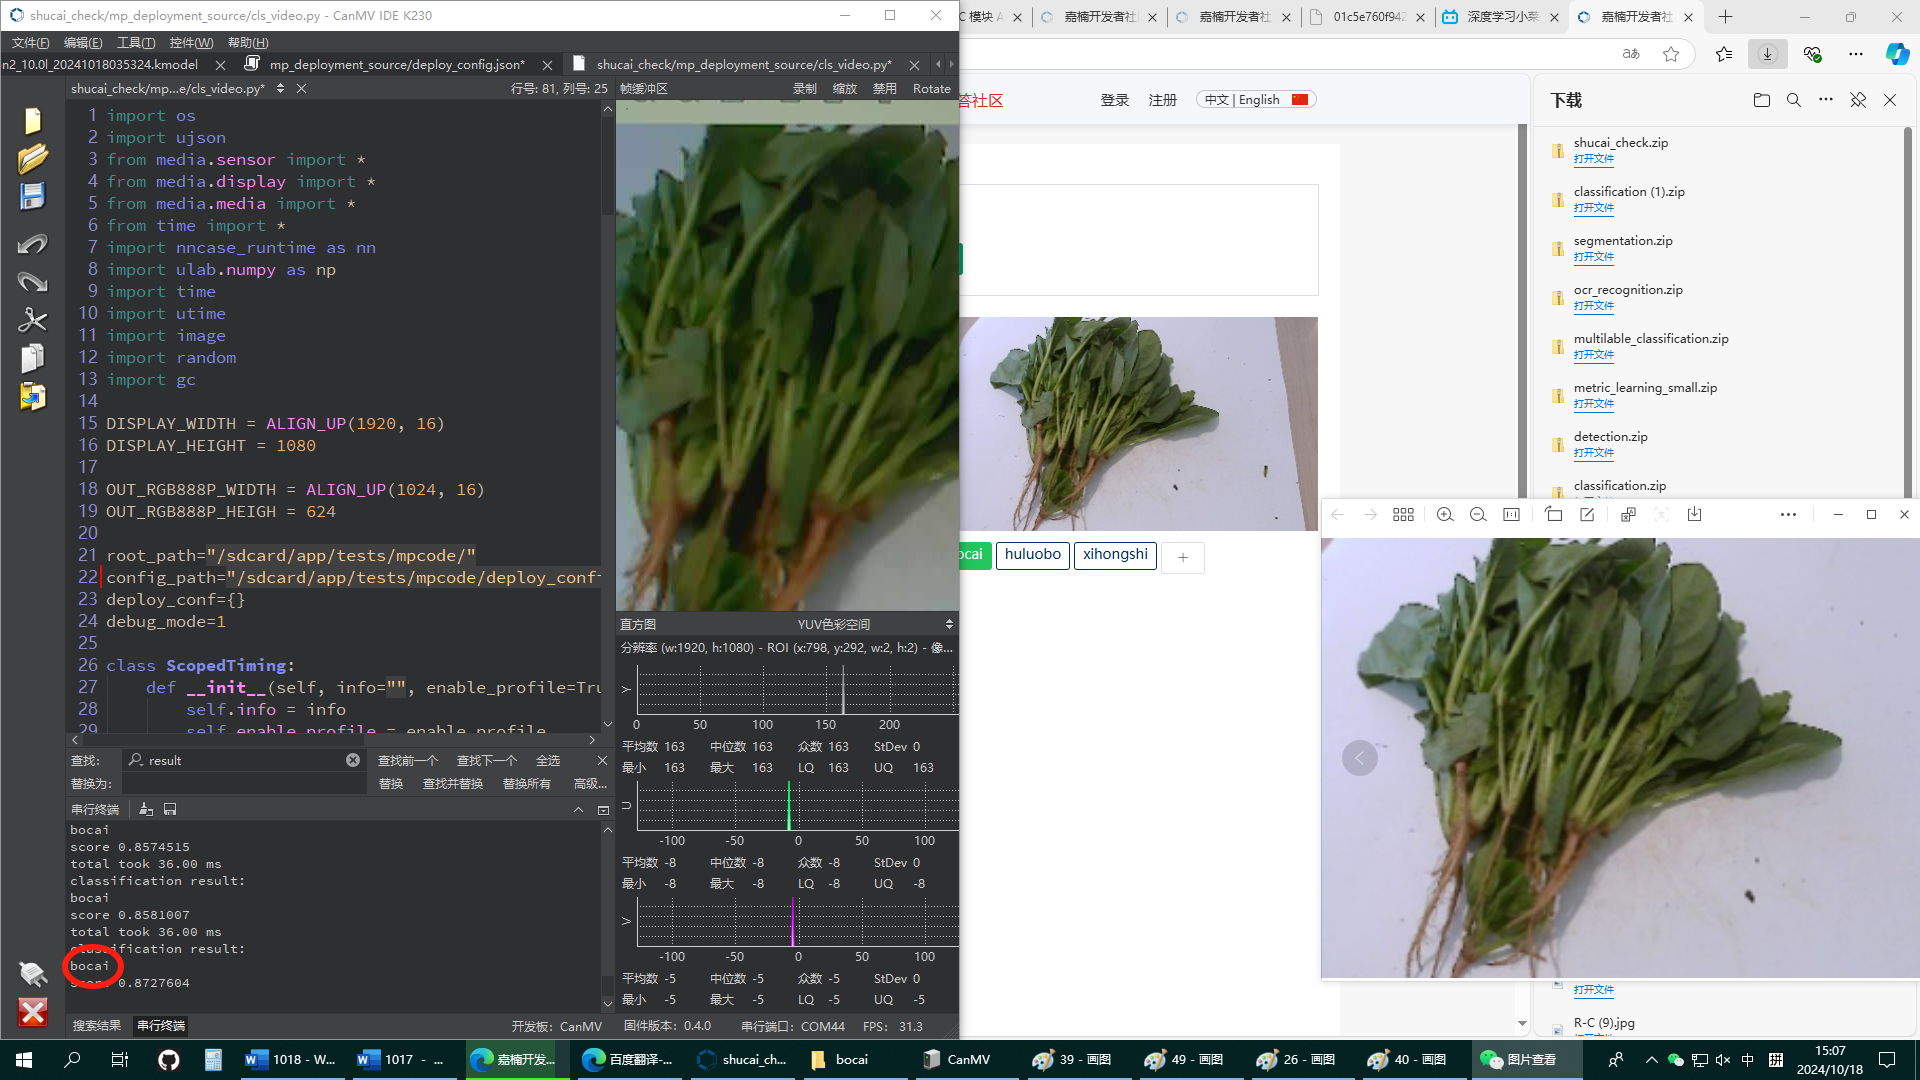
异常:
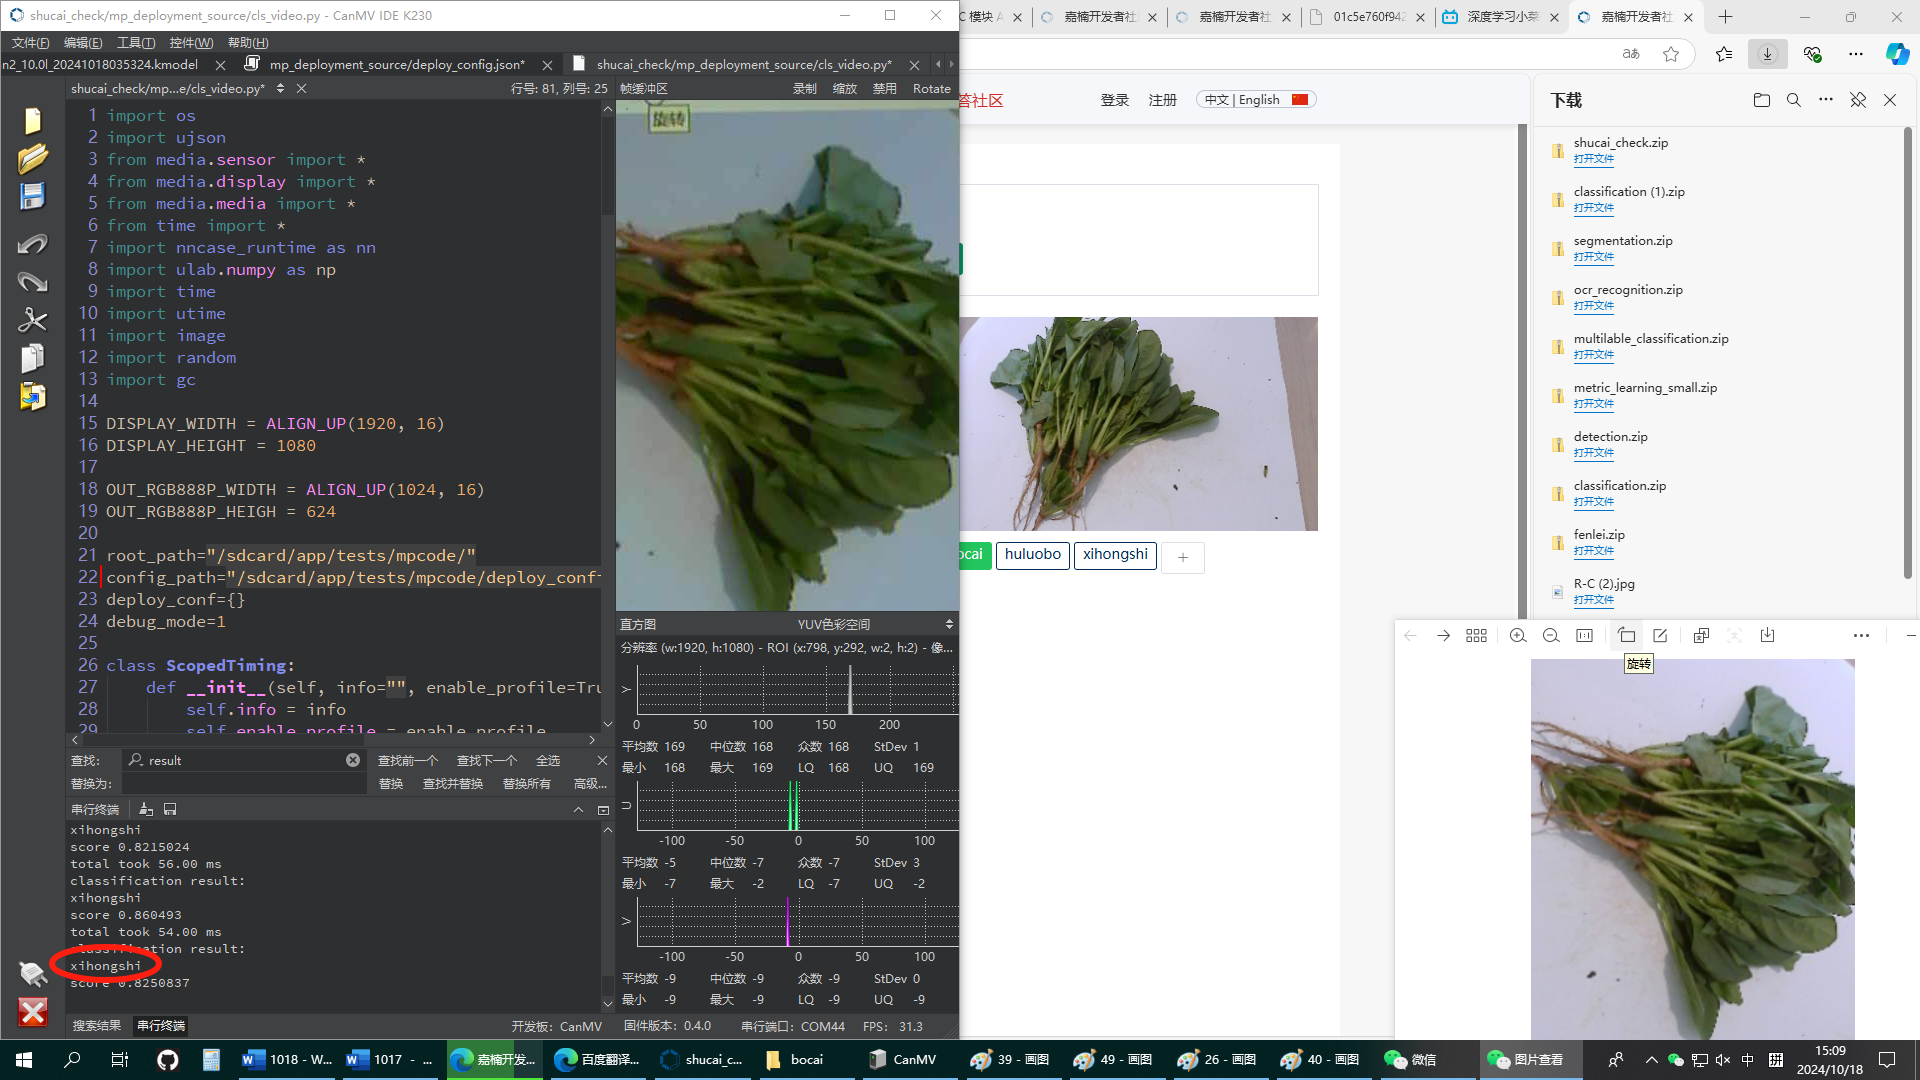
摄像头没角度高度没变,图片旋转九十度,从菠菜判断成为了西红柿。
期待结果和实际结果
上午用自己拍的样本尝试,也是这样,下午用了官方的样本 还是这样。而且当我摄像头对着地板或者别的无关的东西,分数还是很高,有0.8-0.95左右。上午用我自己的照片,分数一直是1.我想通过调整参数阈值等,完成调整,修改了几个初始化时候被赋值的变量值,但是都没有很好的效果。
软硬件版本信息
硬件为K230。固件版本CanMV-K230_micropython_v1.0_sdk_v1.6_nncase_v2.8.3(创乐博V3.0)。
错误日志
无
补充材料

这个现象算是正常现象,数据集里可能没有旋转90度的这种图片,模型自然就会识别错误,所以准备数据集的时候要分布合理均匀,才能训出好的模型。你可以把图片旋转之后重新训练,看新模型能不能识别。
就是说同一张照片,可以四个角度当四张照片使用,我理解的是这个意思,甚至更多角度。但是我还有相关问题,就是说在颜色上,菠菜和西红柿胡萝卜啥的,差异还是很大的,但是看到那个旋转之后评分还是很高的,然后就是,我什么都不拍,哪怕把摄像头挡住画面黑黑的,也会判断出是哪一种蔬菜,这两个问题比较困惑。
然后我观察了一边数据集里的菠菜照片。上下左右四个角度的照片是都有的,是太少了吗,我用的就是社区里那个官方的图片包。