用yolo8训练的模型做送药小车,看了yolov8的历程,可以使用,但是不知道输出时具体用的是什么通道?我看API发现,是用get_frame()获取一帧图片给AI程序使用,但是返回值是ulab.numpy.ndarray格式。我做巡线也用摄像头,返回的ulab.numpy.ndarray格式没办法给巡线使用,所以我参考了前面大佬回复的相关双线程的问题,想给巡线单独配置一个通道使用,但是没有相关教程,配置一直出错。
期待结果和实际结果
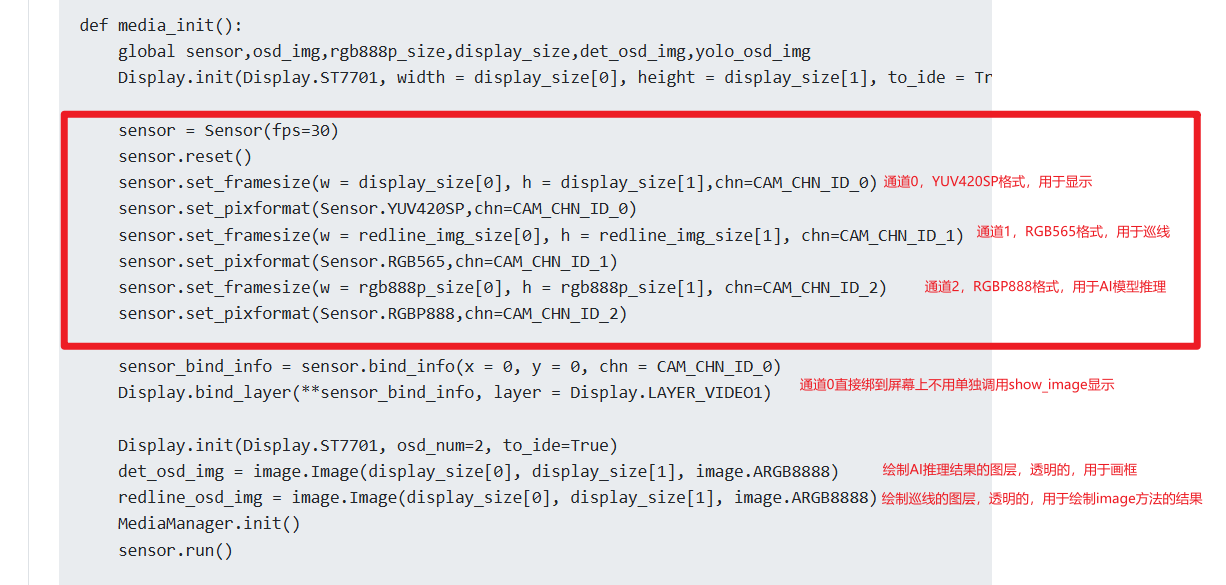
配置通道
补充材料
下面是官方yolov8模型调用的代码:
from libs.PipeLine import PipeLine
from libs.YOLO import YOLOv8
from libs.Utils import *
from media.sensor import *
from media.display import *
from media.media import *
import time, gc, _thread, ujson, utime, os, sys,image
import ulab.numpy as np
from machine import UART, FPIOA, Pin

# ---------- 串口初始化 ----------
fpioa = FPIOA()
fpioa.set_function(11, FPIOA.UART2_TXD)
fpioa.set_function(12, FPIOA.UART2_RXD)
uart = UART(UART.UART2, baudrate=9600, bits=UART.EIGHTBITS, parity=UART.PARITY_NONE, stop=UART.STOPBITS_ONE)

if __name__=="__main__":
    # 这里仅为示例,自定义场景请修改为您自己的模型路径、标签名称、模型输入大小

    kmodel_path="/sdcard/test_number.kmodel"
    labels = ["1","2","3","4","5","6","7","8"]
    model_input_size=[320,320]

    display_mode="lcd"
    rgb888p_size=[640,360]
    confidence_threshold = 0.4
    nms_threshold=0.4
    # 初始化PipeLine
    pl=PipeLine(rgb888p_size=rgb888p_size,display_mode=display_mode)
    pl.create()
    display_size=pl.get_display_size()
    # 初始化YOLOv8实例
    yolo=YOLOv8(task_type="detect",mode="video",kmodel_path=kmodel_path,labels=labels,rgb888p_size=rgb888p_size,model_input_size=model_input_size,display_size=display_size,conf_thresh=confidence_threshold,nms_thresh=nms_threshold,mask_thresh=1,max_boxes_num=50,debug_mode=0)
    yolo.config_preprocess()
    while True:
        with ScopedTiming("total",1):
            # 逐帧推理
            img=pl.get_frame()
            res=yolo.run(img)
            # res说明
            # res[0] = [bbox1, bbox2, ...]          # 每个目标的边界框:数组格式 [x, y, w, h]
            # res[1] = [class_id1, class_id2, ...]  # 每个目标对应的类别索引
            # res[2] = [score1, score2, ...]        # 每个目标对应的置信度分数
            boxes, class_ids, scores = res
            start_x = 5
            start_y = 5
            line_height = 20
            for i in range(min(4, len(class_ids))):
                x, y, w, h = boxes[i]
                cx = int(x + w / 2)
                cy = int(y + h / 2)
                class_id = class_ids[i]
                label = labels[class_id] if class_id < len(labels) else str(class_id)
                text = "{}:({},{})".format(label, cx, cy)
                print(text)
            yolo.draw_result(res,pl.osd_img)
            pl.show_image()
            gc.collect()
    yolo.deinit()
    pl.destroy()
"""

我想在上面的基础上配置一个通道,将输出的图片信息提供给巡线使用。


下面是巡线模块:
"""
from media.sensor import *
from media.display import *
from media.media import *
from machine import UART, FPIOA, Pin
import time, utime, image, gc

# ---------- 串口初始化 ----------
fpioa = FPIOA()
fpioa.set_function(11, FPIOA.UART2_TXD)
fpioa.set_function(12, FPIOA.UART2_RXD)
uart = UART(UART.UART2, baudrate=9600, bits=UART.EIGHTBITS,
            parity=UART.PARITY_NONE, stop=UART.STOPBITS_ONE)

# ---------- 摄像头配置 ----------
sensor = Sensor(width=1280, height=720)
sensor.reset()
sensor.set_framesize(width=800, height=480, chn=CAM_CHN_ID_1)
sensor.set_pixformat(Sensor.RGB565, chn=CAM_CHN_ID_1)
Display.init(Display.ST7701, width=800, height=480, to_ide=True)
MediaManager.init()
sensor.run()

# ---------- 颜色阈值 ----------
red_threshold = [(20, 60, 20, 127, -128, 127)]
black_threshold = [(0, 30)]  # 黑色色块检测(终点)

# ---------- ROI 区域 ----------
ROIS_MID = [
    (200, 120, 400, 40),
    (200, 200, 400, 40),
    (200, 280, 400, 40),
]
ROIS_LR = [
    (0, 0, 200, 100),     # 左
    (600, 0, 200, 100),   # 右
]

# ---------- 全局状态变量 ----------
turn_state = 0              # 0 正常, 1 左转中, 2 右转中
at_intersection = False
intersection_flag = False
wait_for_manage = False
end_flag = False

# ---------- 功能函数 ----------
def draw_rois(img):
    for r in ROIS_MID + ROIS_LR:
        img.draw_rectangle(r, color=(0, 255, 0))

def compute_offset(blobs):
    weight_sum, cx_sum = 0, 0
    weights = [0.3, 0.4, 0.3]
    for i, b in enumerate(blobs):
        if b:
            largest = max(b, key=lambda x: x.pixels())
            cx_sum += largest.cx() * weights[i]
            weight_sum += weights[i]
    if weight_sum == 0:
        return 0
    cx = cx_sum / weight_sum
    dx = int(cx - 400)
    return dx

def get_red_offset(img):
    blobs_mid = [img.find_blobs(red_threshold, roi=roi, merge=True) for roi in ROIS_MID]
    return compute_offset(blobs_mid)

def detect_intersection(img):
    left = img.find_blobs(red_threshold, roi=ROIS_LR[0], merge=True)
    right = img.find_blobs(red_threshold, roi=ROIS_LR[1], merge=True)
    left_ok = any(b.pixels() > 1500 for b in left)
    right_ok = any(b.pixels() > 1500 for b in right)
    return left_ok, right_ok

def detect_end(img):
    count = 0
    blobs = img.find_blobs(black_threshold, roi=(0, 400, 800, 80), pixels_threshold=1000)
    for b in blobs:
        if b.pixels() > 1500:
            count += 1
    return count >= 5

def send_uart(msg, debug_text=None):
    uart.write((msg + "\n").encode())
    if debug_text:
        print(msg + " —— " + debug_text)
    else:
        print(msg)

def receive_turn_command(dx):
    global turn_state, intersection_flag, wait_for_manage
    if uart.any():
        cmd = uart.read().decode().strip()
        if cmd == "1":
            turn_state = 1
            send_uart("[1,0]", "左转")
            wait_for_manage = True
            intersection_flag = False
        elif cmd == "2":
            turn_state = 2
            send_uart("[2,0]", "右转")
            wait_for_manage = True
            intersection_flag = False
        elif cmd == "0":
            turn_state = 0
            send_uart(f"[0,{dx}]", "直行")
            intersection_flag = False

def wait_turn_finish():
    global wait_for_manage, turn_state
    if uart.any():
        cmd = uart.read().decode().strip()
        if (turn_state == 1 and "left-manage" in cmd) or (turn_state == 2 and "right-manage" in cmd):
            wait_for_manage = False
            turn_state = 0
            print("转弯完成,恢复直行")

# ---------- 帧率初始化 ----------
last_time = utime.ticks_ms()

# ---------- 主循环 ----------
while True:
    start_time = utime.ticks_ms()

    draw_rois(img)

    if not end_flag and detect_end(img):
        send_uart("[3,0]", "终点识别,停止")
        end_flag = True
        continue

    dx = get_red_offset(img)
    left_ok, right_ok = detect_intersection(img)

    if left_ok and right_ok and not at_intersection:
        intersection_flag = True
        at_intersection = True
        send_uart("[0,0]", "十字路口检测,等待指令...")
        continue
    elif not (left_ok and right_ok):
        at_intersection = False

    if intersection_flag:
        receive_turn_command(dx)
    elif wait_for_manage:
        wait_turn_finish()
    elif not end_flag:
        send_uart(f"[0,{dx}]", f"巡线中 dx={dx}")

    # ---------- 计算与显示 FPS ----------
    end_time = utime.ticks_ms()
    duration = utime.ticks_diff(end_time, start_time)
    fps = 1000 / duration if duration > 0 else 0
    print("FPS: {:.2f}".format(fps))
    img.draw_string(5, 5, "FPS: {:.1f}".format(fps), scale=2, color=(255, 255, 255))

    Display.show_image(img)
    gc.collect()
    time.sleep_ms(100)
"""

下面是数字识别模块:
"""
from libs.PipeLine import PipeLine
from libs.YOLO import YOLOv8
from libs.Utils import *
from media.sensor import *
from media.display import *
from media.media import *
import time, gc, ujson, utime, os, sys, image
import ulab.numpy as np
from machine import UART, FPIOA, Pin

# ---------- 串口初始化 ----------
fpioa = FPIOA()
fpioa.set_function(11, FPIOA.UART2_TXD)
fpioa.set_function(12, FPIOA.UART2_RXD)
uart = UART(UART.UART2, baudrate=9600, bits=UART.EIGHTBITS,
            parity=UART.PARITY_NONE, stop=UART.STOPBITS_ONE)

# ---------- 数字识别模型和参数 ----------
kmodel_path = "/sdcard/test_number.kmodel"
labels = ["1", "2", "3", "4", "5", "6", "7", "8"]
model_input_size = [320, 320]
display_mode = "lcd"
rgb888p_size = [640, 360]
confidence_threshold = 0.3
nms_threshold = 0.45

# ---------- 初始化视觉模块 ----------
pl = PipeLine(rgb888p_size=rgb888p_size, display_mode=display_mode)
pl.create()
display_size = pl.get_display_size()
yolo = YOLOv8(task_type="detect", mode="video", kmodel_path=kmodel_path,
              labels=labels, rgb888p_size=rgb888p_size, model_input_size=model_input_size,
              display_size=display_size, conf_thresh=confidence_threshold,
              nms_thresh=nms_threshold, max_boxes_num=5, debug_mode=0)
yolo.config_preprocess()

# ---------- 全局变量 ----------
first_digit = None
mode = 0  # 0: 空闲,1: 等待保存数字,2: 对比模式
compare_count = 0
compare_total = 5

# ---------- 判断相对位置 ----------
def analyze_res_position(res):
    bboxes = res[0]
    class_ids = res[1]
    result = []
    center_x = 800 // 2
    for i in range(min(4, len(bboxes))):
        x, y, w, h = bboxes[i]
        label = class_ids[i]
        obj_center_x = x + w / 2
        position = "left" if obj_center_x < center_x else "right"
        result.append([label, position])
    return result

# ---------- 比较函数 ----------
def compare_with_reference(ref_digit, result_list):
    for label_idx, pos in result_list:
        label_str = labels[label_idx] if 0 <= label_idx < len(labels) else str(label_idx)
        if label_str == ref_digit:
            return pos
    return "go straight"

# ---------- 封装:获取稳定的第一个数字 ----------
def get_stable_first_label(res):
    class_ids = res[1]
    if len(class_ids) == 1:
        idx = class_ids[0]
        if 0 <= idx < len(labels):
            return labels[idx]
    return None

# ---------- 串口输出和打印函数 ----------
def print_and_send(msg):
    # 打印到终端
    print(msg)
    # 发送到串口
    uart.write((msg + "\n").encode())

# ---------- 主循环 ----------
while True:
    with ScopedTiming("total", 1):
        img = pl.get_frame()
        res = yolo.run(img)

        # 串口监听指令
        if uart.any():
            try:
                cmd = uart.read().decode().strip()
                if cmd == "1":
                    if first_digit is None:
                        mode = 1
                        print_and_send("准备记录第一个数字,请确保画面中仅有一个数字...")
                    else:
                        mode = 2
                        compare_count = 0
                        print_and_send("进入对比模式,参考数字为:" + str(first_digit))
                elif cmd == "2":
                    print_and_send("收到结束指令,退出程序")
                    break
            except Exception as e:
                print("串口读取错误:", e)

        # ---------- 模式1:记录第一个数字 ----------
        if mode == 1 and first_digit is None:
            label = get_stable_first_label(res)
            if label:
                first_digit = label
                print_and_send("记录成功,第一个数字为:" + str(first_digit))
                mode = 0
            else:
                print_and_send("等待仅出现一个数字...")

        # ---------- 模式2:对比参考数字 ----------
        elif mode == 2 and first_digit:
            result = analyze_res_position(res)
            decision = compare_with_reference(first_digit, result)
            print_and_send("对比结果:" + decision)
            compare_count += 1
            if compare_count >= compare_total:
                print_and_send("比对结束,共输出" + str(compare_total) + "次")
                mode = 0

        yolo.draw_result(res, pl.osd_img)
        pl.show_image()
        gc.collect()

# ---------- 释放资源 ----------
yolo.deinit()
pl.destroy()
"""