问题描述
想让你的K230开发板拥有"紧盯"手部的超能力吗?今天就带你解锁基于PID算法的手部追踪技能,只需简单代码,让二维舵机云台跟随手部移动,科技感拉满!
一、核心原理:PID 算法+视觉识别
手部追踪的核心是让舵机云台根据摄像头捕捉的手部位置,实时调整角度,始终将手部锁定在画面中央。这背后的"智慧大脑"就是PID控制算法:
- P(比例):根据手部与画面中心的偏差,直接调整舵机角度,偏差越大,调整幅度越大
- I(积分):消除长期存在的微小偏差,让追踪更精准
- D(微分):根据偏差变化速度,抑制过冲和震荡,让追踪更平稳
配合K230强大的视觉识别能力,就能实现流畅的实时追踪啦~
二、 准备工作:硬件与环境
1. 所需硬件
- K230开发板(这里我们使用的是庐山派,需要接上摄像头)
- 舵机云台2个(淘宝购买,本次demo舵机链接:https://item.taobao.com/item.htm?id=17392171945)
- 外部电源,需要5V,1.5A以上供电能力
- 电脑
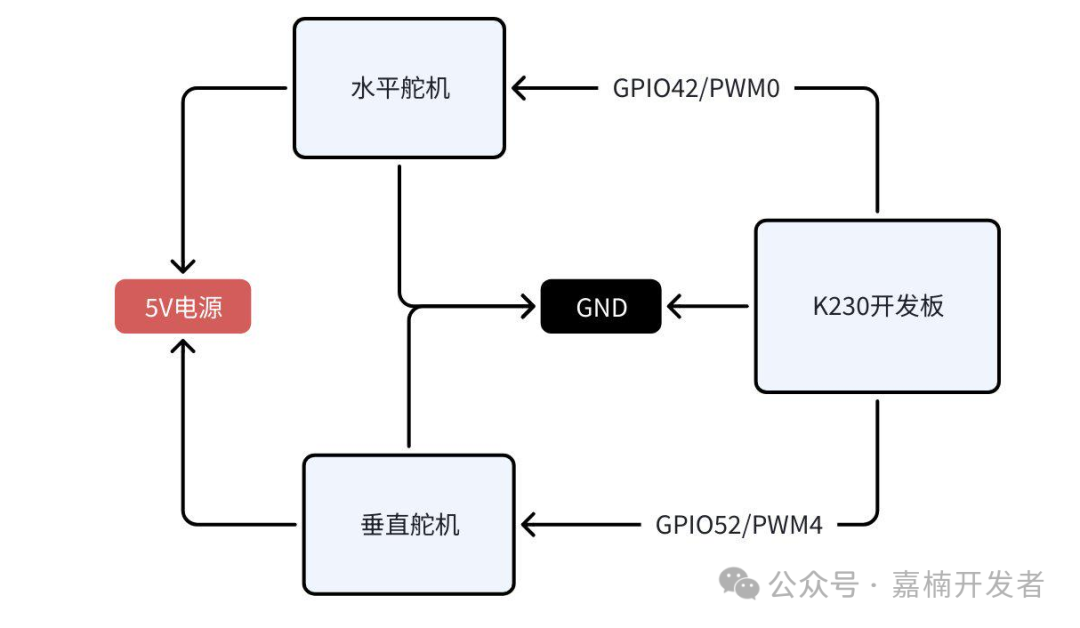
硬件连接:

连线方式
⚠️ 重要提示:舵机需单独外接 5V 电源供电,请勿直接使用开发板的 5V 输出。若供电不足,可能导致舵机运行卡顿、扭矩不足甚至损坏设备,影响追踪效果哦~
2.软件环境
CanMV K230官方固件
- 下载链接:
https://kendryte-download.canaan-creative.com/developer/releases/canmv_k230_micropython/daily_build/ - CanMV IDE
下载链接:
https://www.kendryte.com/zh/resource?selected=0-2-1 - 参考代码
/canmv/sdcard/examples/03-Machine/handle_detect_servo.py
三、实战步骤: 从0到1实现追踪
1.步骤1:搭建基础框架
首先导入必要的库,包括视觉处理、舵机控制和PID算法相关模块:
from libs.PipeLine import PipeLine
from libs.AIBase import AIBase
from libs.AI2D import Ai2d
from libs.Utils import *
import os, sys, ujson, gc, math
from media.media import *
import nncase_runtime as nn
import ulab.numpy as np
import image
import aicube
from machine import PWM, FPIOA
import time
步骤2:配置硬件接口
将GPIO引脚配置为I2C功能,连接舵机驱动板
def servo_init():
    # 初始化水平方向控制PWM
    fpioa = FPIOA()
    fpioa.set_function(PWM_PIN, fpioa.PWM0)
    g_pwm = PWM(0)
    g_pwm.freq(PWM_FREQ)
    move_servo_x(60)  # 初始到中间位置

    fpioa.set_function(PWM_PIN_H, fpioa.PWM4)
    h_pwm = PWM(4)
    h_pwm.freq(PWM_FREQ)
    move_servo_y(60)
步骤3:编写PID控制器
创建PID类,实现核心控制逻辑:
class PID(object):
    """PID控制器类(保持原逻辑,确保稳定性)"""
    def __init__(
        self,
        Kp=1.0,
        Ki=0.0,
        Kd=0.0,
        setpoint=0,
        sample_time=0.01,
        output_limits=(None, None),
        auto_mode=True,
        proportional_on_measurement=False,
        differetial_on_measurement=False,
        error_map=None,
    ):
        self.Kp, self.Ki, self.Kd = Kp, Ki, Kd
        self.setpoint = setpoint
        self.sample_time = sample_time
        self._min_output, self._max_output = None, None
        self._auto_mode = auto_mode
        self.proportional_on_measurement = proportional_on_measurement
        self.differetial_on_measurement = differetial_on_measurement
        self.error_map = error_map
        self._proportional = 0
        self._integral = 0
        self._derivative = 0
        self._last_time = None
        self._last_output = None
        self._last_error = None
        self._last_input = None
        self.dt_range = (0.01, 0.1)
        try:
            self.time_fn = time.monotonic
        except AttributeError:
            self.time_fn = ticks_seconds
        self.output_limits = output_limits
        self.reset()
    def __call__(self, input_, dt=None):
        """
        Update the PID controller.
        Call the PID controller with *input_* and calculate and return a control output if
        sample_time seconds has passed since the last update. If no new output is calculated,
        return the previous output instead (or None if no value has been calculated yet).
        :param dt: If set, uses this value for timestep instead of real time. This can be used in
            simulations when simulation time is different from real time.
        """
        ifnot self.auto_mode:
            return self._last_output
        now = self.time_fn()
        if self._last_time is None:
            dt = 0
        elif dt is None:
            dt = now - self._last_time
            dt = _clamp(dt, self.dt_range)
        elif dt <= 0:
            raise ValueError('dt has negative value {}, must be positive'.format(dt))
        if self.sample_time is not None and dt < self.sample_time and self._last_output is not None:
            # Only update every sample_time seconds
            return self._last_output
        # Compute error terms
        error = self.setpoint - input_
        d_input = input_ - (self._last_input if (self._last_input is not None) else input_)
        d_error = error - (self._last_error if (self._last_error is not None) else error)
        # Check if must map the error
        if self.error_map is not None:
            error = self.error_map(error)
        # Compute the proportional term
        ifnot self.proportional_on_measurement:
            # Regular proportional-on-error, simply set the proportional term
            self._proportional = self.Kp * error
        else:
            # Add the proportional error on measurement to error_sum
            self._proportional -= self.Kp * d_input
        # Compute integral and derivative terms
        self._integral += self.Ki * error * dt
        self._integral = _clamp(self._integral, self.output_limits)  # Avoid integral windup
        if dt > 0:
            if self.differetial_on_measurement:
                self._derivative = -self.Kd * d_input / dt
            else:
                self._derivative = self.Kd * d_error / dt
        else:
            self._derivative = 0
        # Compute final output
        output = self._proportional + self._integral + self._derivative
        output = _clamp(output, self.output_limits)
        # Keep track of state
        self._last_output = output
        self._last_input = input_
        self._last_error = error
        self._last_time = now

        return output
步骤4:初始化PID参数
根据手部追踪需求,设置X轴(水平)和Y轴(垂直)的PID参数:
printf("hello wo# 初始化X方向PID(目标:手掌中心对准屏幕中心)
    g_pid = PID(
        Kp=PID_KP,
        Ki=PID_KI,
        Kd=PID_KD,
        setpoint=0,  # PID目标值:屏幕中心X坐标
        sample_time=0.02,          # 采样时间20ms
        output_limits=PID_OUT_RANGE_X  # PID输出限制在舵机角度范围内
    )

# 初始化Y方向PID(目标:手掌中心对准屏幕中心)
    h_pid = PID(
        Kp=PID_KP_Y,
        Ki=PID_KI_Y,
        Kd=PID_KD_Y,
        setpoint=0,  # PID目标值:屏幕中心Y坐标
        sample_time=0.02,          # 采样时间20ms
        output_limits=PID_OUT_RANGE_Y  # PID输出限制在舵机角度范围内
    )rld!");
步骤5:通过手掌检测,获取手掌中心位置
根据手掌中心位置的X、Y坐标,送进PID计算偏移量,转换成舵机角度,并移动舵机
def adjust_servo_by_hand_x(hand_center_x):

    global last_target_handle_x
    #根据手掌中心X坐标,通过PID控制舵机角度
    if hand_center_x is None:
        return  # 未检测到手

    deviation = abs(hand_center_x - screen_center_x)
    if deviation < 50:
        return

    # 调用PID计算目标角度(输入:当前手掌X坐标,输出:目标舵机角度)
    hand_adjust_x = hand_center_x - screen_center_x
    target_screen_position = g_pid(hand_adjust_x)

    p, i, d = g_pid.components
    if False:
        print(f"p:{p}, i:{i}, d:{d}")
    target_angle = pid_to_servo_x(-target_screen_position) #由于demo屏幕方向与坐标相反,需要对PID输出的值取反,根据实际情况调整
    if False:
        print(f"hand_center_x: {hand_center_x}, target_screen_position: {target_screen_position}, target_angle:{target_angle}")


    last_target_handle_x = hand_center_x
    # 移动舵机到目标角度
    move_servo_x(target_angle)
步骤6:核心追踪循环
实时检测手部位置,通过PID计算调整舵机角度:
pri# 主循环
while True:
    with ScopedTiming("总耗时", 1):
        img = pl.get_frame()  # 获取摄像头帧
        dets = hand_det.run(img)  # 手势检测推理
        hand_center_x, hand_center_y = hand_det.draw_result(pl, dets)  # 绘制结果并获取手掌中心
        pl.show_image()  # 显示图像
        # 根据手掌位置控制舵机
        adjust_servo_by_hand_x(hand_center_x)
        adjust_servo_by_hand_y(hand_center_y)

        gc.collect()  # 垃圾回收ntf("hello world!");
调试技巧:让追踪更流畅
1.参数调整:如果追踪太迟钝,可增大P值;若震荡严重,可增大D值
2.死区设置:abs(deviation) < 20中的数值可根据实际情况调整,过滤微小抖动
3.角度限制:通过max(0, min(...))确保舵机不超出机械范围
4.帧率优化:定期调用gc.collect()进行垃圾回收,保持流畅运行
扩展玩法
更换模型:将手部检测替换为人脸、物体检测,实现更多追踪场景
多级调速:根据手部移动速度动态调整PID参数,实现"近慢远快"
联动应用:结合灯光、声音模块,打造互动感应装置
只需一套K230开发板,就能解锁无限创意!快来动手试试,让你的设备拥有"智慧之眼"吧~
