
Frequently Asked Questions#
Hardware Issues#
Computer does not recognize the correct USB device#
Shows K230 USB Boot Device#
When K230 USB Boot Device appears, it may be caused by the following reasons:
The firmware is not burned into the boot medium, causing the chip to fail to boot and automatically enter USB burning mode.
The Boot mode is set incorrectly, causing the chip to fail to read the correct firmware, resulting in a boot failure.
You can force the K230 into USB burning mode by holding down the BOOT button. At this point, K230 USB Boot Device will be displayed on the computer, and you can use K230 Burning Tool to burn the firmware.
When using K230 USB Boot Device, you need to install the corresponding driver through Zadig in order to use the burning tool properly.
Shows an unknown USB device (device descriptor request failed)#
This situation is usually caused by burning the wrong firmware, resulting in U-Boot failing to start. Please re-burn the correct firmware and restart the device to resolve this issue.
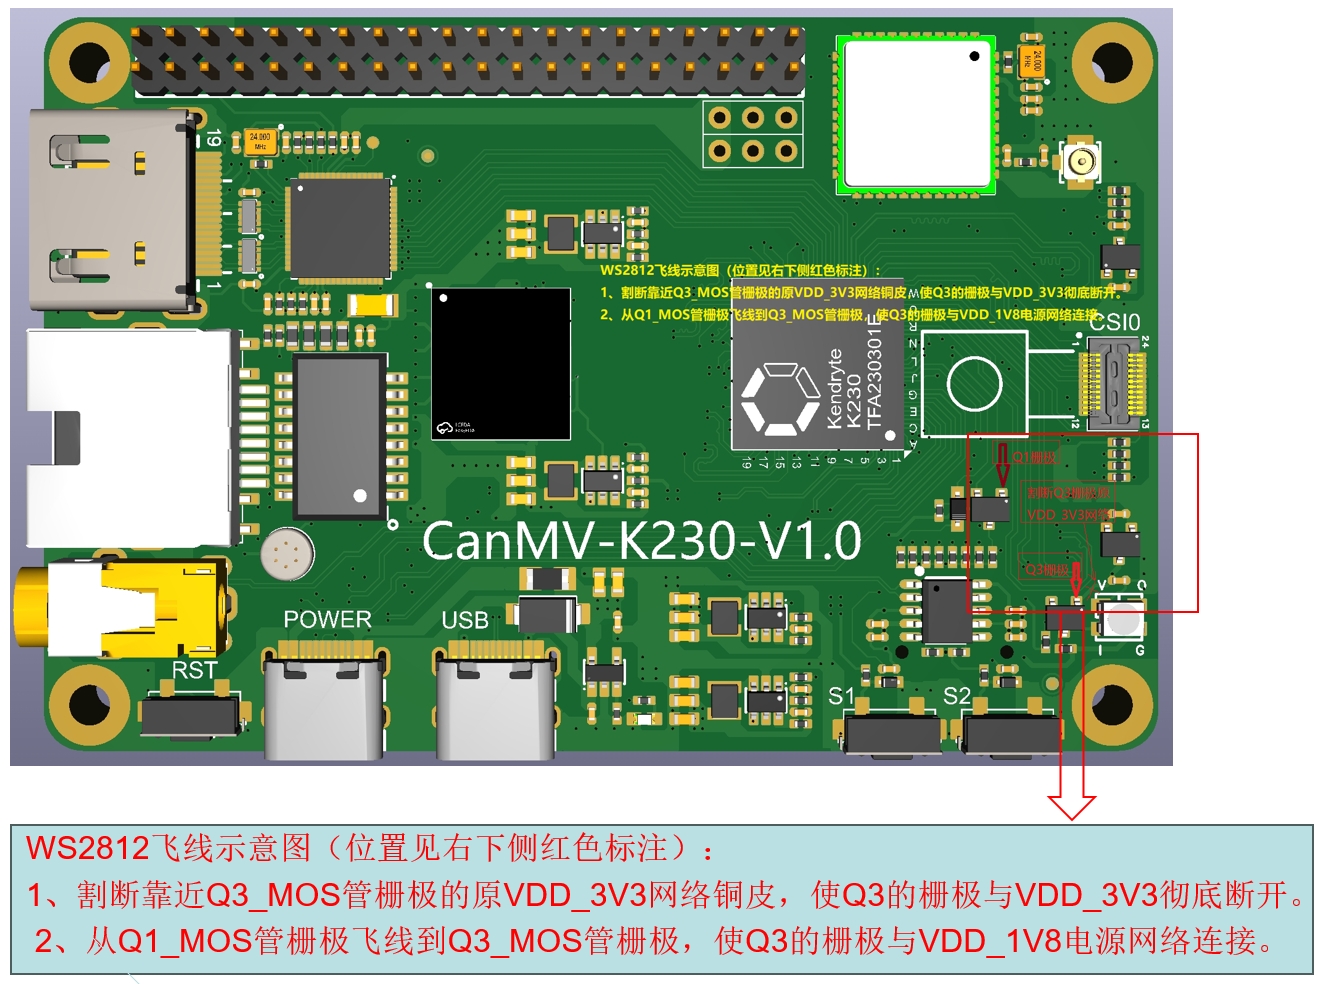
CanMV-K230 V1.1 How to Light Up LED (WS2812)#
The CanmV-K230-V1.1 development board requires hardware modification to light up the onboard LED
SDK Issues#
IDE Unable to Connect to Canmv-K230 Development Board#
Ensure that both USB interfaces of the development board are properly connected to the computer.
Confirm that the firmware burned in the TF card starts with “CanMV-K230_micropython”; other types of firmware will not be able to connect.
Check whether “USB Serial Device (COMxx)” is displayed in the computer’s Device Manager. If it is not displayed, try unplugging and replugging the USB cable or replacing the USB cable.
Using the Virtual U Disk#
Since version V0.5, CanMV supports the virtual U disk function, and the TF card of the development board will be virtualized as a U disk. After the system starts, you will see a device named “CanMV” in the “This PC” section under Devices and Drives. You can operate the TF card just like a normal U disk. It contains MicroPython sample code, and it is recommended to prioritize using these samples to ensure compatibility with the current image version.
nncase Issues#
(This section is to be supplemented)
AI demo Issues#
(This section is to be supplemented)
IDE Issues#
IDE Displays Low Image Frame Rate#
By default, the IDE displays 1080P HDMI images transmitted back through the VideoOutput module. Due to the limitation of USB transfer speed, the frame rate is only 15-20 FPS.
You can use the image.compress_for_ide() function to send a specified image. Refer to the camera_480p.py example; the hardware encoder can reach 30 FPS when sending 480P images. Note that the image must meet the following conditions:
The image source must be a vb buffer obtained through
sensor.snapshot().The physical address of the image buffer must be aligned to 4096.
The image format must be YUV420SP, YUV422SP, ARGB8888, or BGRA8888.
If the image does not meet the above requirements, compress_for_ide() will use the CPU for encoding, and the frame rate will be reduced.
Methods to Increase Frame Rate#
Select
Displ.VIRTas the display output device, and set an appropriate resolution and frame rate to achieve a higher frame rate.