
AI Development Documentation#
Introduction to KPU Hardware Fundamentals#
In edge computing scenarios (such as IoT devices, smart cameras, industrial inspection terminals, wearable devices, etc.), devices are typically deployed at sites far from cloud data centers, facing challenges of high real-time requirements, limited network bandwidth, sensitive data privacy, and strict power constraints. Running complex AI models (such as image recognition, object detection, voice wake-up) in these scenarios, if relying solely on traditional general-purpose CPUs for computation, often encounters problems of excessive computation, slow processing speed, and high power consumption, making it difficult to meet the requirements of real-time response and energy efficiency.
KPU (Knowledge Processing Unit) is a hardware acceleration engine specifically designed by Canaan Technology to address edge AI computing challenges. It is essentially a highly optimized deep learning coprocessor/accelerator, whose core function is to efficiently execute dense computation tasks in neural network models (particularly operations such as convolution, matrix multiplication, and activation functions).
Core advantages of KPU: Specialization and efficiency. Compared with general-purpose CPUs, the advantages of KPU lie in its specialized architecture:
Parallel computing capability: KPU internally contains a large number of processing units (PE) specifically designed for neural network computation, capable of simultaneously processing massive data (such as feature maps, weights), significantly accelerating the model inference process.
Optimized data flow and memory access: Deep optimization for neural network computation patterns (such as data reuse), reducing unnecessary data transfer, maximizing memory bandwidth utilization, and lowering latency.
High energy efficiency ratio: Specialized circuit design avoids the overhead of CPUs executing general instructions. When performing the same AI computation tasks, KPU typically provides tens to hundreds of times the computational efficiency (TOPS/W) of CPUs, achieving high-performance AI processing within the limited power budget of edge devices.
Reduced CPU load: Offloading heavy AI computation tasks to KPU execution frees up valuable CPU resources to handle other key tasks such as device control, communication, and user interaction, improving overall system responsiveness and stability.
KPU supports various mainstream neural network model architectures, suitable for a wide range of edge vision AI application scenarios, including but not limited to:
Image classification: Identifying object categories in images (such as recognizing fruit types, industrial parts).
Object detection: Locating and recognizing multiple targets and their positions in images (such as detecting pedestrians, vehicles, defects).
Semantic segmentation: Classifying each pixel in an image (such as distinguishing roads, sky, buildings; medical image analysis).
Face detection and recognition: On-device face verification, access control attendance.
Pose estimation: Analyzing human body joint positions (such as fitness action guidance).
KPU’s position in the system:
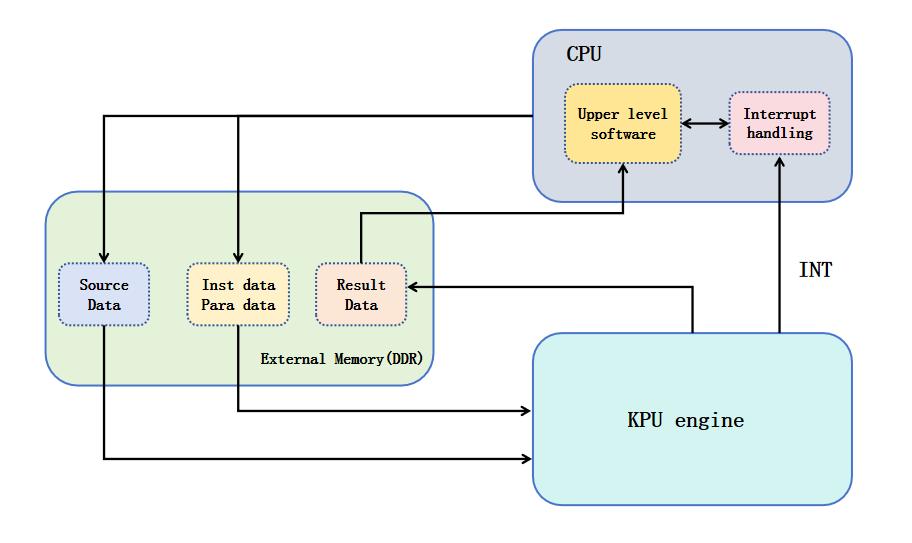
It typically exists as an independent IP core in the SoC (System on Chip), working in coordination with CPU, memory, peripherals, etc. The CPU is responsible for system management, task scheduling, and application logic, while efficiently handing over computationally intensive AI model inference tasks to the KPU for execution. The figure below shows the position of KPU in a typical edge AI SoC.
K230 AI Application Examples#
To help developers quickly get started and intuitively experience the powerful edge AI capabilities of K230, the CanMV K230 image comes with rich and diverse AI example programs (AI Demo).
These out-of-the-box Demos cover two major categories: single-model applications (such as face detection) and multi-model applications (such as hand keypoints). Users can experience mainstream AI functions with zero configuration and one-click operation, without needing to set up an environment from scratch, including but not limited to:
Vision applications: Object recognition, face detection, gesture recognition, human recognition, license plate recognition, OCR text recognition.
Audio applications: Keyword spotting (KWS), text-to-speech (TTS), etc.
Through these Demos, developers can quickly verify model performance, become familiar with K230’s AI inference capabilities, and lay a solid foundation for subsequent customized development.
How to run:
All Demo source code is open, clearly structured, and richly commented, uniformly stored in the /CanMV/sdcard/examples/05-AI-Demo directory. Users can conveniently open, run, debug, and deeply study this code through the CanMV IDE, understanding API calls, data processing workflows, and model integration methods, greatly accelerating the development of their own applications.
Notes:
Some Demos may not run properly on the K230D chip due to high memory usage. Please refer to the adaptation description list to select appropriate examples for testing.
For the differences between K230 and K230D, please refer to: Product Center
Demo Name |
Scenario |
Task Type |
K230 |
K230D |
|---|---|---|---|---|
body_seg |
Human body part segmentation |
Single-model task |
✅ |
❌ |
dynamic_gesture |
Dynamic gesture recognition |
Multi-model task |
✅ |
✅ |
eye_gaze |
Gaze estimation |
Multi-model task |
✅ |
❌ |
face_detection |
Face detection |
Single-model task |
✅ |
✅ |
face_landmark |
Face key points |
Multi-model task |
✅ |
✅ |
face_liveness_rgb |
Face liveness detection |
Multi-model task |
✅ |
✅ |
face_mesh |
Face 3D mesh |
Multi-model task |
✅ |
❌ |
face_parse |
Face parsing |
Multi-model task |
✅ |
❌ |
face_pose |
Face pose |
Multi-model task |
✅ |
✅ |
face_registration |
Face registration |
Multi-model task |
✅ |
❌ |
face_recognition |
Face recognition |
Multi-model task |
✅ |
❌ |
face_registration_lite |
Lightweight face registration |
Multi-model task |
✅ |
✅ |
face_recognition_lite |
Lightweight face recognition |
Multi-model task |
✅ |
✅ |
falldown_detection |
Fall detection |
Single-model task |
✅ |
✅ |
finger_guessing |
Finger guessing game |
Multi-model task |
✅ |
✅ |
hand_detection |
Hand detection |
Single-model task |
✅ |
✅ |
hand_keypoint_class |
Hand keypoint classification |
Multi-model task |
✅ |
✅ |
hand_keypoint_detection |
Hand keypoint detection |
Multi-model task |
✅ |
✅ |
hand_recognition |
Gesture recognition |
Multi-model task |
✅ |
✅ |
keyword_spotting |
Keyword wake-up |
Single-model task |
✅ |
✅ |
multi_kws |
Multi-command keyword wake-up |
Single-model task |
✅ |
✅ |
license_plate_det |
License plate detection |
Single-model task |
✅ |
✅ |
license_plate_det_rec |
License plate recognition |
Multi-model task |
✅ |
✅ |
license_plate_det_yolo |
yolo license plate detection |
Single-model task |
✅ |
✅ |
license_plate_det_rec_yolo |
yolo license plate detection + recognition |
Multi-model task |
✅ |
✅ |
nanotracker |
Single target tracking |
Multi-model task |
✅ |
✅ |
object_detect_yolov8n |
yolov8n object detection |
Single-model task |
✅ |
✅ |
ocr_det |
OCR detection |
Single-model task |
✅ |
❌ |
ocr_rec |
OCR recognition |
Multi-model task |
✅ |
❌ |
person_detection |
Person detection |
Single-model task |
✅ |
✅ |
person_kp_detect |
Person keypoint detection |
Multi-model task |
✅ |
✅ |
puzzle_game |
Puzzle game |
Multi-model task |
✅ |
✅ |
segment_yolov8n |
yolov8 segmentation |
Single-model task |
✅ |
❌ |
self_learning |
Self-learning |
Single-model task |
✅ |
✅ |
space_resize |
Local magnifier |
Multi-model task |
✅ |
✅ |
tts_zh |
Chinese text-to-speech |
Multi-model task |
✅ |
❌ |
yolo11n_obb |
yolo11n rotated object detection |
Single-model task |
✅ |
✅ |
yolov8n_obb |
yolov8n rotated object detection |
Single-model task |
✅ |
✅ |
yolo26_person_kp.py |
yolo26 human skeleton keypoints |
Single-model task |
✅ |
✅ |
Basic Process of AI Model Inference#
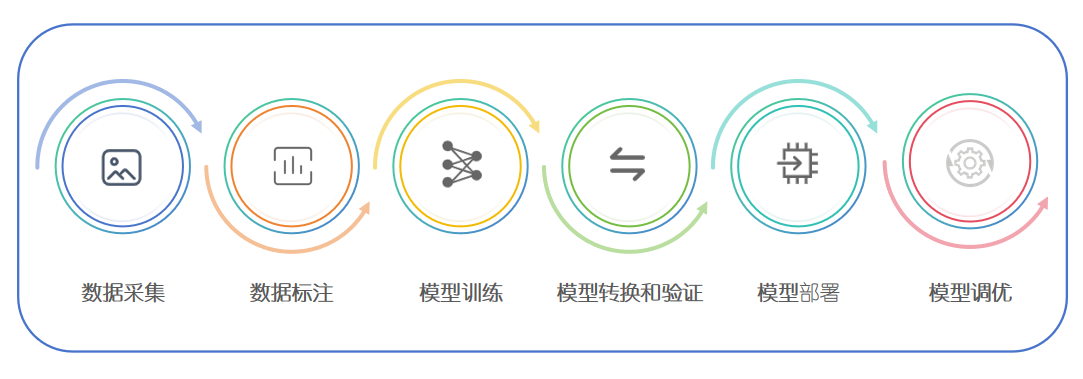
The basic process of deploying a trained AI model on K230 is shown in the flowchart below:
🏷️ Data Collection:
Data collection refers to the process of gathering raw input data through sensing devices such as cameras and microphones. The quality and quantity of collected data directly determine the effectiveness of model training and inference. Therefore, selecting appropriate collection devices and strategies is crucial.
For better deployment results, it is recommended to use K230 itself to collect image data to ensure that the data distribution is closer to the actual deployment environment.
🏷️ Data Annotation:
Data annotation is the process of adding semantic labels to collected data for supervised learning model training. This process can be done manually or semi-automatically with the help of annotation tools.
For example, image classification tasks require assigning correct category labels to each image; object detection tasks require adding bounding boxes and their category labels to each target in the image. Accurate annotation is essential for training high-performance models with strong generalization capabilities.
🏷️ Model Training:
The model training phase is one of the important steps in the entire AI application development workflow. Its main goal is to use labeled datasets to train neural network models with generalization capabilities through deep learning methods. During this process, the model continuously adjusts internal parameters to gradually fit the distribution characteristics of the data, so that it can make accurate and stable predictions when faced with unseen input data.
Model training typically requires a large amount of high-quality sample data, covering diverse scenarios and categories related to the task. The sufficiency of data and the accuracy of annotation directly affect the model’s learning effectiveness and application performance. During training, neural network models extract features from input data, compute predicted outputs, and generate loss by comparing with true labels. With the help of backpropagation mechanisms, weight parameters in the network are adjusted to continuously optimize model performance.
To achieve efficient training, developers need to select a model architecture suitable for the current task, such as MobileNet, ResNet in image classification, YOLO series in object detection, etc. Model selection depends not only on accuracy requirements but also on inference speed, model size, and resource constraints of the deployment platform. Especially when targeting edge AI chips like K230, lightweight models have more practical value.
In addition, the training process often needs to be carried out on computing platforms with certain computing power support (such as GPU servers or local high-performance workstations) to ensure that the model completes optimization within a reasonable time. Modern deep learning training typically uses mature training frameworks such as PyTorch and TensorFlow, which provide rich neural network building modules, optimizers, loss functions, and data processing tools, greatly simplifying the model development workflow. You can choose a suitable framework for training based on your technical background and model requirements.
🏷️ Model Conversion and Verification:
Due to the limited computing resources of edge devices, models trained on high-computing platforms cannot be directly deployed. Models must be optimized and quantized through model conversion tools to generate inference formats suitable for the target hardware.
For the K230 chip:
Use KPU (Knowledge Processing Unit) as the neural network acceleration unit;
The supported model format is KModel;
Use the nncase compiler to convert trained ONNX or TFLite models into KModel;
Structural optimization and quantization are performed during the conversion process to reduce model size and computational complexity.
After conversion, functional verification is required to ensure that the model meets application requirements in terms of accuracy, latency, and resource usage.
🏷️ Model Deployment:
The verified KModel can be loaded onto the device through the API provided by the K230 MicroPython SDK.
The deployment process typically includes the following steps:
Load kmodel;
Read image/audio and other input data;
Perform data preprocessing (such as scaling, normalization, channel arrangement, etc.);
Run model inference;
Perform result post-processing (such as classification decoding, bounding box filtering, etc.);
Draw/output inference results.
Different models may have different preprocessing and post-processing flows, and corresponding code logic needs to be manually adapted according to the specific model.
🏷️ Model Tuning:
After deployment, the model still needs to be tuned in terms of performance and effectiveness to adapt to the actual needs of edge scenarios. Optimization measures include but are not limited to:
Set more reasonable inference thresholds or output strategies;
Adjust model conversion parameters (such as quantization strategy, input resolution);
Improve model architecture or training hyperparameters;
Enrich and optimize datasets;
Optimize inference flow (such as thread scheduling, memory reuse).
Model tuning is a continuous iterative process that helps improve system stability, real-time performance, and energy efficiency.
The above six steps constitute the complete process of AI model deployment and inference on the K230 chip. Each step requires careful design and execution to ensure that the final application has good performance, stability, and user experience.
Training the Model#
Note
🤖 【Scenario Definition】: Implement “Recognition and Localization of Printed Numbers” on the K230 development board.
📌 Task Background: In many AI applications, we often encounter the need to “recognize certain things in images,” such as recognizing faces, objects in images, or like in this example, recognizing numbers. To better understand the basic process of object detection, we designed a simple small task——recognize the four types of numbers “0”, “1”, “2”, “3” printed on paper, and mark their positions in the image.
This task is not complicated, but it can completely practice the entire process from model deployment to image processing and result display. As an introductory tutorial, it helps everyone quickly master how to deploy AI models on the K230 platform, perform object detection, and display detection results on the screen.
🎯 Project Goal: Based on the Kendryte K230 AI SoC platform, develop a lightweight, high-performance visual recognition example that implements the following functions:
✅ Recognition categories: Only recognize the four categories of number characters “0”, “1”, “2”, “3”;
✅ Recognition target: Standard font numbers printed on paper;
✅ Localization function: Not only recognize number categories but also accurately obtain the position coordinates of each number in the image (draw bounding boxes), providing a foundation for subsequent processing or operations;
✅ Running platform: The application is deployed on the K230 development board, utilizing its AI hardware acceleration, camera input, and screen display capabilities to achieve on-device inference and real-time display.
🖼 Expected Effect:
Data Collection#
Note
👉 Collecting training data is actually very simple! You just need to first flash the MicroPython firmware onto the development board, then find the script——/sdcard/examples/16-AI-Cube/DataCollectionCamera.py, rename it to main.py, and put it in the /sdcard directory. Then power on again (that is, restart the board), and after running, press the key button on the board to start collecting! Each press takes a photo, and the images are automatically saved to the /sdcard/examples/data/ folder, completely without your intervention, super worry-free!
Before training the model, data collection is the first step in the entire workflow and is also a crucial step. High-quality data not only improves model performance but also enhances the model’s generalization ability in real application scenarios. Depending on different application requirements, data collection can be divided into general scenarios and dedicated scenarios, which will be described in detail below.
📌 Data Collection in General Scenarios
In general artificial intelligence tasks such as image classification, object detection, and semantic segmentation, existing public datasets can usually be used to build training samples. These datasets are organized and released by academic institutions, research organizations, or large enterprises, with good annotation quality and a wide range of application foundations.
For example, common public image datasets include: ImageNet, COCO, MNIST, Fashion-MNIST, CIFAR series, etc., or you can find open-source datasets for corresponding scenarios on the network.
Although public datasets are of high quality, appropriate screening and processing are still needed before actual use to ensure they meet project requirements:
Quality assurance processing: Remove blurry, incorrectly annotated, or low-quality samples.
Class balance: Ensure balanced sample sizes for each category to avoid model bias.
Format unification: Convert data to a unified format (such as JPEG, PNG, etc.).
Data augmentation: Expand data volume through rotation, cropping, flipping, adding noise, etc., to improve model robustness.
Build customized datasets: Sometimes a single dataset may not meet specific needs. You can build customized datasets that better fit business scenarios by combining multiple datasets and re-annotating and cleaning them.
📌 Data Collection in Dedicated Scenarios
For some special industries or specific application scenarios (such as industrial quality inspection, agricultural monitoring, security surveillance, medical diagnosis, etc.), it is often necessary to collect data specifically for that scenario. In this case, public datasets may not accurately reflect the data distribution of real environments, so customized data collection is needed.
In some specific AI deployment scenarios, you can directly use the K230 device for data collection when conditions permit. The collected data is closer to the actual deployment environment, helping to improve model performance on the device.
⚠️ Here are some data collection process recommendations:
Clarify collection goals: Define collection targets (such as object types, scenes), lighting conditions, angles, resolution, etc.
Clarify data tasks: Different tasks have different requirements for datasets. On one hand, you need to consider actual deployment scenarios; on the other hand, you need to consider task requirements. For example, classification tasks may require objects to occupy a large area, and large areas of background may affect classification results; while object detection can have multiple objects of different sizes.
Use appropriate tools: Use the K230 development board with a camera module, and you can write scripts for automatic collection.
Synchronize annotation information: Try to record label information synchronously during the collection process for later annotation.
Preliminary quality check: Eliminate invalid samples such as blurriness, overexposure, and serious occlusion.
Data Annotation#
Note
👉 After getting the collected images, you can start labeling them! According to the requirements of this task, you can use some common annotation tools, such as LabelImg, Labelme, or X-AnyLabeling, to add corresponding categories to the numbers in the images and draw target boxes. You can collect images yourself and annotate them manually, and the whole process is quite fun. Of course, if you don’t want to do it from scratch, we have carefully prepared a ready-made “0/1/2/3 four-category printed number recognition” dataset. Just click here to download: 0/1/2/3 four-category printed number recognition dataset. Saves time and effort, and you can directly start training!
Data annotation is one of the key steps in training a model. It involves annotating raw data so that the model can learn the features and patterns of the data. When performing data annotation, the following aspects need to be considered:
Annotation format: Select an annotation format suitable for the model, such as XML, JSON, TXT, etc.
Annotation tools: Select appropriate annotation tools, such as LabelImg, Labelme, X-AnyLabeling, VIA, etc.
Annotation quality: Ensure the accuracy and consistency of annotations, avoiding annotation errors.
Annotation strategy: Select appropriate annotation strategies based on task requirements and data characteristics, such as bounding box annotation, keypoint annotation, etc.
For common vision tasks, it is recommended to use X-AnyLabeling for annotation. Download link: X-AnyLabeling-release.
Model Training#
Note
👉 There are many methods for model training, among which the YOLO series is a particularly commonly used choice now, such as YOLOv5, YOLOv8, or YOLO11. We recommend you use YOLO for training because it has good results, fast speed, and an active community. Even better, the dataset we provide has been organized and can be directly used to train YOLO models! You just need to jump to this example: YOLO Detection Example, follow the process inside, and replace the dataset part in the example with our prepared “0/1/2/3 four-category printed number recognition dataset”. The goal of this section is to first train the model well and export it in ONNX format. There are more interesting contents waiting for you to unlock later!
Model training is the most important step in the entire AI workflow. It involves model construction, training, and optimization. When performing model training, the following aspects need to be considered:
Model selection: Select a suitable model based on task requirements and data characteristics.
Model construction: Build the network structure of the model, including input layer, hidden layer, and output layer.
Model training: Use annotated data for model training, including selecting appropriate loss functions and optimizers.
Model evaluation: Use the test set to evaluate the model, assessing model performance and generalization ability.
Model optimization: Based on model evaluation results, optimize the model to improve its performance and generalization ability.
The trained model needs to be converted into an onnx model or tflite model, preparing for subsequent use of nncase for model conversion to obtain a kmodel that can be inferred on K230.
Model Conversion#
After training is complete, we get an ONNX model file. However, this model cannot be run directly on the K230 using the KPU, because the KPU only supports the Kmodel format.
Therefore, next we need to use a compiler called nncase to “translate” the ONNX model into Kmodel, so that the KPU can understand and run it.
Let’s take a brief look at this key tool — nncase!
What is nncase#
Introduction to nncase#
nncase is a neural network compiler designed specifically for AI accelerators. Currently supported backends (targets) include: CPU, K210, K510, K230, and other platforms.
Core features provided by nncase
Supports multi-input multi-output network structures, compatible with common multi-branch model topologies;
Adopts a static memory allocation strategy, requiring no runtime heap memory dependency, with controllable resource usage;
Implements operator fusion and graph optimization, effectively reducing redundant computation and improving inference efficiency;
Supports floating-point (float) inference and fixed-point quantized inference (uint8/int8);
Supports Post-Training Quantization (PTQ), capable of generating efficient quantized models based on float models and calibration datasets;
The compiled model is a Flat Model structure, with Zero-Copy Loading capability, suitable for resource-constrained embedded scenarios.
Supported model formats
nncase supports the following model formats exported from mainstream deep learning frameworks:
TFLite (TensorFlow Lite)
ONNX (Open Neural Network Exchange)
You can use training frameworks such as PyTorch and TensorFlow to export models to the above formats, and then convert them to KModel via nncase for deployment on devices such as K230.
Architecture overview

The nncase software stack mainly consists of the following two major components:
Compiler: Converts TFLite or ONNX models exported by high-level frameworks into the KModel format suitable for target hardware platforms, and performs structural optimization, operator scheduling, and quantization processing;
Runtime: Loads and runs KModel on target devices (such as K230), combined with hardware acceleration units (such as the KPU) to achieve high-performance model inference.
🏷️ Compiler: Used to compile neural network models on a PC, ultimately generating kmodel files. It mainly includes modules such as importer, IR, Evaluator, Quantize, Transform optimization, Tiling, Partition, Schedule, Codegen, etc.
Importer: Imports models from other neural network frameworks into nncase;
IR: Intermediate Representation, divided into Neutral IR (device-independent) imported by the importer and Target IR (device-dependent) generated by lowering from Neutral IR;
Evaluator: The Evaluator provides interpretive execution capability for the IR, and is commonly used in scenarios such as Constant Folding/PTQ Calibration;
Transform: Used for IR conversion and graph traversal optimization;
Quantize: Post-training quantization, which adds quantization markers to the tensors to be quantized, calls the Evaluator for interpretive execution based on the input calibration set, collects the data range of tensors, inserts quantization/dequantization nodes, and finally optimizes to eliminate unnecessary quantization/dequantization nodes, etc.;
Tiling: Limited by the relatively small memory capacity of the NPU, large blocks of computation need to be split. In addition, when computation involves a large amount of data reuse, choosing Tiling parameters will affect latency and bandwidth;
Partition: Partitions the graph by ModuleType, and each subgraph after partitioning corresponds to a RuntimeModule. Different types of RuntimeModules correspond to different Devices (CPU/K230);
Schedule: Generates the computation order and allocates Buffers based on the data dependency relationships in the optimized graph;
Codegen: Calls the codegen corresponding to each ModuleType for each subgraph to generate RuntimeModules;
🏷️ Runtime: Integrated into user applications (App), providing model loading, input setting, inference execution, and output reading functions. The Runtime interface shields underlying hardware differences, allowing developers to focus more on integrating model inference logic and application development.
The Model Conversion chapter mainly introduces the usage of nncase compiler and simulator.
Installing the nncase Environment#
Setting up nncase in a Linux environment
First, please install .NET SDK 7.0 and configure the DOTNET_ROOT environment variable. Please note that it is not recommended to install dotnet in an Anaconda virtual environment, as this may cause compatibility issues.
sudo apt-get update
sudo apt-get install dotnet-sdk-7.0
export DOTNET_ROOT=/usr/share/dotnet
Next, install nncase and nncase-kpu via pip:
pip install nncase nncase-kpu
Setting up nncase in a Windows environment
First, install .NET SDK 7.0, please follow the official Microsoft documentation to complete the installation process.
Install the nncase library. You can install the main program nncase online via pip, and download the corresponding version of nncase_kpu from the GitHub Releases page, then install it offline using pip.
pip install nncase
# Please replace `2.x.x` with the actual downloaded version number.
pip install nncase_kpu-2.x.x-py2.py3-none-win_amd64.whl
Setting up the environment using Docker
If you have not configured a local Ubuntu environment, you can directly use the officially provided nncase Docker image. This image is based on Ubuntu 20.04, with Python 3.8 and dotnet-sdk-7.0 pre-installed, for quick startup.
cd /path/to/nncase_sdk
docker pull ghcr.io/kendryte/k230_sdk
docker run -it --rm -v `pwd`:/mnt -w /mnt ghcr.io/kendryte/k230_sdk /bin/bash
Viewing nncase version information
After entering the Python interactive environment, you can confirm the currently installed nncase version with the following command:
>>> import _nncase
>>> print(_nncase.__version__)
2.11.0
The example output is
2.11.0, please refer to the actually installed version.
Converting kmodel using nncase compiler#

The process of compiling kmodel mainly includes the following key steps, each of which has its specific purpose and technical considerations:
Set compilation options: The core purpose of this step is to adapt the model deployment to the target hardware platform. Since edge computing devices need to explicitly specify the running platform to ensure whether the generated kmodel needs to leverage hardware (kpu) acceleration. At the same time, configuring preprocessing parameters (such as input normalization parameters) into the kmodel internally can reduce computation overhead during inference and improve overall efficiency.
Initialize the compiler: The initialization of the nncase compiler is to build a standardized environment for subsequent conversion work. The compiler completes the initialization process based on the previously configured compilation options.
Import the original model: The ONNX/TFLite models generated by current mainstream training frameworks (such as TensorFlow/PyTorch) contain generic operators, but KPU, as a dedicated accelerator, requires specific operator formats. This step transforms the original model into an optimizable intermediate representation for the compiler through model parsing and operator transformation, laying the foundation for subsequent hardware-related optimization.
Quantization processing: This is a key step to improve edge-side inference performance. Although our trained FP32 model has high accuracy, it has problems such as high computation latency and high memory consumption. By quantizing to INT8/INT16: it significantly reduces model size, improves computation speed (utilizing hardware fixed-point acceleration instructions), and reduces power consumption (decreasing memory bandwidth requirements). Note that quantization introduces accuracy loss, so a calibration dataset is needed to help the model determine the range to which the weights and activation values of each layer should be mapped during the quantization process, in order to retain more information and reduce quantization errors. The quantization process requires configuring quantization parameters and calibration data. See Compilation Parameters Description for quantization parameters.
Compile and generate kmodel: Based on the aforementioned optimizations, the final generated kmodel is deeply optimized and can be directly deployed to K230 devices for efficient inference.
Conversion Example#
Let’s take the four-class printed digit recognition scenario as an example and convert the ONNX model obtained above into a Kmodel. Here is the compilation example script:
# Import required libraries
import os
import argparse
import numpy as np
from PIL import Image  # Used for image reading and processing
import onnxsim         # ONNX model simplification tool
import onnx            # ONNX model processing tool
import nncase          # nncase compiler SDK
import shutil
import math

def parse_model_input_output(model_file, input_shape):
    # Load the ONNX model
    onnx_model = onnx.load(model_file)

    # Get the names of all input nodes in the model
    input_all = [node.name for node in onnx_model.graph.input]

    # Get the parameters in the model that have been initialized (such as weights, etc.), which do not belong to input data
    input_initializer = [node.name for node in onnx_model.graph.initializer]

    # Real input = all inputs - initializers
    input_names = list(set(input_all) - set(input_initializer))

    # Extract real input tensors from the graph
    input_tensors = [node for node in onnx_model.graph.input if node.name in input_names]

    # Extract the name, data type, shape and other information of the input tensor
    inputs = []
    for _, e in enumerate(input_tensors):
        onnx_type = e.type.tensor_type
        input_dict = {}
        input_dict['name'] = e.name
        # Convert to NumPy data type
        input_dict['dtype'] = onnx.mapping.TENSOR_TYPE_TO_NP_TYPE[onnx_type.elem_type]
        # If a certain dimension is 0, it means the ONNX model has not fixed the shape, use the passed-in input_shape instead
        input_dict['shape'] = [(i.dim_value if i.dim_value != 0 else d) for i, d in zip(onnx_type.shape.dim, input_shape)]
        inputs.append(input_dict)

    return onnx_model, inputs

def onnx_simplify(model_file, dump_dir, input_shape):
    # Get the model and input shape information
    onnx_model, inputs = parse_model_input_output(model_file, input_shape)

    # Automatically infer missing shape information
    onnx_model = onnx.shape_inference.infer_shapes(onnx_model)

    # Construct the input shape mapping for onnxsim
    input_shapes = {input['name']: input['shape'] for input in inputs}

    # Simplify the model
    onnx_model, check = onnxsim.simplify(onnx_model, input_shapes=input_shapes)
    assert check, "Model simplification verification failed"

    # Save the simplified model
    model_file = os.path.join(dump_dir, 'simplified.onnx')
    onnx.save_model(onnx_model, model_file)
    return model_file

def read_model_file(model_file):
    with open(model_file, 'rb') as f:
        model_content = f.read()
    return model_content

def generate_data(shape, batch, calib_dir):
    # Get the paths of all images in the dataset
    img_paths = [os.path.join(calib_dir, p) for p in os.listdir(calib_dir)]
    data = []

    for i in range(batch):
        assert i < len(img_paths), "Insufficient calibration images"

        # Load the image and convert to RGB format
        img_data = Image.open(img_paths[i]).convert('RGB')

        # Resize according to the model input size
        img_data = img_data.resize((shape[3], shape[2]), Image.BILINEAR)

        # Convert to NumPy array
        img_data = np.asarray(img_data, dtype=np.uint8)

        # Convert to NCHW format
        img_data = np.transpose(img_data, (2, 0, 1))

        # Add batch dimension
        data.append([img_data[np.newaxis, ...]])

    return np.array(data)

def main():
    # Command line argument definition
    parser = argparse.ArgumentParser(prog="nncase")
    parser.add_argument("--target", default="k230", type=str, help='Compilation target, e.g., k230 or cpu')
    parser.add_argument("--model", type=str, help='Input ONNX model path')
    parser.add_argument("--dataset_path", type=str, help='PTQ calibration dataset path')
    parser.add_argument("--input_width", type=int, default=320, help='Model input width')
    parser.add_argument("--input_height", type=int, default=320, help='Model input height')
    parser.add_argument("--ptq_option", type=int, default=0, help='PTQ option: 0-5')

    args = parser.parse_args()

    # Input size aligned up to a multiple of 32 to meet hardware requirements
    input_width = int(math.ceil(args.input_width / 32.0)) * 32
    input_height = int(math.ceil(args.input_height / 32.0)) * 32
    input_shape = [1, 3, input_height, input_width]  # NCHW format

    # Create a temporary directory to save intermediate models
    dump_dir = 'tmp'
    if not os.path.exists(dump_dir):
        os.makedirs(dump_dir)

    # Simplify the model
    model_file = onnx_simplify(args.model, dump_dir, input_shape)

    # Compilation option settings
    compile_options = nncase.CompileOptions()
    compile_options.target = args.target                  # Specify target platform
    compile_options.preprocess = True                     # Enable preprocessing
    compile_options.swapRB = False                        # Do not swap RB channels
    compile_options.input_shape = input_shape             # Set input shape
    compile_options.input_type = 'uint8'                  # Input image data type
    compile_options.input_range = [0, 1]                  # Input image dequantization range
    compile_options.mean = [0, 0, 0]                      # Preprocessing mean
    compile_options.std = [1, 1, 1]                       # Set standard deviation to 1, no normalization
    compile_options.input_layout = "NCHW"                 # Input data format

    # Initialize the compiler
    compiler = nncase.Compiler(compile_options)

    # Import the ONNX model as IR
    model_content = read_model_file(model_file)
    import_options = nncase.ImportOptions()
    compiler.import_onnx(model_content, import_options)

    # PTQ option settings (post-training quantization)
    ptq_options = nncase.PTQTensorOptions()
    ptq_options.samples_count = 10  # Number of calibration samples

    # Support 6 quantization schemes (choose based on accuracy and performance trade-off)
    if args.ptq_option == 0:
        ptq_options.calibrate_method = 'NoClip'
        ptq_options.quant_type = 'uint8'
        ptq_options.w_quant_type = 'uint8'
    elif args.ptq_option == 1:
        ptq_options.calibrate_method = 'NoClip'
        ptq_options.quant_type = 'uint8'
        ptq_options.w_quant_type = 'int16'
    elif args.ptq_option == 2:
        ptq_options.calibrate_method = 'NoClip'
        ptq_options.quant_type = 'int16'
        ptq_options.w_quant_type = 'uint8'
    elif args.ptq_option == 3:
        ptq_options.calibrate_method = 'Kld'
        ptq_options.quant_type = 'uint8'
        ptq_options.w_quant_type = 'uint8'
    elif args.ptq_option == 4:
        ptq_options.calibrate_method = 'Kld'
        ptq_options.quant_type = 'uint8'
        ptq_options.w_quant_type = 'int16'
    elif args.ptq_option == 5:
        ptq_options.calibrate_method = 'Kld'
        ptq_options.quant_type = 'int16'
        ptq_options.w_quant_type = 'uint8'

    # Set PTQ calibration data
    ptq_options.set_tensor_data(generate_data(input_shape, ptq_options.samples_count, args.dataset_path))

    # Apply PTQ
    compiler.use_ptq(ptq_options)

    # Compile the model
    compiler.compile()

    # Export the KModel file
    base, ext = os.path.splitext(args.model)
    kmodel_name = base + ".kmodel"
    with open(kmodel_name, 'wb') as f:
        f.write(compiler.gencode_tobytes())

# Python program main entry
if __name__ == '__main__':
    main()
Save the above code as the to_kmodel.py script, and use the following conversion command to complete the compilation:
# You need to replace the onnx model with your trained model
python to_kmodel.py --target k230 --model best.onnx --dataset_path test --input_width 320 --input_height 320 --ptq_option 0
Through the above code, we have successfully obtained the Kmodel model for recognizing four classes of digits. You may be curious: In the process of converting the model to Kmodel, what exactly do those parameters used mean? If I want to change a model for conversion in the future, do I need to change the parameters as well? Don’t worry, the following chapters will guide you through the specific meaning of these conversion parameters, and teach you how to correctly configure them when converting other models, guiding you step by step without getting lost!
Compilation Parameters Description#
Using nncase compiler to convert tflite/onnx models to kmodel, the key to the model conversion code is to configure the options according to your own needs, mainly CompileOptions, PTQTensorOptions, and ImportOptions.
The nncase user guide document can be found at: github: user_guide or gitee: user_guide.
Compilation Options CompileOptions
The CompileOptions class is used to configure nncase compilation options. The description of each property is as follows:
Property Name |
Type |
Required |
Description |
|---|---|---|---|
target |
string |
Yes |
Specify the compilation target, e.g., ‘cpu’, ‘k230’ |
dump_ir |
bool |
No |
Specify whether to dump IR, default is False |
dump_asm |
bool |
No |
Specify whether to dump asm assembly file, default is False |
dump_dir |
string |
No |
After specifying the switches such as dump_ir above, specify the dump directory here, default is “” |
input_file |
string |
No |
When the ONNX model exceeds 2GB, used to specify the parameter file path, default is “” |
preprocess |
bool |
No |
Whether to enable preprocessing, default is False. The following parameters only take effect when |
input_type |
string |
No |
Specify the input data type when preprocessing is enabled, default is “float”. When |
input_shape |
list[int] |
No |
Specify the input data shape when preprocessing is enabled, default is []. It must be specified when |
input_range |
list[float] |
No |
Specify the floating-point range of the input data after dequantization when preprocessing is enabled, default is [ ]. It must be specified when |
input_layout |
string |
No |
Specify the layout of the input data, default is “” |
swapRB |
bool |
No |
Whether to reverse the data in the |
mean |
list[float] |
No |
Preprocessing normalization parameter mean, default is [0,0,0] |
std |
list[float] |
No |
Preprocessing normalization parameter variance, default is [1,1,1] |
letterbox_value |
float |
No |
Specify the padding value of the preprocessing letterbox, default is 0 |
output_layout |
string |
No |
Specify the layout of the output data, default is “” |
shape_bucket_enable |
bool |
Yes |
Whether to enable the ShapeBucket function, default is False. Takes effect when |
shape_bucket_range_info |
Dict[str, [int, int]] |
Yes |
The range of variables in each input shape dimension information, the minimum value must be greater than or equal to 1 |
shape_bucket_segments_count |
int |
Yes |
The range of input variables is divided into several segments |
shape_bucket_fix_var_map |
Dict[str, int] |
No |
Fix the variable in the shape dimension information to a specific value |
For the configuration description of preprocessing, please refer to the API documentation: nncase Model Compilation API Manual Preprocessing Flow. Encapsulating part of the preprocessing operations inside the model can improve the preprocessing efficiency during inference on the development board. The supported preprocessing includes: swapRB(RGB->BGR or BGR->RGB), Transpose(NHWC->NCHW or NCHW->NHWC), Normalization (subtract mean and divide by variance), Dequantize, etc. For example: the onnx model requires the input to be RGB, but the image we read using opencv is BGR. Normally, the preprocessing for onnx model inference requires us to first convert BGR to RGB for use by the onnx model. When converting to kmodel, we can set swapRB to True, so that the kmodel itself contains the preprocessing step of swapping the RB channel. When performing the preprocessing of kmodel inference, we can ignore the step of swapping the RB channel and put this step inside the kmodel.
Import Options ImportOptions
The ImportOptions class is used to configure nncase import options and configure the model to be converted by the compiler. tflite/onnx can be configured. The usage example is as follows:
# Read and import the tflite model
model_content = read_model_file(model)
compiler.import_tflite(model_content, import_options)

# Read and import the onnx model
model_content = read_model_file(model)
compiler.import_onnx(model_content, import_options)
Post-Training Quantization Options PTQTensorOptions
The PTQTensorOptions class is used to configure nncase PTQ options:
Name |
Type |
Required |
Description |
|---|---|---|---|
samples_count |
int |
No |
Specify the number of calibration sets used for quantization |
calibrate_method |
string |
No |
Specify the quantization method, optional ‘NoClip’ or ‘Kld’, default is ‘Kld’ |
finetune_weights_method |
string |
No |
Specify whether to fine-tune the weights, optional ‘NoFineTuneWeights’ or ‘UseSquant’, default is ‘NoFineTuneWeights’ |
quant_type |
string |
No |
Specify the data quantization type, optional ‘uint8’, ‘int8’, ‘int16’, |
w_quant_type |
string |
No |
Specify the weight quantization type, optional ‘uint8’, ‘int8’, ‘int16’, |
quant_scheme |
string |
No |
Path to the imported quantization parameter configuration file |
quant_scheme_strict_mode |
bool |
No |
Whether to strictly perform quantization according to quant_scheme |
export_quant_scheme |
bool |
No |
Whether to export the quantization parameter configuration file |
export_weight_range_by_channel |
bool |
No |
Whether to export weights quantization parameters in |
For the specific usage flow of mixed quantization, see MixQuant Description.
For the configuration description of quantization, please refer to the table above. If the converted kmodel does not achieve the desired effect, you can modify the quant_type and w_quant_type parameters to change the quantization types of the model data and weights, but these two parameters cannot be set to int16 at the same time.
Quantization Calibration Set Settings
Name |
Type |
Description |
|---|---|---|
data |
List[List[np.ndarray]] |
Read calibration data |
The calibration data used in the quantization process is set through the set_tensor_data method. The interface parameter type is List[List[np.ndarray]]. For example: if the model has one input and the calibration data amount is set to 10, the dimension of the passed-in calibration data is [10,1,3,320,320]; if the model has two inputs and the calibration data amount is set to 10, the dimension of the passed-in calibration data is [[10,1,3,224,224],[10,1,3,320,320]].
Using the nncase Simulator to Verify Conversion Results#
Earlier we discussed how to convert a model into a Kmodel. Now we’re going to “check up” on this model to see whether the conversion went well!
Since ONNX and Kmodel may differ in preprocessing, we need to prepare input data according to each model’s own requirements. Then, run inference using both the ONNX model and the Kmodel, save the results, and compute the Cosine Similarity between them—this is essentially comparing how “similar” their outputs are.
In a nutshell: we want to see whether the converted Kmodel produces outputs similar to those of the original ONNX model. If the difference is too large, it suggests there may be issues during the conversion process, and we should go back and check the parameter settings~
After a successful model conversion, you can use nncase.Simulator to load the Kmodel locally on a PC for inference, and judge whether the Kmodel’s output is correct by calculating the cosine similarity between the ONNX model and the Kmodel. Note that this process runs on the local computer, not on the k230 development board.
First, you need to install the ONNX-related packages in the Python environment:
pip install onnx==1.15.0
pip install onnxruntime==1.19.0
pip install onnxsim==0.4.36
To execute the simulator inference script, you need to add the nncase plugin environment variable:
linux:
# The paths in the commands below refer to the Python environment path where nncase is installed. Please adapt them to your environment.
export NNCASE_PLUGIN_PATH=$NNCASE_PLUGIN_PATH:/usr/local/lib/python3.9/site-packages/
export PATH=$PATH:/usr/local/lib/python3.9/site-packages/
source /etc/profile
windows:
Add the Lib/site-packages path under the Python environment where nncase is installed to the system environment variable Path.
For the 4-class printed digit recognition scenario, here is example code for verifying output similarity:
import os
import cv2
import numpy as np
import onnxruntime as ort
import nncase
import math

def get_onnx_input(img_path,mean,std,model_input_size):
    # Read the image; image data is generally RGB three-channel, with color range [0, 255.0]
    image_fp32=cv2.imread(img_path)
    # If the model input requires RGB, convert to RGB; if it requires BGR, no conversion is needed
    image_fp32=cv2.cvtColor(image_fp32, cv2.COLOR_BGR2RGB)
    # Resize to the model input size
    image_fp32 = cv2.resize(image_fp32, (model_input_size[0], model_input_size[1]))
    # Data type is float32
    image_fp32 = np.asarray(image_fp32, dtype=np.float32)
    # Data normalization: first normalize to [0,1], then subtract the mean and divide by the standard deviation
    image_fp32/=255.0
    for i in range(3):
        image_fp32[:, :, i] -= mean[i]
        image_fp32[:, :, i] /= std[i]
    # Arrange as NCHW or NHWC according to the model input requirements
    image_fp32 = np.transpose(image_fp32, (2, 0, 1))
    return image_fp32.copy()

def get_kmodel_input(img_path,mean,std,model_input_size):
    # Read the image; image data is generally RGB three-channel, with color range [0, 255.0]
    image_uint8=cv2.imread(img_path)
    # If the model input requires RGB, convert to RGB; if it requires BGR, no conversion is needed
    image_uint8=cv2.cvtColor(image_uint8, cv2.COLOR_BGR2RGB)
    # Resize to the model input size
    image_uint8 = cv2.resize(image_uint8, (model_input_size[0], model_input_size[1]))
    # Data type is uint8; since preprocessing was enabled during the Kmodel conversion and standardization parameters were set, standardization is not needed here for the input
    image_uint8 = np.asarray(image_uint8, dtype=np.uint8)
    # Arrange as NCHW or NHWC according to the model input requirements
    image_uint8 = np.transpose(image_uint8, (2, 0, 1))
    return image_uint8.copy()

def onnx_inference(onnx_path,onnx_input_data):
    # Create ONNX inference session (load the model)
    ort_session = ort.InferenceSession(onnx_path)
    # Get the list of output names for subsequent inference calls
    output_names = []
    model_outputs = ort_session.get_outputs()
    for i in range(len(model_outputs)):
        output_names.append(model_outputs[i].name)

    # Get the model's input information
    model_input = ort_session.get_inputs()[0]             # The first input (usually there is only one)
    model_input_name = model_input.name                   # Input name (key)
    model_input_type = np.float32                         # Input data type; assumed to be float32 here
    model_input_shape = model_input.shape                 # Input tensor shape (dimensions)

    # Process input data; ensure it matches the model's input shape
    model_input_data = onnx_input_data.astype(model_input_type).reshape(model_input_shape)

    # Run inference, passing in the input name and data, returning all output results
    onnx_results = ort_session.run(output_names, { model_input_name : model_input_data })
    return onnx_results

def kmodel_inference(kmodel_path,kmodel_input_data,model_input_size):
    # Initialize the nncase simulator
    sim = nncase.Simulator()
    # Read the Kmodel
    with open(kmodel_path, 'rb') as f:
        kmodel = f.read()
    # Load the Kmodel
    sim.load_model(kmodel)
    # Read input data
    input_shape = [1, 3, model_input_size[1], model_input_size[0]]
    dtype = sim.get_input_desc(0).dtype
    # Process input data; ensure it matches the model's input shape
    kmodel_input = kmodel_input_data.astype(dtype).reshape(input_shape)
    # Set the simulator's input tensor; this is a single input
    sim.set_input_tensor(0, nncase.RuntimeTensor.from_numpy(kmodel_input))
    # Simulator runs inference on the Kmodel
    sim.run()
    # Get inference outputs
    kmodel_results = []
    for i in range(sim.outputs_size):
        kmodel_result = sim.get_output_tensor(i).to_numpy()  # Convert to a numpy array
        kmodel_results.append(kmodel_result)  # Save to the list
    return kmodel_results

def cosine_similarity(onnx_results,kmodel_results):
    output_size=len(kmodel_results)
    # Flatten each output to one dimension, then compute cosine similarity
    for i in range(output_size):
        onnx_i=np.reshape(onnx_results[i], (-1))
        kmodel_i=np.reshape(kmodel_results[i], (-1))
        cos = (onnx_i @ kmodel_i) / (np.linalg.norm(onnx_i, 2) * np.linalg.norm(kmodel_i, 2))
        print('output {0} cosine similarity : {1}'.format(i, cos))
    return

if __name__ == '__main__':
    img_path="test.jpg"
    mean=[0,0,0]
    std=[1,1,1]
    model_input_size=[320,320]
    # ONNX model file
    onnx_model = "best.onnx"
    # Kmodel file
    kmodel_path="best.kmodel"
    # Generate ONNX model input data
    onnx_input_data = get_onnx_input(img_path,mean,std,model_input_size)
    # Generate Kmodel input data
    kmodel_input_data = get_kmodel_input(img_path,mean,std,model_input_size)
    # ONNX model inference
    onnx_results = onnx_inference(onnx_model,onnx_input_data)
    # Kmodel inference
    nncase_results = kmodel_inference(kmodel_path,kmodel_input_data,model_input_size)
    # Compute output similarity
    cosine_similarity(onnx_results,nncase_results)
Save the above code into a file, replace the model in the code with your own converted model, and run the script to obtain output similar to the following:
output 0 cosine similarity : 0.9995334148406982
Generally, we consider the model conversion successful and deployable in real-world scenarios when the similarity is greater than 0.99.
Generating Input Data#
⚠️ Note: When running inference with the ONNX model and the KModel, you must carefully handle the preprocessing steps for the input data. If the KModel has already encapsulated certain preprocessing operations, you do not need to manually perform these preprocessing steps on its input data before inference. However, when running inference with the ONNX model, all necessary preprocessing steps must be explicitly performed outside the model.
The preprocessing operations supported and encodable by KModel include:
Channel order conversion (e.g., RGB ↔ BGR), corresponding to the
SwapRBparameter;Layout conversion (NCHW ↔ NHWC), corresponding to the
input_shapeandinput_layoutparameters;Data standardization processing, depending on the
meanandstdparameters;Input dequantization processing, depending on the
input_typeandinput_rangeparameters;
Refer to the following flowchart for the differences between the ONNX and KModel inference processes:

When running inference with the ONNX model, since it contains no preprocessing logic internally, the user must complete all required preprocessing steps before input.
For the KModel, if the preprocess option was enabled during model compilation, the related preprocessing operations will be automatically encapsulated inside the model, and the user no longer needs to perform them manually at inference time.
If preprocess was not enabled, its usage is the same as the ONNX model: all preprocessing still needs to be completed outside the model.
Based on the above flow, developers can construct inference data that conforms to the input specifications according to the model’s requirements for use during inference. Please note: the data generation process must strictly comply with the model’s requirements, and input processing flows may vary significantly between different models; they cannot be mixed.
The following is example code for data preprocessing:
def get_onnx_input(img_path,mean,std,model_input_size):
    # Read the image; image data is generally RGB three-channel, with color range [0, 255.0]
    image_fp32=cv2.imread(img_path)
    # If the model input requires RGB, convert to RGB; if it requires BGR, no conversion is needed
    image_fp32=cv2.cvtColor(image_fp32, cv2.COLOR_BGR2RGB)
    # Resize to the model input size
    image_fp32 = cv2.resize(image_fp32, (model_input_size[0], model_input_size[1]))
    # Data type is float32
    image_fp32 = np.asarray(image_fp32, dtype=np.float32)
    # Data normalization: first normalize to [0,1], then subtract the mean and divide by the standard deviation
    image_fp32/=255.0
    for i in range(3):
        image_fp32[:, :, i] -= mean[i]
        image_fp32[:, :, i] /= std[i]
    # Arrange as NCHW or NHWC according to the model input requirements
    image_fp32 = np.transpose(image_fp32, (2, 0, 1))
    return image_fp32.copy()

def get_kmodel_input(img_path,mean,std,model_input_size):
    # Read the image; image data is generally RGB three-channel, with color range [0, 255.0]
    image_uint8=cv2.imread(img_path)
    # If the model input requires RGB, convert to RGB; if it requires BGR, no conversion is needed
    image_uint8=cv2.cvtColor(image_uint8, cv2.COLOR_BGR2RGB)
    # Resize to the model input size
    image_uint8 = cv2.resize(image_uint8, (model_input_size[0], model_input_size[1]))
    # Data type is uint8; since preprocessing was enabled during the Kmodel conversion and standardization parameters were set, standardization is not needed here for the input
    image_uint8 = np.asarray(image_uint8, dtype=np.uint8)
    # Arrange as NCHW or NHWC according to the model input requirements
    image_uint8 = np.transpose(image_uint8, (2, 0, 1))
    return image_uint8.copy()
When running inference with the ONNX model and the KModel, there are several key differences in input data preprocessing, mainly reflected in the following aspects:
Standardization processing: The ONNX model itself does not contain any preprocessing logic, so its input data must be standardized externally (e.g., subtract the mean and divide by the standard deviation). For the KModel, if normalization parameters (such as
meanandstd) were configured during model conversion, this standardization operation will be encapsulated inside the model, and no repetition is needed before inference.Data type differences: The ONNX model’s input is typically of type
float32, while the KModel’s input type depends on theinput_type(e.g.,uint8) andinput_rangespecified during model conversion. The KModel performs dequantization internally during inference, converting the integer type back to an approximate floating-point representation.Channel order processing: If
SwapRBwas not enabled during model conversion (i.e., the parameter isFalse), the input image’s channel order needs to be converted from BGR to RGB during external preprocessing. IfSwapRB=True, this channel conversion operation will be handled automatically inside the KModel, and does not need to be performed externally.
In summary, the external preprocessing required by the ONNX model equals the KModel’s external preprocessing plus its internal preprocessing. The relationship between the two can be expressed as follows:
ONNX model external preprocessing = KModel external preprocessing + KModel internal preprocessing
Loading the ONNX Model and Running Inference#
First, use the ONNX model to complete inference and obtain the ONNX model’s inference results. Example code is as follows:
def onnx_inference(onnx_path,onnx_input_data):
    # Create ONNX inference session (load the model)
    ort_session = ort.InferenceSession(onnx_path)
    # Get the list of output names for subsequent inference calls
    output_names = []
    model_outputs = ort_session.get_outputs()
    for i in range(len(model_outputs)):
        output_names.append(model_outputs[i].name)

    # Get the model's input information
    model_input = ort_session.get_inputs()[0]             # The first input (usually there is only one)
    model_input_name = model_input.name                   # Input name (key)
    model_input_type = np.float32                         # Input data type; assumed to be float32 here
    model_input_shape = model_input.shape                 # Input tensor shape (dimensions)

    # Process input data; ensure it matches the model's input shape
    model_input_data = onnx_input_data.astype(model_input_type).reshape(model_input_shape)

    # Run inference, passing in the input name and data, returning all output results
    onnx_results = ort_session.run(output_names, { model_input_name : model_input_data })
    return onnx_results
Loading the Kmodel and Running Inference#
Then, use the successfully converted Kmodel for inference to obtain the Kmodel’s inference results. Example code is as follows:
def kmodel_inference(kmodel_path,kmodel_input_data,model_input_size):
    # Initialize the nncase simulator
    sim = nncase.Simulator()
    # Read the Kmodel
    with open(kmodel_path, 'rb') as f:
        kmodel = f.read()
    # Load the Kmodel
    sim.load_model(kmodel)
    # Read input data
    input_shape = [1, 3, model_input_size[1], model_input_size[0]]
    dtype = sim.get_input_desc(0).dtype
    # Process input data; ensure it matches the model's input shape
    kmodel_input = kmodel_input_data.astype(dtype).reshape(input_shape)
    # Set the simulator's input tensor; this is a single input
    sim.set_input_tensor(0, nncase.RuntimeTensor.from_numpy(kmodel_input))
    # Simulator runs inference on the Kmodel
    sim.run()
    # Get inference outputs
    kmodel_results = []
    for i in range(sim.outputs_size):
        kmodel_result = sim.get_output_tensor(i).to_numpy()  # Convert to a numpy array
        kmodel_results.append(kmodel_result)  # Save to the list
    return kmodel_results
Computing the Cosine Similarity of the Outputs#
After obtaining the inference results from both the ONNX model and the Kmodel, compute the cosine similarity for each output one by one. Generally, when the similarity is above 0.99, the model conversion can be considered successful and the model is deployable. Example code is as follows:
def cosine_similarity(onnx_results,kmodel_results):
    output_size=len(kmodel_results)
    # Flatten each output to one dimension, then compute cosine similarity
    for i in range(output_size):
        onnx_i=np.reshape(onnx_results[i], (-1))
        kmodel_i=np.reshape(kmodel_results[i], (-1))
        cos = (onnx_i @ kmodel_i) / (np.linalg.norm(onnx_i, 2) * np.linalg.norm(kmodel_i, 2))
        print('output {0} cosine similarity : {1}'.format(i, cos))
    return
Model Deployment#
Note
👉 Earlier we converted and validated the kmodel. The next step is of course — let’s get it running on the board! In this chapter, we’ll discuss how to load the model and perform inference using the nncase runtime API in the K230 MicroPython environment.
So here’s the question: we have the model, but how do we prepare the input data? We need to process the input image according to the model’s “taste”, such as size, format, normalization, etc., to make sure it can “eat” correctly. Then we feed the processed data in and let the model start inference. After inference, the model gives us a bunch of “output results” — what do they mean? We need to parse them, for example to extract the class, coordinates, and other useful information.
Finally, of course, we won’t keep it to ourselves! We’ll display the recognized content on the screen, such as drawing boxes and labeling numbers, so that the entire process — from image acquisition, model inference, to result display — flows smoothly as a complete pipeline!
This chapter will walk you through this complete process and make the model really come “alive”~
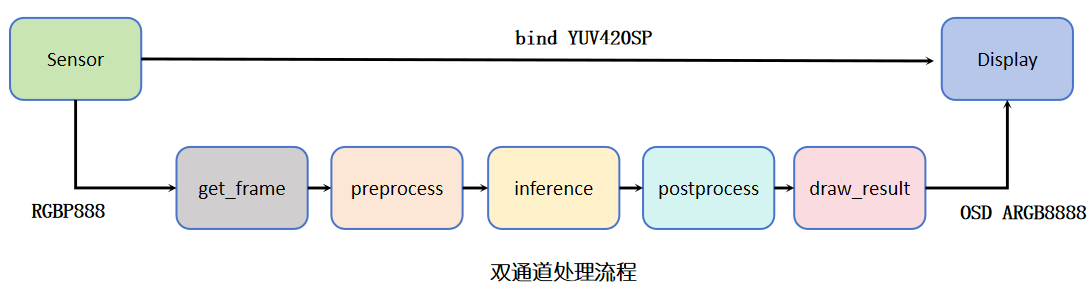
For a practical AI program, it includes not only model inference, but also image input, pre- and post-processing programs, result display, and other different modules. The figure below shows a complete block diagram of a typical AI application:
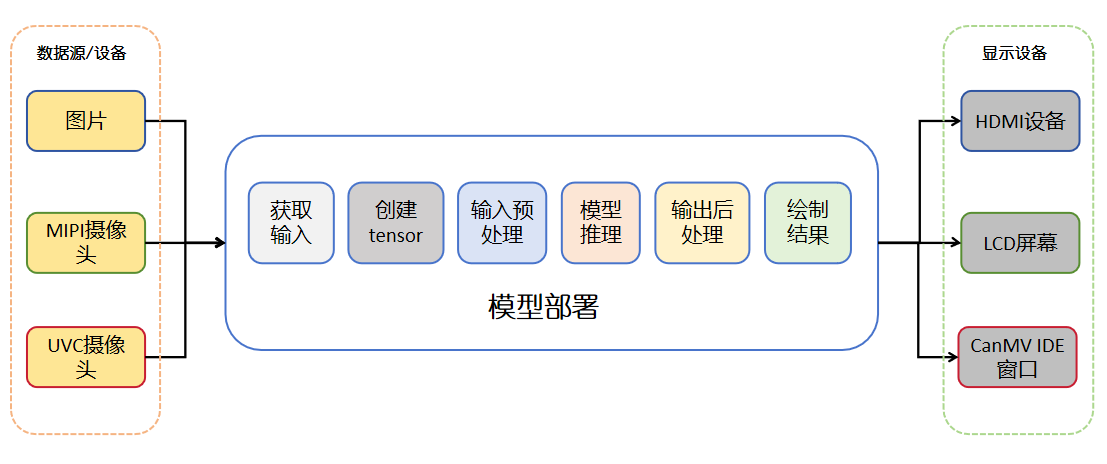
🚀 Deployment Process Explanation: Deployment can be understood as the process of “making the model truly work”. Below we introduce it step by step following the process.
1️⃣ Acquire Image Data (Input Data Source) We first need to get an image, usually captured in real-time from a camera, or we can load a test image locally. After getting the image, we will get an Image object. On the K230 development board, you usually get the image through sensor.snapshot().
2️⃣ Construct Input Tensor (Prepare Data to Feed the Model)
Once we have the image, we need to “package” it into a format the model can process — nncase_runtime.runtime_tensor. This step is to feed the model a standard structured data.
3️⃣ Preprocessing (ai2d Module) The model has specific requirements for the input image, such as size, format, channel order, etc. In this step, we use the ai2d module to process the image tensor into the “look” the model requires.
4️⃣ Model Inference (Using the KPU Inference Module) After the image is processed, it is fed into the KPU (K230’s neural network acceleration module) for inference. The KPU returns a result tensor, which contains the model’s output, such as detection boxes, classification probabilities, etc.
5️⃣ Postprocessing (Extract Useful Information) The KPU output is a bunch of numbers, and we need to parse out the “good stuff”. For example, what number was recognized? Where is the box on the image? These all need to be handled by postprocessing algorithms. For YOLO models, postprocessing includes confidence filtering, NMS (non-maximum suppression), etc.
6️⃣ Display Recognition Results (Visualization) The last step is to “draw” out the recognized content! We can draw detection boxes, numeric labels, etc. on the screen to make the results clear at a glance. Generally, two layers are used for display: one is the original image, and the other is the recognition result (such as boxes and numbers). Overlaying them ensures a clearer and more flexible display.
Summary: The core process of deployment is: get image → process into input → feed to model → get result → interpret result → display it! Once this process runs through, your model is truly “online and working”! 🎉
💡 Firmware Introduction: Please download the latest PreRelease firmware from github according to your development board type to ensure that the latest features are supported! Or compile the firmware yourself using the latest code, see the tutorial: Firmware Compilation.
Get Input and Create Tensor#
As we mentioned earlier, once the model is up and running, it needs input data to start inference, right? So where does this image data come from? In this section, we’ll talk about — how the image comes about, and how it is step by step transformed into a format the model can “eat”!
There are actually three ways to get an image: you can use a local image pre-placed on the board (such as a test image you copied in advance), you can use the on-board MIPI camera to capture real-time images, or you can connect a UVC camera to get images. No matter which method you choose, in the end we all need to get an Image object — this is like the “raw material”.
After getting the image, we can’t feed it directly to the model. It needs to be “processed” in between! We’ll use ulab.numpy.ndarray to convert the image into an array format, through which we can view information such as the channel order of the data.
Finally, we use the API provided by the nncase_runtime module to convert this array into a tensor. At this point the data is “packaged” and can be safely sent into the model for inference!
So what is a tensor? You can think of it as the “language” the model can understand — it’s like a box that holds data. What the model takes in is a tensor, and what it spits out after inference is also a tensor. In the nncase_runtime module, this is encapsulated as runtime_tensor. As long as you construct it as required, you can use it directly — very convenient.
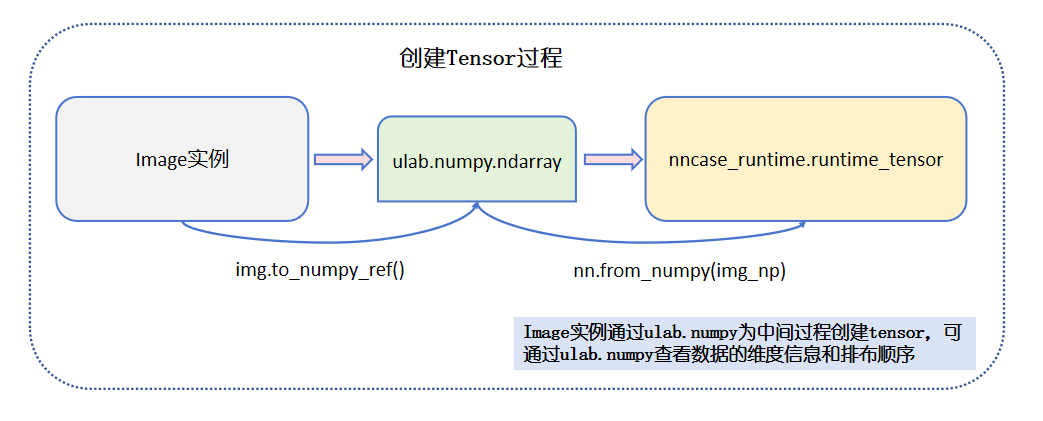
The figure above illustrates the process of acquiring the input image and creating a tensor. The model inference input is of type nncase_runtime runtime_tensor, which can be created from ulab.numpy.ndarray data. The ulab.numpy.ndarray data can come from an Image instance, and an Image instance can come from the following three sources:
Image file
MIPI camera
UVC camera
This section provides a detailed introduction to these three input data sources.
Image File Input#
Read an image from the development board, create an Image instance, and convert the Image instance to the nncase_runtime tensor type. The example code is as follows:
import os,sys
import nncase_runtime as nn
import ulab.numpy as np
import time,image,random,gc

# Please copy the test image to the data directory of the development board yourself
img_path="/data/test.jpg"

# Create an Image instance using the image, type is jpeg
img_data = image.Image(img_path)
print(img_data)
# Convert the image data into an Image instance of rgb888 format, this type of data has three RGB channels, with color range [0,255]
img_rgb888=img_data.to_rgb888()
print(img_rgb888)
# Convert the Image instance to ulab.numpy.ndarray type, this data is of HWC type
img_hwc=img_rgb888.to_numpy_ref()
print(img_hwc.shape)
# Get the shape of HWC layout, use the transpose method of ulab.numpy to convert HWC to CHW layout
shape=img_hwc.shape
img_tmp = img_hwc.reshape((shape[0] * shape[1], shape[2]))
img_trans = img_tmp.transpose()
img_tmp=img_trans.copy()
img_chw=img_tmp.reshape((shape[2],shape[0],shape[1]))
print(img_chw.shape)
# Use chw data to create nncase_runtime runtime_tensor, which can be used for kmodel inference
input_tensor=nn.from_numpy(img_chw)
print(type(input_tensor))
The IDE print information of the above code is as follows:
{"w":1024, "h":1024, "type":"jpeg", "size":200610}
{"w":1024, "h":1024, "type":"rgb888", "size":3145728}
(1024, 1024, 3)
(3, 1024, 1024)
<class 'runtime_tensor'>
MIPI Video Stream Input#
The k230 Sensor module is responsible for image acquisition and data processing, and supports MIPI interface cameras. The MIPI camera can collect image data through the Sensor module. The Sensor module supports multi-channel image capture, and can convert the collected image data into nncase_runtime runtime_tensor type for kmodel inference. For the configuration and use of the Sensor module, please refer to the Sensor API Documentation.
🏷️ Single-Channel Image Capture
Each MIPI camera can output up to 3 image channels (each channel can have different resolutions or different formats). Here we use one channel output as an example, and the data processing flow chart is shown in the figure below:

The input data in the model inference process can also come from the video stream of the MIPI camera. In order to ensure that the output data is in CHW layout, we generally specify the camera output data format as Sensor.RGBP888. The code is as follows:
import os,sys
from media.sensor import *
from media.media import *
import nncase_runtime as nn
import ulab.numpy as np
import time,image,random,gc

#-----------------------------Sensor initialization part-------------------------------
# Define AI inference frame resolution
AI_RGB888P_WIDTH = ALIGN_UP(1280, 16)
AI_RGB888P_HEIGHT = 720

sensor = Sensor()
sensor.reset()
# Set horizontal mirror and vertical flip. The orientation differs across boards; configure these two parameters to make the image upright
#sensor.set_hmirror(False)
#sensor.set_vflip(False)

# Configure the multi-channel image output of sensor. The output format and resolution of each channel can be different, and up to three channels can be output. Refer to the sensor API documentation
# Channel 1 is given to AI for algorithm processing, the format is RGB888P
sensor.set_framesize(width = AI_RGB888P_WIDTH , height = AI_RGB888P_HEIGHT, chn=CAM_CHN_ID_1)
# Set the output format of channel 1
sensor.set_pixformat(Sensor.RGBP888, chn=CAM_CHN_ID_1)

# MediaManager initialization
MediaManager.init()
# Start sensor
sensor.run()
while True:
    #------------------------Dump a frame of image from the camera and process it----------------------------------
    print("-----------------------------------")
    # Dump a frame of RGB888P format Image from camera channel 1
    img=sensor.snapshot(chn=CAM_CHN_ID_1)
    print(img)
    # Convert to ulab.numpy.ndarray format data, CHW
    img_np=img.to_numpy_ref()
    print(img_np.shape)
    # Create nncase_runtime.runtime_tensor for subsequent preprocessing
    runtime_tensor=nn.from_numpy(img_np)
    print(type(runtime_tensor))
    print("-----------------------------------")

sensor.stop()
time.sleep_ms(50)
MediaManager.deinit()
nn.shrink_memory_pool()
The serial output of CanMV IDE is:
-----------------------------------
{"w":1280, "h":720, "type":"rgbp888", "size":2764800}
(3, 720, 1280)
<class 'runtime_tensor'>
-----------------------------------
-----------------------------------
{"w":1280, "h":720, "type":"rgbp888", "size":2764800}
(3, 720, 1280)
<class 'runtime_tensor'>
-----------------------------------
🏷️ Dual-Channel Image Capture
When performing AI model inference on edge devices, the inference process usually takes a relatively long time due to the large amount of model computation, ranging from a few milliseconds to hundreds of milliseconds. If a single-channel processing flow is used:
Image acquisition → Format conversion → Data preprocessing → Model inference → Result postprocessing → Original image drawing → Image display
This serial execution method will cause high image display latency. Especially when the model is large or system resources are limited, the frame update becomes noticeably slower, affecting the user experience.
To solve this problem, it is recommended to use a dual-channel processing architecture, that is, an asynchronous processing strategy of “one channel for real-time display, the other channel for model inference”. This architecture processes image acquisition and model inference in parallel, effectively reducing display latency and improving picture smoothness. The dual-channel processing mechanism is as follows:
Display Channel: Directly captures images and pushes them to the screen for low-latency real-time image display.
Inference Channel: Independently captures images and executes the complete AI inference process (including format conversion, preprocessing, model inference, and postprocessing).
OSD Layer Composition: The model inference results (such as detection boxes, key points, etc.) are drawn as an OSD layer, and then composited with the original image through hardware overlay before being output for display.
Although there will be a certain visual delay in the inference results (i.e., the detection box of the previous frame is displayed on the current frame image), the overall picture continuity is better and the user experience is smoother.
The code is as follows:
import os,sys
from media.sensor import *
from media.display import *
from media.media import *
import nncase_runtime as nn
import ulab.numpy as np
import time,image,random,gc

#-----------------------------Sensor/Display initialization part-------------------------------

# Define screen display resolution
DISPLAY_WIDTH = ALIGN_UP(800, 16)
DISPLAY_HEIGHT = 480

# Define AI inference frame resolution
AI_RGB888P_WIDTH = ALIGN_UP(1280, 16)
AI_RGB888P_HEIGHT = 720

sensor = Sensor()
sensor.reset()
# Set horizontal mirror and vertical flip. The orientation differs across boards; configure these two parameters to make the image upright
#sensor.set_hmirror(False)
#sensor.set_vflip(False)

# Configure the multi-channel image output of sensor. The output format and resolution of each channel can be different, and up to three channels can be output. Refer to the sensor API documentation
# Channel 0 is directly given to display VO, the format is YUV420
sensor.set_framesize(width = DISPLAY_WIDTH, height = DISPLAY_HEIGHT,chn=CAM_CHN_ID_0)
sensor.set_pixformat(Sensor.YUV420SP,chn=CAM_CHN_ID_0)
# Channel 1 is given to AI for algorithm processing, the format is RGB888P
sensor.set_framesize(width = AI_RGB888P_WIDTH , height = AI_RGB888P_HEIGHT, chn=CAM_CHN_ID_1)
# set chn2 output format
sensor.set_pixformat(Sensor.RGBP888, chn=CAM_CHN_ID_1)

# Bind the camera image of channel 0 to the screen to prevent the AI inference process of the other channel from being too slow and affecting the display process, causing stuttering
sensor_bind_info = sensor.bind_info(x = 0, y = 0, chn = CAM_CHN_ID_0)
Display.bind_layer(**sensor_bind_info, layer = Display.LAYER_VIDEO1)

# OSD image initialization, create a transparent image with the same size as the screen resolution for drawing AI inference results
osd_img = image.Image(DISPLAY_WIDTH, DISPLAY_HEIGHT, image.ARGB8888)

# Set to LT9611 display, default 1920x1080
#Display.init(Display.LT9611,width=DISPLAY_WIDTH,height=DISPLAY_HEIGHT,osd_num=1, to_ide = True)
## If using ST7701 LCD screen for display, default 800*480, also supports 640*480, etc. Refer to the Display module API documentation for details
Display.init(Display.ST7701, width=DISPLAY_WIDTH,height=DISPLAY_HEIGHT,osd_num=1, to_ide=True)

# Limit the frame rate of the bind channel to prevent the producer from being too fast
sensor._set_chn_fps(chn = CAM_CHN_ID_0, fps = Display.fps())

# Media initialization
MediaManager.init()
# Start sensor
sensor.run()
while True:
    #------------------------Dump a frame of image from the camera and process it----------------------------------
    print("---------------------------------")
    # Dump a frame of RGB888P format Image from camera channel 1
    img=sensor.snapshot(chn=CAM_CHN_ID_1)
    print(img)
    # Convert to ulab.numpy.ndarray format data, CHW
    img_np=img.to_numpy_ref()
    print(img_np.shape)
    # Create nncase_runtime.runtime_tensor for subsequent preprocessing
    runtime_tensor=nn.from_numpy(img_np)
    print(type(runtime_tensor))
    osd_img.clear()
    osd_img.draw_string_advanced( 20 , 20, 32, "This simulates drawing results", color=(0,255,0))
    print("---------------------------------")
    #------------------------Display detection box results on the screen----------------------------------------
    Display.show_image(osd_img)
    gc.collect()

sensor.stop()
Display.deinit()
time.sleep_ms(50)
MediaManager.deinit()
nn.shrink_memory_pool()
The serial output of CanMV IDE is:
---------------------------------
{"w":1280, "h":720, "type":"rgbp888", "size":2764800}
(3, 720, 1280)
<class 'runtime_tensor'>
---------------------------------
---------------------------------
{"w":1280, "h":720, "type":"rgbp888", "size":2764800}
(3, 720, 1280)
<class 'runtime_tensor'>
---------------------------------
UVC Video Stream Input#
k230 MicroPython supports USB cameras after version 1.3. The UVC module provides camera detection, configuration, and image acquisition functions, supporting single-camera operation. The acquired video stream image can also be used as input to the kmodel for inference. The UVC inference process is shown in the figure below:

Here is the code to create runtime_tensor, and other steps are introduced in the following sections. The example code is as follows:
from libs.Utils import *
import os,sys,ujson,gc,math, urandom
from media.display import *
from media.media import *
from media.uvc import *
import nncase_runtime as nn
import ulab.numpy as np
import image
from nonai2d import CSC

# Display screen resolution
DISPLAY_WIDTH = ALIGN_UP(800, 16)
DISPLAY_HEIGHT = 480

# Define AI inference frame resolution, only supports resolutions supported by the USB camera
AI_RGB888P_WIDTH = 640
AI_RGB888P_HEIGHT = 480

# CSC module implements format conversion
csc = CSC(0, CSC.PIXEL_FORMAT_RGB_888)

# Use ST7701 LCD screen for display, default 800*480, also supports 640*480, etc. Refer to the Display module API documentation for details
Display.init(Display.ST7701, width=DISPLAY_WIDTH, height=DISPLAY_HEIGHT, to_ide=True)

# MediaManager initialization
MediaManager.init()

# Wait for the USB camera to be detected
while True:
    plugin, dev = UVC.probe()
    if plugin:
        print(f"detect USB Camera {dev}")
        break
    time.sleep_ms(100)

# Set UVC output: 640x480 @ 30 FPS, MJPEG format
mode = UVC.video_mode(640, 480, UVC.FORMAT_MJPEG, 30)
succ, mode = UVC.select_video_mode(mode)
print(f"select mode success: {succ}, mode: {mode}")

# Start UVC
UVC.start(cvt=True)

while True:
    print("-------------------------------------------")
    # Get a frame of image from UVC
    img = UVC.snapshot()
    print(type(img))
    if img is not None:
        # CSC converts the image to RGB888
        img = csc.convert(img)
        print(img)
        # Convert to Ulab.Numpy.ndarray
        img_np_hwc = img.to_numpy_ref()
        print(img_np_hwc.shape)
        # HWC->CHW, use the hwc2chw method in libs.Utils
        img_np_chw = hwc2chw(img_np_hwc)
        print(img_np_chw.shape)
        # Create nncase_runtime.runtime_tensor
        runtime_tensor=nn.from_numpy(img_np_chw)
        print(type(runtime_tensor))
        ############################################
        # Here you can implement model preprocessing->inference->postprocessing->drawing results
        ############################################
        # Display image on screen
        Display.show_image(img)
        # Release img cache
        img.__del__()
        gc.collect()
    print("-------------------------------------------")
Display.deinit()
csc.destroy()
UVC.stop()
time.sleep_ms(100)
MediaManager.deinit()
The serial output of CanMV IDE is:
-------------------------------------------
<class 'py_video_frame_info'>
{"w":640, "h":480, "type":"rgb888", "size":921600}
(480, 640, 3)
(3, 480, 640)
<class 'runtime_tensor'>
-------------------------------------------
-------------------------------------------
<class 'py_video_frame_info'>
{"w":640, "h":480, "type":"rgb888", "size":921600}
(480, 640, 3)
(3, 480, 640)
<class 'runtime_tensor'>
-------------------------------------------
Image Tensor Preprocessing#
We have previously successfully converted image data into a tensor, but here’s the issue—this tensor may not match the model’s “appetite.” For example, the size might be wrong, or the color channels might be incorrect. At this point, it’s our turn to process the tensor and transform it into a format acceptable by the model. This entire processing procedure is called “preprocessing,” and the one that does this work is today’s protagonist — the ai2d module!
🛠️ Why Do We Need Preprocessing? Models are “picky eaters” — they only accept data of specific sizes and formats, for example: the input must be 320x320 in size; it must be in RGB order, not BGR; and whether channels come first (CHW) or last (HWC) must also match. If these don’t match, recognition will fail, or the model may simply refuse to work and throw an error.
⚡ ai2d Module: Hardware-Accelerated, Lightning-Fast Processing! ai2d is a module on the K230 platform specifically designed for image tensor preprocessing. It runs on hardware, is extremely fast, and is well-suited for embedded real-time tasks. It can help you complete operations such as: scaling, cropping, padding, affine transformations, etc., so that image data is processed into tensor data that meets the model’s input requirements.
The figure below shows the input/output flow and format of preprocessing via the ai2d module on the K230 platform:
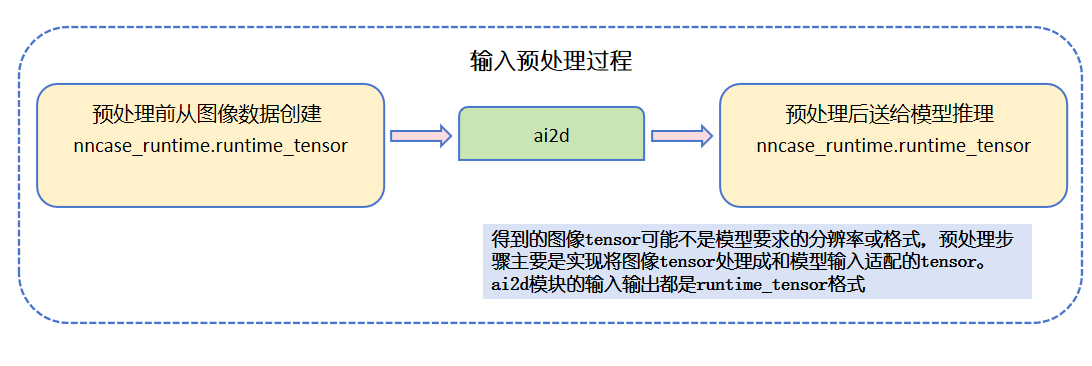
Introduction to the Preprocessing Process#
When deploying a model, the runtime_tensor of the input image does not necessarily conform to the model’s input specifications. For example, the image captured by the camera might be 1280×720, while the model’s input requires 320×320. In this case, the image needs to be preprocessed.
Preprocessing operations include but are not limited to the following common methods:
Resize: Adjust the original image to the size required by the model’s input;
Crop: Retain the key region of the image and remove redundant parts;
Normalization: Map pixel values to a specified interval (such as
[0, 1]or[-1, 1]);Padding: Perform edge padding to maintain the image’s aspect ratio and avoid stretching distortion.
The specific preprocessing methods to be used should be set according to the ONNX model’s training preprocessing flow. At the same time, during the process of converting the ONNX model to KModel, some preprocessing steps (such as normalization, color channel conversion, etc.) can be encapsulated into the model through compiler parameters. These operations do not need to be re-implemented during deployment and are automatically completed by KModel.
⚠️ Note: A clear understanding of the preprocessing flow is required, especially when performing image Aspect Ratio Padding, where users can choose different strategies:
Two-sided padding: Pad both the top/bottom and left/right sides of the image to center the image;
One-sided padding: Pad only on one side of the image (e.g., top/left or bottom/right) to maintain alignment on one edge.
Different padding methods will affect the coordinate restoration logic of the model inference output. Therefore, in the post-processing stage, it is necessary to match the corresponding coordinate transformation rules to ensure that the results are correctly mapped back to the original image.
Introduction to the ai2d Module#
In the MicroPython solution, common image preprocessing operations are typically hardware-accelerated through the nncase_runtime.ai2d module. This module supports five main preprocessing methods, including:
Resize
Crop
Pad
Affine
Shift
Using the ai2d module can effectively reduce the CPU computation burden and improve preprocessing efficiency, making it suitable for image adaptation operations before model inference. For detailed API usage, see the official documentation: ai2d API Documentation.
Attention
(1) Affine and Resize are mutually exclusive: They cannot be enabled simultaneously; only one geometric transformation can be selected.
(2) Shift only supports Raw16 input format, used for high-bit shift operations of specific formats.
(3) Pad Value is configured per channel: A list consistent with the number of input image channels should be provided. For example, an RGB image requires padding values for three channels.
(4) The execution order is Crop → Shift → Resize/Affine → Pad: This order must be followed when configuring multiple preprocessing steps. If the preprocessing flow does not match this order, it is recommended to initialize multiple ai2d instances and complete the required processing step by step.
By properly configuring the ai2d module, efficient and flexible image preprocessing can be achieved to meet the input data requirements of different models.
Here, taking the aspect-ratio scaled padding preprocessing process used in the printed digit recognition task as an example, the usage of the ai2d module is introduced. The core code (this code is for illustration only and cannot be run directly) is as follows:
import os,sys
import nncase_runtime as nn
import ulab.numpy as np
import time,image,random,gc

# Calculate the padding scaling ratio and the padding sizes in the four directions (top, bottom, left, right).
# This is one-sided padding where top and left padding sizes are 0, and padding is applied to the bottom and right.
def letterbox_pad_param(input_size,output_size):
    ratio_w = output_size[0] / input_size[0]  # Width scaling ratio
    ratio_h = output_size[1] / input_size[1]   # Height scaling ratio
    ratio = min(ratio_w, ratio_h)  # Take the smaller scaling ratio
    new_w = int(ratio * input_size[0])  # New width
    new_h = int(ratio * input_size[1])  # New height
    dw = (output_size[0] - new_w) / 2  # Width difference
    dh = (output_size[1] - new_h) / 2  # Height difference
    top = int(round(0))
    bottom = int(round(dh * 2 + 0.1))
    left = int(round(0))
    right = int(round(dw * 2 - 0.1))
    return top, bottom, left, right,ratio


# Define the AI inference frame resolution
AI_RGB888P_WIDTH = ALIGN_UP(1280, 16)
AI_RGB888P_HEIGHT = 720

# Model input resolution
model_input_size=[320,320]

# Assume here we have an image tensor of size [AI_RGB888P_WIDTH, AI_RGB888P_HEIGHT],
# which can be obtained from the data source in the previous section
ai2d_input_tensor
# Initialize an empty tensor for ai2d output
input_init_data = np.ones((1,3,model_input_size[1],model_input_size[0]),dtype=np.uint8)
ai2d_output_tensor = nn.from_numpy(input_init_data)

#------------------------Configure ai2d preprocessing method----------------------------------------
# Initialize ai2d preprocessing and configure the ai2d pad+resize preprocessing.
# The input resolution of the preprocessing process is the image resolution,
# and the output resolution meets the model's input requirements.
# This implements the process: tensor -> ai2d preprocess -> tensor -> kmodel.
ai2d=nn.ai2d()
# Configure the input/output data types and formats of the ai2d module
ai2d.set_dtype(nn.ai2d_format.NCHW_FMT, nn.ai2d_format.NCHW_FMT, np.uint8, np.uint8)
# Calculate the padding sizes in the four directions based on the long-side ratio
top,bottom,left,right,ratio=letterbox_pad_param([AI_RGB888P_WIDTH,AI_RGB888P_HEIGHT],model_input_size)
# Set the pad parameters: top/bottom/left/right padding sizes and the specific pixel values for the three channels
ai2d.set_pad_param(True,[0,0,0,0,top,bottom,left,right], 0, [128,128,128])
# Set the resize parameters and configure the interpolation method
ai2d.set_resize_param(True,nn.interp_method.tf_bilinear, nn.interp_mode.half_pixel)
# Set the input/output dimensions of the ai2d module and build the builder instance
ai2d_builder = ai2d.build([1,3,AI_RGB888P_HEIGHT,AI_RGB888P_WIDTH], [1,3,model_input_size[1],model_input_size[0]])

#------------------------Execute ai2d preprocessing step----------------------------------------
# Execute the preprocessing process
ai2d_builder.run(ai2d_input_tensor, ai2d_output_tensor)
# Convert the preprocessed runtime_tensor to ulab.numpy.ndarray format
ai2d_output_np=ai2d_output_tensor.to_numpy()
print("ai2d output shape:",ai2d_output_np.shape)

#Exit the loop and release resources
del ai2d
nn.shrink_memory_pool()
The shape of the preprocessed data is as follows:
ai2d output shape: (1, 3, 320, 320)
Ai2d Module in AIDemo#
Based on the interfaces provided by the nncase_runtime module, the application layer performs secondary encapsulation of nncase_runtime.ai2d. Its underlying implementation is the same as using nncase_runtime.ai2d directly.
The encapsulation module is located at /sdcard/libs/AI2D.py after flashing the firmware. For the provided interfaces, see: ai2d_module_api_manual.
To help users better implement the preprocessing process, the Ai2d documentation provides examples for the five preprocessing methods and visualizes the processing results. For example documentation, see the link: Ai2d Example Documentation.
KPU Inference#
We have already preprocessed the image and the input tensor is ready—now it’s finally time for the main character to appear, that is, our “Neural Network Acceleration Unit”—KPU!
KPU is the hardware accelerator on the K230 specifically designed to run neural network models. Its job is: Give me the model, and I’ll handle the inference!
However, before we start, we need to tell it: Hey, which model am I using! So you need to put the .kmodel file into the K230 board in advance, and then load this model into KPU in the code.
Next, we need to set up the input—the tensor we previously processed using the ai2d module comes into play, serving as the model input passed to KPU. Then, we can let KPU start running the model at lightning speed!
Once the model finishes running, KPU will return the result to us. This result is an output tensor, which contains the raw data inferred by the model. However, this format is not human-readable or easy to use, so we need to do another step of “translation”: convert the output tensor into an array format like ulab.numpy.ndarray to facilitate subsequent analysis, such as determining which number is recognized and its position, etc.
The following figure shows the process of using KPU to perform model inference. The model inference process includes loading the model, setting the model input, executing the model inference, and obtaining the model output:
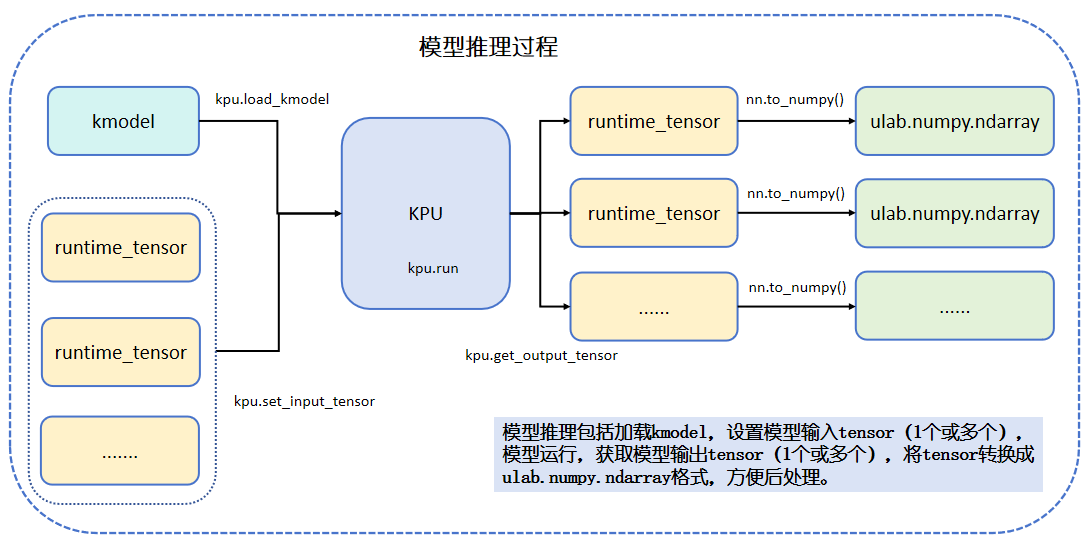
KPU is an acceleration engine specifically designed for deep learning, accelerating the computation process of neural network models. In MicroPython, the nncase_runtime.kpu module provides interfaces for invoking the KPU inference model. The API documentation for this module can be found at the link: nncase_runtime API documentation.
Here is the core code for using the nncase_runtime.kpu module for KPU inference (this code is for illustration only and cannot be run directly):
import os,sys
import nncase_runtime as nn
import ulab.numpy as np
import time,image,random,gc
from libs.Utils import *

# 假设这里有一个ai2d模块处理完成后的tensor
ai2d_output_tensor

#-----------------------------AI模型初始化+推理部分-------------------------------
# Kmodel模型路径
kmodel_path="/sdcard/best.kmodel"

# 创建kpu实例
kpu=nn.kpu()
# 加载kmodel模型
kpu.load_kmodel(kmodel_path)

# 设置kpu的第0个输入为ai2d预处理后的tensor,如果有多个,可以依次设置
kpu.set_input_tensor(0,ai2d_output_tensor)
# 在kpu上执行模型推理
kpu.run()
#------------------------获取模型推理结束的输出----------------------------------------
# 获取模型推理的输出tensor,并将其转换成ulab.numpy.ndarray数据进行后处理
results=[]
for i in range(kpu.outputs_size()):
    output_i_tensor = kpu.get_output_tensor(i)
    result_i = output_i_tensor.to_numpy()
    print(f"output {i}:",result_i.shape)
    results.append(result_i)
    del output_i_tensor
del ai2d
del kpu
time.sleep_ms(50)
nn.shrink_memory_pool()
For the four-class printed digit recognition task, the kpu model inference has only one output, with output shape [1,8,2100]. The output data shape is shown below:

Post-processing#
The model inference is done! KPU gave us a long string of “numeric arrays” as results, but don’t get too excited—these numbers look meaningless at first glance. So, the next task is to translate these data into content that humans can understand, such as: which numbers appear in the image? Where are they? How reliable is the recognition result?
For example, the output shape of our “four-class printed digit recognition” model is [1, 8, 2100], meaning there are a total of 2100 candidate boxes, each described by 8 numbers. What are they specifically? The first 4 are the box positions (X, Y coordinates of the center point, plus width and height), and the last 4 are the “scores” for the four digits (0, 1, 2, 3), which represent the model’s confidence in judging each class.
The first step we need to do is to pick the highest score from these 4 scores, get its class index and the corresponding score, which represents which digit this box is most likely to be, and how confident the model is that it’s this digit.
Then, we need to process the positions. The model outputs the box as “center point + width and height”, but we are usually more accustomed to using the “top-left coordinate + bottom-right coordinate” format, which is more convenient for subsequent NMS operations.
So what is NMS (Non-Maximum Suppression)? You can think of it as “deduplication”. Sometimes the model is too “enthusiastic” and outputs multiple boxes for the same digit, and we don’t need that many—we only keep the one with the highest score, and delete all the other overlapping ones, leaving it clean! This step is called NMS, and almost all object detection model post-processing includes this step, which is very critical!
Finally, there’s another detail: the model performs inference on the input size, for example, we input a 320×320 image, but the original image may be of a different size, so we also need to “restore” these coordinates proportionally to the original image to correctly draw boxes.
After these operations, we have transformed a pile of “mystery numbers” from the model output into clear recognition results: which digits appear in the image, where they are, how reliable the recognition is, and the boxes are drawn! This step is the legendary “post-processing” stage, and the entire process is truly complete!
The following figure illustrates the main work of the post-processing process:
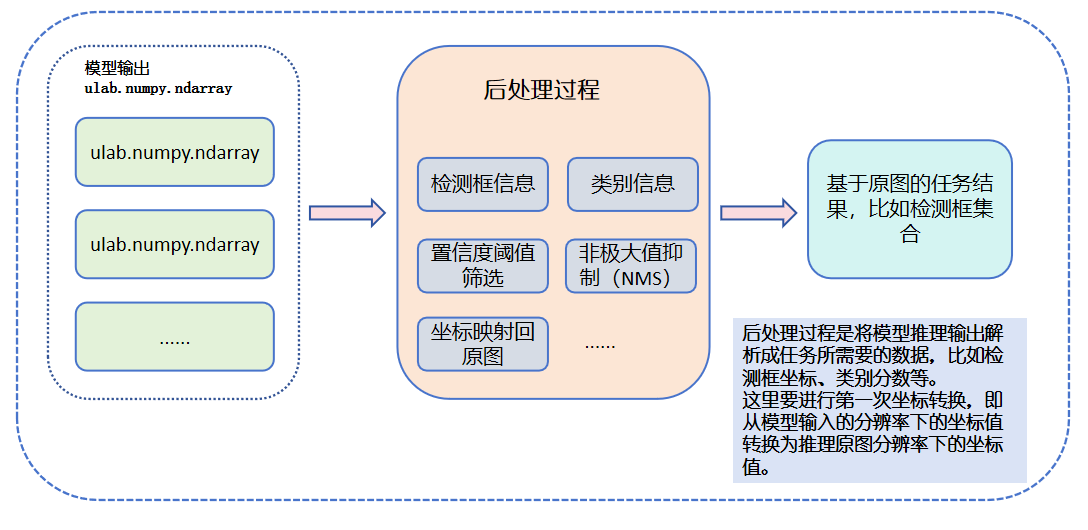
After the model inference is complete, the model output tensor is converted into ulab.numpy.ndarray format and stored in results. Users can implement post-processing according to the needs of the application scenario. For example, post-processing the output of the YOLOv8 model to obtain the coordinates and class information of the detection boxes. First, you need to understand the meaning of the output. For the output of [1,8,2100], 8 indicates that 4 of the data are coordinate information and 4 are the scores of the classes. The post-processing process needs to find the class index and class score with the highest score, and restore the coordinate information to the original image size using the ratio calculated during preprocessing, converting it from the center point + width and height format to the top-left and bottom-right coordinate format. Then, use the confidence threshold to filter out some boxes, and use the NMS (Non-Maximum Suppression) method to filter out redundant overlapping boxes. The final result is the detection box information based on the original image. For the four-class printed digit recognition, we provide the MicroPython core code for the post-processing of this task (this code is for illustration only and cannot be run directly) as follows:
import os,sys
import nncase_runtime as nn
import ulab.numpy as np
import time,image,random,gc
from libs.Utils import *

# 多目标检测非最大值抑制方法实现
def nms(boxes,scores,thresh):
    """Pure Python NMS baseline."""
    x1,y1,x2,y2 = boxes[:, 0],boxes[:, 1],boxes[:, 2],boxes[:, 3]
    areas = (x2 - x1 + 1) * (y2 - y1 + 1)
    order = np.argsort(scores,axis = 0)[::-1]
    keep = []
    while order.size > 0:
        i = order[0]
        keep.append(i)
        new_x1,new_y1,new_x2,new_y2,new_areas = [],[],[],[],[]
        for order_i in order:
            new_x1.append(x1[order_i])
            new_x2.append(x2[order_i])
            new_y1.append(y1[order_i])
            new_y2.append(y2[order_i])
            new_areas.append(areas[order_i])
        new_x1 = np.array(new_x1)
        new_x2 = np.array(new_x2)
        new_y1 = np.array(new_y1)
        new_y2 = np.array(new_y2)
        xx1 = np.maximum(x1[i], new_x1)
        yy1 = np.maximum(y1[i], new_y1)
        xx2 = np.minimum(x2[i], new_x2)
        yy2 = np.minimum(y2[i], new_y2)
        w = np.maximum(0.0, xx2 - xx1 + 1)
        h = np.maximum(0.0, yy2 - yy1 + 1)
        inter = w * h
        new_areas = np.array(new_areas)
        ovr = inter / (areas[i] + new_areas - inter)
        new_order = []
        for ovr_i,ind in enumerate(ovr):
            if ind < thresh:
                new_order.append(order[ovr_i])
        order = np.array(new_order,dtype=np.uint8)
    return keep

# 假设results中包含模型推理的输出数据
results=[]

#------------------------推理输出的后处理步骤----------------------------------------
# 模型输出只有1个,也就是results[0]的shape为[1, 8,2100],转换成[2100,8]方便依次处理每个框
output_data=results[0][0].transpose()
# 每个框前四个数据为中心点坐标和宽高
boxes_ori = output_data[:,0:4]
# 剩余数据为每个类别的分数,通过argmax找到分数最大的类别编号和分数值
class_ori = output_data[:,4:]
class_res=np.argmax(class_ori,axis=-1)
scores_ = np.max(class_ori,axis=-1)
# 通过置信度阈值筛选框(小于置信度阈值的丢弃),同时处理坐标为x1,y1,x2,y2,为框的左上和右下的坐标,注意比例变换,将输入分辨率坐标(model_input_size)转换成原图坐标(AI_RGB888P_WIDTH,AI_RGB888P_HEIGHT)
boxes,inds,scores=[],[],[]
for i in range(len(boxes_ori)):
    if scores_[i]>confidence_threshold:
        x,y,w,h=boxes_ori[i][0],boxes_ori[i][1],boxes_ori[i][2],boxes_ori[i][3]
        x1 = int((x - 0.5 * w)/ratio)
        y1 = int((y - 0.5 * h)/ratio)
        x2 = int((x + 0.5 * w)/ratio)
        y2 = int((y + 0.5 * h)/ratio)
        boxes.append([x1,y1,x2,y2])
        inds.append(class_res[i])
        scores.append(scores_[i])
#如果第一轮筛选后还有框,继续下一帧处理
if len(boxes)!=0:
    # 将list转换成ulab.numpy.ndarray方便处理
    boxes = np.array(boxes)
    scores = np.array(scores)
    inds = np.array(inds)
    # NMS过程,去除重叠的冗余框,keep为NMS处理后剩余框的索引列表
    keep = nms(boxes,scores,nms_threshold)
    dets = np.concatenate((boxes, scores.reshape((len(boxes),1)), inds.reshape((len(boxes),1))), axis=1)
    # 得到最后的检测框的结果
    det_res = []
    for keep_i in keep:
        det_res.append(dets[keep_i])
    det_res = np.array(det_res)
    print("boxes number:",det_res.shape[0])
The above code provides the post-processing steps for the YOLOv8 four-class printed digit recognition model. The post-processing here is entirely implemented using MicroPython modules, and the efficiency is not high.
In response to this characteristic, we use C++ to encapsulate the YOLO-related post-processing. YOLO-related models can use this method, refer to: yolo_battle.
Result Drawing#
Now we have the recognition results! We know the “identity” and “position” of each digit, and the next step is to make these results “visible”—that is, draw detection boxes on the image, label the digits, and tell everyone: “Look! There’s a 1 here!” “That’s a 3 over there!”
However, things are not that simple—your model recognizes on a 320×320 image, but the screen may be 800×480, 1920×1080, or even other sizes. If you draw the model’s boxes directly on the screen, the positions may all be skewed! So we need to do a very important thing: map the image coordinates to screen coordinates, that is, convert the box positions proportionally so that they fit just right on the screen.
When drawing these recognition information, we generally don’t modify the original image directly, but create a transparent layer called OSD (On-Screen Display) that is the same size as the screen, like sticking a glass film on a photo, and we draw boxes and label classes on this layer without affecting the picture underneath.
The last step is to overlay this OSD layer with the original image and display them together on the screen! This way you can clearly see: each digit has been recognized, and the boxes are drawn properly!
The following figure shows the process of drawing results:
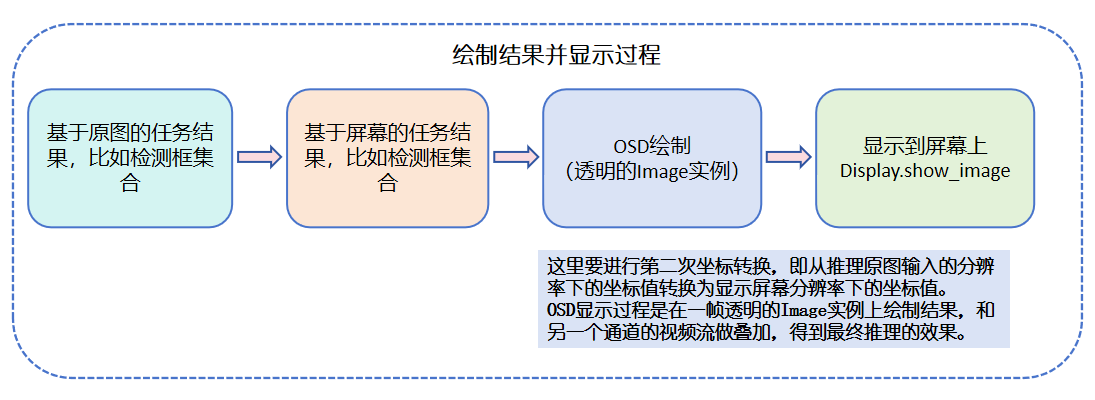
Taking the detection boxes of four-class printed digit recognition as an example, the coordinates of the detection boxes we calculated are based on the input original image resolution. If we want to display them on the screen, we need to convert the coordinates proportionally to the coordinates under the screen resolution, and then draw the effect on the osd_img of the initialized transparent image, and then call the show_image method of the Display module to display. Here is the core code (this code is for illustration only and cannot be run directly):
import os,sys
from media.display import *
import ulab.numpy as np
import time,image,random,gc
from libs.Utils import *

#-----------------------------Display初始化部分-------------------------------

# 定义屏幕显示分辨率
DISPLAY_WIDTH = ALIGN_UP(800, 16)
DISPLAY_HEIGHT = 480

# 定义AI推理帧分辨率
AI_RGB888P_WIDTH = ALIGN_UP(1280, 16)
AI_RGB888P_HEIGHT = 720
labels=["0","1","2","3"]
max_boxes_num = 30
# 获取颜色值
colors=get_colors(len(labels))

# OSD图像初始化,创建一帧和屏幕分辨率同样大的透明图像,用于绘制AI推理结果
osd_img = image.Image(DISPLAY_WIDTH, DISPLAY_HEIGHT, image.ARGB8888)

# 设置为st7701,默认800*480
Display.init(Display.ST7701,width=DISPLAY_WIDTH,height=DISPLAY_HEIGHT,osd_num=1, to_ide = True)

# 这里取了前max_boxes_num的框,防止框数量过多
det_res = det_res[:max_boxes_num, :]
#------------------------绘制检测框结果----------------------------------------
osd_img.clear()
# 分别处理每一个框,将原图坐标(AI_RGB888P_WIDTH,AI_RGB888P_HEIGHT)转换成显示屏幕坐标(DISPLAY_WIDTH,DISPLAY_HEIGHT)
for det in det_res:
    x_1, y_1, x_2, y_2 = map(lambda pos: int(round(pos, 0)), det[:4])
    draw_x= int(x_1 * DISPLAY_WIDTH // AI_RGB888P_WIDTH)
    draw_y= int(y_1 * DISPLAY_HEIGHT // AI_RGB888P_HEIGHT)
    draw_w = int((x_2 - x_1) * DISPLAY_WIDTH // AI_RGB888P_WIDTH)
    draw_h = int((y_2 - y_1) * DISPLAY_HEIGHT // AI_RGB888P_HEIGHT)
    osd_img.draw_rectangle(draw_x,draw_y, draw_w, draw_h, color=colors[int(det[5])],thickness=4)
    osd_img.draw_string_advanced( draw_x , max(0,draw_y-50), 24, labels[int(det[5])] + " {0:.3f}".format(det[4]), color=colors[int(det[5])])
#------------------------在屏幕显示检测框结果----------------------------------------
Display.show_image(osd_img)
Through the above steps, we have basically completed the complete steps of developing an application using MicroPython. Users need to have a good understanding of the entire process of model inference starting from model conversion.
Display Device Introduction#
For display output, k230 provides three display devices, and you can choose to use one of the three methods: HDMI/LCD screen/IDE. The API documentation for the corresponding module can be found at the link: Display Module API Documentation. The following describes these three methods:
🏷️ HDMI: The device type is LT9611, and you can refer to the API documentation to check the supported resolution, frame rate, number of osd, and whether to display synchronously with the IDE during initialization. In dual-channel AI inference, an OSD transparent image of the same size as the screen display resolution is generally created for drawing inference results. When calling the Display.show_image interface, you need to pay attention to the layer number of the OSD display. OSD only supports display in the four layers LAYER_OSD0/LAYER_OSD1/LAYER_OSD2/LAYER_OSD3. The example code is as follows:
import os,sys
from media.display import *
from media.media import *

# 定义屏幕显示分辨率
DISPLAY_WIDTH = ALIGN_UP(800, 16)
DISPLAY_HEIGHT = 480

# OSD图像初始化,创建一帧和屏幕分辨率同样大的透明图像,用于绘制AI推理结果
osd_img = image.Image(DISPLAY_WIDTH, DISPLAY_HEIGHT, image.ARGB8888)

# 设置为LT9611显示,默认1920x1080
Display.init(Display.LT9611,width=DISPLAY_WIDTH,height=DISPLAY_HEIGHT,osd_num=1, to_ide = True)

MediaManager.init()
🏷️ LCD: The device type is ST7701 or HX8399, and you can refer to the API documentation to check the supported resolution, frame rate, number of osd, and whether to display synchronously with the IDE during initialization. In dual-channel AI inference, an OSD transparent image of the same size as the screen display resolution is generally created for drawing inference results. When calling the Display.show_image interface, you need to pay attention to the layer number of the OSD display. OSD only supports display in the four layers LAYER_OSD0/LAYER_OSD1/LAYER_OSD2/LAYER_OSD3. The example code is as follows:
import os,sys
from media.display import *
from media.media import *

# 定义屏幕显示分辨率
DISPLAY_WIDTH = ALIGN_UP(800, 16)
DISPLAY_HEIGHT = 480

# OSD图像初始化,创建一帧和屏幕分辨率同样大的透明图像,用于绘制AI推理结果
osd_img = image.Image(DISPLAY_WIDTH, DISPLAY_HEIGHT, image.ARGB8888)

## 如果使用ST7701的LCD屏幕显示,默认800*480,还支持640*480等,具体参考Display模块API文档
Display.init(Display.ST7701, width=DISPLAY_WIDTH,height=DISPLAY_HEIGHT,osd_num=1, to_ide=True)

MediaManager.init()
🏷️ CanMV IDE Preview Window: The device type is VIRT, and you can refer to the API documentation to check the supported resolution, frame rate, and number of osd during initialization. In this mode, the image effect is only viewed in the preview window in the upper right corner of the IDE, and is not displayed on an external screen. Users can configure between [64,64] to [4096,4096] and frame rate 1~200. The example code is as follows:
import os,sys
from media.display import *
from media.media import *

# 定义屏幕显示分辨率
DISPLAY_WIDTH = ALIGN_UP(800, 16)
DISPLAY_HEIGHT = 480

# OSD图像初始化,创建一帧和屏幕分辨率同样大的透明图像,用于绘制AI推理结果
osd_img = image.Image(DISPLAY_WIDTH, DISPLAY_HEIGHT, image.ARGB8888)

## 如果使用VIRT在CanMV IDE上显示
Display.init(Display.VIRT, width=DISPLAY_WIDTH,height=DISPLAY_HEIGHT,osd_num=1)

MediaManager.init()
🏷️ CanMV IDE Preview Image: The device type is VIRT, and you can refer to the API documentation to check the supported resolution, frame rate, and number of osd during initialization. In this mode, the image effect is only viewed in the preview window in the upper right corner of the IDE, and is not displayed on an external screen. Users use the image instance to call compress_for_ide() to display a static image in the CanMV IDE preview window. The example code is as follows:
import os,sys
import image

#-----------------------------读取图片部分-------------------------------
# 请自行将测试图片拷贝到开发板data目录下
img_path="/data/test.jpg"

# 使用图片创建Image实例,类型为jpeg
img_data = image.Image(img_path)
# 将图片数据转换成rgb888格式的Image实例,该类型数据是RGB三通道,颜色范围为[0,255]
img_rgb888=img_data.to_rgb888()

img_rgb888.compress_for_ide()
Class Printed Digit Recognition Deployment Code#
We have prepared a complete “0”, “1”, “2”, “3” four-class printed digit recognition example code for you, which not only supports single image inference, but also supports continuous recognition of real-time video streams! Whether you want to test the model effect on static images, or perform real-time detection after connecting the camera, you can get started quickly. You only need to use the kmodel exported in the previous steps, and with the example scripts we provide, you can easily deploy and run on the K230 development board!
If you want to verify the recognition accuracy and positioning effect of the model on images, you can directly run our image recognition code; if you want to experience the “video effect” during the recognition process in real time, try the dual-channel video recognition code to see if the boxes can accurately track the digits when they appear on the screen!
Next, you can boldly try the deployment process, feel the running effect of K230 edge AI, and AI can read the digital world you photographed!
Image Recognition Code#
Here is the complete 4-class printed digit recognition image inference code. You can use the kmodel obtained from the above steps for testing:
import os,sys
from media.sensor import *
from media.display import *
from media.media import *
import nncase_runtime as nn
import ulab.numpy as np
import time,image,random,gc
from libs.Utils import *

#-----------------------------其他必要方法---------------------------------------------
# 多目标检测 非最大值抑制方法实现
def nms(boxes,scores,thresh):
    """Pure Python NMS baseline."""
    x1,y1,x2,y2 = boxes[:, 0],boxes[:, 1],boxes[:, 2],boxes[:, 3]
    areas = (x2 - x1 + 1) * (y2 - y1 + 1)
    order = np.argsort(scores,axis = 0)[::-1]
    keep = []
    while order.size > 0:
        i = order[0]
        keep.append(i)
        new_x1,new_y1,new_x2,new_y2,new_areas = [],[],[],[],[]
        for order_i in order:
            new_x1.append(x1[order_i])
            new_x2.append(x2[order_i])
            new_y1.append(y1[order_i])
            new_y2.append(y2[order_i])
            new_areas.append(areas[order_i])
        new_x1 = np.array(new_x1)
        new_x2 = np.array(new_x2)
        new_y1 = np.array(new_y1)
        new_y2 = np.array(new_y2)
        xx1 = np.maximum(x1[i], new_x1)
        yy1 = np.maximum(y1[i], new_y1)
        xx2 = np.minimum(x2[i], new_x2)
        yy2 = np.minimum(y2[i], new_y2)
        w = np.maximum(0.0, xx2 - xx1 + 1)
        h = np.maximum(0.0, yy2 - yy1 + 1)
        inter = w * h
        new_areas = np.array(new_areas)
        ovr = inter / (areas[i] + new_areas - inter)
        new_order = []
        for ovr_i,ind in enumerate(ovr):
            if ind < thresh:
                new_order.append(order[ovr_i])
        order = np.array(new_order,dtype=np.uint8)
    return keep

# 计算padding缩放比例和上下左右padding大小
def letterbox_pad_param(input_size,output_size):
    ratio_w = output_size[0] / input_size[0]  # 宽度缩放比例
    ratio_h = output_size[1] / input_size[1]   # 高度缩放比例
    ratio = min(ratio_w, ratio_h)  # 取较小的缩放比例
    new_w = int(ratio * input_size[0])  # 新宽度
    new_h = int(ratio * input_size[1])  # 新高度
    dw = (output_size[0] - new_w) / 2  # 宽度差
    dh = (output_size[1] - new_h) / 2  # 高度差
    top = int(round(0))
    bottom = int(round(dh * 2 + 0.1))
    left = int(round(0))
    right = int(round(dw * 2 - 0.1))
    return top, bottom, left, right,ratio


if __name__=="__main__":
    # 请自行将测试图片拷贝到开发板sdcard目录下
    img_path="/sdcard/test.jpg"

    # 使用图片创建Image实例,类型为jpeg
    img_data = image.Image(img_path)
    img_width=img_data.width()
    img_height=img_data.height()
    # 将图片数据转换成rgb888格式的Image实例,该类型数据是RGB三通道,颜色范围为[0,255]
    img_rgb888=img_data.to_rgb888()
    # 将Image实例转换成ulab.numpy.ndarray类型,这是数据是HWC类型的
    img_hwc=img_rgb888.to_numpy_ref()
    # 获取hwc排布的shape,使用ulab.numpy的transpose方法将hwc转换为chw排布
    shape=img_hwc.shape
    img_tmp = img_hwc.reshape((shape[0] * shape[1], shape[2]))
    img_trans = img_tmp.transpose()
    img_tmp=img_trans.copy()
    img_chw=img_tmp.reshape((shape[2],shape[0],shape[1]))
    # 使用chw数据创建nncase_runtime runtime_tensor,可以给kmodel模型推理使用
    ai2d_input_tensor=nn.from_numpy(img_chw)


    #-----------------------------AI模型初始化部分-------------------------------
    # Kmodel模型路径
    kmodel_path="/sdcard/best.kmodel"
    # 类别标签
    labels = ["0","1","2","3"]
    # 模型输入分辨率
    model_input_size=[320,320]
    # 其它参数设置,包括阈值、最大检测框数量等
    confidence_threshold = 0.5
    nms_threshold = 0.4
    max_boxes_num = 30
    # 不同类别框的颜色
    colors=get_colors(len(labels))

    # 初始化ai2d预处理,并配置ai2d padding+resize预处理,预处理过程输入分辨率为图片分辨率,输出分辨率模型输入的需求分辨率,实现image->preprocess->model的过程
    ai2d=nn.ai2d()
    # 配置ai2d模块的输入输出数据类型和格式
    ai2d.set_dtype(nn.ai2d_format.NCHW_FMT, nn.ai2d_format.NCHW_FMT, np.uint8, np.uint8)
    # 设置padding的参数,上下左右padding的大小和三个通道padding的具体值
    top,bottom,left,right,ratio=letterbox_pad_param([img_width,img_height],model_input_size)
    ai2d.set_pad_param(True,[0,0,0,0,top,bottom,left,right], 0, [128,128,128])
    # 设置resize参数,配置插值方法
    ai2d.set_resize_param(True,nn.interp_method.tf_bilinear, nn.interp_mode.half_pixel)
    # 设置ai2d模块的输入输出维度,并构建builder实例
    ai2d_builder = ai2d.build([1,3,img_height,img_width], [1,3,model_input_size[1],model_input_size[0]])
    # 初始化一个空的tensor,用于ai2d输出
    input_init_data = np.ones((1,3,model_input_size[1],model_input_size[0]),dtype=np.uint8)
    kpu_input_tensor = nn.from_numpy(input_init_data)

    # 创建kpu实例
    kpu=nn.kpu()
    # 加载kmodel模型
    kpu.load_kmodel(kmodel_path)

    #------------------------推理前的预处理步骤----------------------------------------
    # 执行预处理过程
    ai2d_builder.run(ai2d_input_tensor, kpu_input_tensor)
    #------------------------使用kpu完成模型推理--------------------------------------
    # 设置kpu的第0个输入为ai2d预处理后的tensor,如果有多个,可以依次设置
    kpu.set_input_tensor(0,kpu_input_tensor)
    # 在kpu上执行模型推理
    kpu.run()
    #------------------------获取模型推理结束的输出----------------------------------------
    # 获取模型推理的输出tensor,并将其转换成ulab.numpy.ndarray数据进行后处理
    results=[]
    for i in range(kpu.outputs_size()):
        output_i_tensor = kpu.get_output_tensor(i)
        result_i = output_i_tensor.to_numpy()
        results.append(result_i)
        del output_i_tensor
    #------------------------推理输出的后处理步骤----------------------------------------
    # 模型输出只有1个,也就是results[0]的shape为[1, 8,2100],转换成[2100,8]方便依次处理每个框
    output_data=results[0][0].transpose()
    # 每个框前四个数据为中心点坐标和宽高
    boxes_ori = output_data[:,0:4]
    # 剩余数据为每个类别的分数,通过argmax找到分数最大的类别编号和分数值
    class_ori = output_data[:,4:]
    class_res=np.argmax(class_ori,axis=-1)
    scores_ = np.max(class_ori,axis=-1)
    # 通过置信度阈值筛选框(小于置信度阈值的丢弃),同时处理坐标为x1,y1,x2,y2,为框的左上和右下的坐标,注意比例变换,将输入分辨率坐标(model_input_size)转换成原图坐标(img_width,img_height)
    boxes,inds,scores=[],[],[]
    for i in range(len(boxes_ori)):
        if scores_[i]>confidence_threshold:
            x,y,w,h=boxes_ori[i][0],boxes_ori[i][1],boxes_ori[i][2],boxes_ori[i][3]
            x1 = int((x - 0.5 * w)/ratio)
            y1 = int((y - 0.5 * h)/ratio)
            x2 = int((x + 0.5 * w)/ratio)
            y2 = int((y + 0.5 * h)/ratio)
            boxes.append([x1,y1,x2,y2])
            inds.append(class_res[i])
            scores.append(scores_[i])
    #如果第一轮筛选后有框,继续下一帧处理
    if len(boxes)!=0:
        # 将list转换成ulab.numpy.ndarray方便处理
        boxes = np.array(boxes)
        scores = np.array(scores)
        inds = np.array(inds)
        # NMS过程,去除重叠的冗余框,keep为NMS去除重叠框后的索引列表
        keep = nms(boxes,scores,nms_threshold)
        dets = np.concatenate((boxes, scores.reshape((len(boxes),1)), inds.reshape((len(boxes),1))), axis=1)
        # 得到最后的检测框的结果
        det_res = []
        for keep_i in keep:
            det_res.append(dets[keep_i])
        det_res = np.array(det_res)
        # 去前max_box_num个,防止检测框过多
        det_res = det_res[:max_boxes_num, :]
        #------------------------绘制检测框结果----------------------------------------
        # 分别处理每一个框,绘制结果
        for det in det_res:
            x_1, y_1, x_2, y_2 = map(lambda pos: int(round(pos, 0)), det[:4])
            draw_x= int(x_1)
            draw_y= int(y_1)
            draw_w = int((x_2 - x_1))
            draw_h = int((y_2 - y_1))
            img_rgb888.draw_rectangle(draw_x,draw_y, draw_w, draw_h, color=colors[int(det[5])],thickness=4)
            img_rgb888.draw_string_advanced( draw_x , max(0,draw_y-50), 24, "类别:"+labels[int(det[5])] + "  分数:{0:.3f}".format(det[4]), color=colors[int(det[5])])
        #------------------------在屏幕显示检测框结果----------------------------------------
        img_rgb888.compress_for_ide()
    #释放资源
    del ai2d
    del kpu
    del ai2d_input_tensor
    del kpu_input_tensor
    nn.shrink_memory_pool()
    gc.collect()
Dual-Channel Video Recognition Code#
Here is the complete 4-class printed digit recognition video inference code. You can use the kmodel obtained from the above steps for testing:
import os,sys
from media.sensor import *
from media.display import *
from media.media import *
import nncase_runtime as nn
import ulab.numpy as np
import time,image,random,gc
from libs.Utils import *

#-----------------------------其他必要方法---------------------------------------------
# 多目标检测 非最大值抑制方法实现
def nms(boxes,scores,thresh):
    """Pure Python NMS baseline."""
    x1,y1,x2,y2 = boxes[:, 0],boxes[:, 1],boxes[:, 2],boxes[:, 3]
    areas = (x2 - x1 + 1) * (y2 - y1 + 1)
    order = np.argsort(scores,axis = 0)[::-1]
    keep = []
    while order.size > 0:
        i = order[0]
        keep.append(i)
        new_x1,new_y1,new_x2,new_y2,new_areas = [],[],[],[],[]
        for order_i in order:
            new_x1.append(x1[order_i])
            new_x2.append(x2[order_i])
            new_y1.append(y1[order_i])
            new_y2.append(y2[order_i])
            new_areas.append(areas[order_i])
        new_x1 = np.array(new_x1)
        new_x2 = np.array(new_x2)
        new_y1 = np.array(new_y1)
        new_y2 = np.array(new_y2)
        xx1 = np.maximum(x1[i], new_x1)
        yy1 = np.maximum(y1[i], new_y1)
        xx2 = np.minimum(x2[i], new_x2)
        yy2 = np.minimum(y2[i], new_y2)
        w = np.maximum(0.0, xx2 - xx1 + 1)
        h = np.maximum(0.0, yy2 - yy1 + 1)
        inter = w * h
        new_areas = np.array(new_areas)
        ovr = inter / (areas[i] + new_areas - inter)
        new_order = []
        for ovr_i,ind in enumerate(ovr):
            if ind < thresh:
                new_order.append(order[ovr_i])
        order = np.array(new_order,dtype=np.uint8)
    return keep

# 计算padding缩放比例和上下左右padding大小
def letterbox_pad_param(input_size,output_size):
    ratio_w = output_size[0] / input_size[0]  # 宽度缩放比例
    ratio_h = output_size[1] / input_size[1]   # 高度缩放比例
    ratio = min(ratio_w, ratio_h)  # 取较小的缩放比例
    new_w = int(ratio * input_size[0])  # 新宽度
    new_h = int(ratio * input_size[1])  # 新高度
    dw = (output_size[0] - new_w) / 2  # 宽度差
    dh = (output_size[1] - new_h) / 2  # 高度差
    top = int(round(0))
    bottom = int(round(dh * 2 + 0.1))
    left = int(round(0))
    right = int(round(dw * 2 - 0.1))
    return top, bottom, left, right,ratio


#-----------------------------Sensor/Display初始化部分-------------------------------

# 定义屏幕显示分辨率
DISPLAY_WIDTH = ALIGN_UP(800, 16)
DISPLAY_HEIGHT = 480

# 定义AI推理帧分辨率
AI_RGB888P_WIDTH = ALIGN_UP(1280, 16)
AI_RGB888P_HEIGHT = 720

sensor = Sensor()
sensor.reset()
# 设置水平镜像和垂直翻转,不同板子的方向不同,通过配置这两个参数使画面转正
#sensor.set_hmirror(False)
#sensor.set_vflip(False)

# 配置sensor的多通道出图,每个通道的出图格式和分辨率可以不同,最多可以出三路图,参考sensor API文档
# 通道0直接给到显示VO,格式为YUV420
sensor.set_framesize(width = DISPLAY_WIDTH, height = DISPLAY_HEIGHT,chn=CAM_CHN_ID_0)
sensor.set_pixformat(Sensor.YUV420SP,chn=CAM_CHN_ID_0)
# 通道1给到AI做算法处理,格式为RGB888P
sensor.set_framesize(width = AI_RGB888P_WIDTH , height = AI_RGB888P_HEIGHT, chn=CAM_CHN_ID_1)
sensor.set_pixformat(Sensor.RGBP888, chn=CAM_CHN_ID_1)

# 绑定通道0的摄像头图像到屏幕,防止另一个通道的AI推理过程太慢影响显示过程,导致出现卡顿效果
sensor_bind_info = sensor.bind_info(x = 0, y = 0, chn = CAM_CHN_ID_0)
Display.bind_layer(**sensor_bind_info, layer = Display.LAYER_VIDEO1)

# OSD图像初始化,创建一帧和屏幕分辨率同样大的透明图像,用于绘制AI推理结果
osd_img = image.Image(DISPLAY_WIDTH, DISPLAY_HEIGHT, image.ARGB8888)

## 设置为LT9611显示,默认1920x1080
#Display.init(Display.LT9611,width=DISPLAY_WIDTH,height=DISPLAY_HEIGHT,osd_num=1, to_ide = True)
# 如果使用ST7701的LCD屏幕显示,默认800*480,还支持640*480等,具体参考Display模块API文档
Display.init(Display.ST7701, width=DISPLAY_WIDTH,height=DISPLAY_HEIGHT,osd_num=1, to_ide=True)

# 限制bind通道的帧率,防止生产者太快
sensor._set_chn_fps(chn = CAM_CHN_ID_0, fps = Display.fps())


#-----------------------------AI模型初始化部分-------------------------------
# Kmodel模型路径
kmodel_path="/sdcard/best.kmodel"
# 类别标签
labels = ["0","1","2","3"]
# 模型输入分辨率
model_input_size=[320,320]
# 其它参数设置,包括阈值、最大检测框数量等
confidence_threshold = 0.3
nms_threshold = 0.4
max_boxes_num = 50
# 不同类别框的颜色
colors=get_colors(len(labels))

# 初始化ai2d预处理,并配置ai2d padding+resize预处理,预处理过程输入分辨率为图片分辨率,输出分辨率模型输入的需求分辨率,实现image->preprocess->model的过程
ai2d=nn.ai2d()
# 配置ai2d模块的输入输出数据类型和格式
ai2d.set_dtype(nn.ai2d_format.NCHW_FMT, nn.ai2d_format.NCHW_FMT, np.uint8, np.uint8)
# 设置padding的参数,上下左右padding的大小和三个通道padding的具体值
top,bottom,left,right,ratio=letterbox_pad_param([AI_RGB888P_WIDTH,AI_RGB888P_HEIGHT],model_input_size)
ai2d.set_pad_param(True,[0,0,0,0,top,bottom,left,right], 0, [128,128,128])
# 设置resize参数,配置插值方法
ai2d.set_resize_param(True,nn.interp_method.tf_bilinear, nn.interp_mode.half_pixel)
# 设置ai2d模块的输入输出维度,并构建builder实例
ai2d_builder = ai2d.build([1,3,AI_RGB888P_HEIGHT,AI_RGB888P_WIDTH], [1,3,model_input_size[1],model_input_size[0]])
# 初始化一个空的tensor,用于ai2d输出和kpu输入,因为一般ai2d的输出会直接送给kpu,因此这里使用一个变量共用
input_init_data = np.ones((1,3,model_input_size[1],model_input_size[0]),dtype=np.uint8)
kpu_input_tensor = nn.from_numpy(input_init_data)


# 创建kpu实例
kpu=nn.kpu()
# 加载kmodel模型
kpu.load_kmodel(kmodel_path)

# media初始化
MediaManager.init()
# 启动sensor
sensor.run()
# 测试帧率
fps = time.clock()
while True:
    fps.tick()
    #------------------------从摄像头dump一帧图像并处理----------------------------------
    # 从摄像头1通道dump一帧RGB888P格式的Image图像
    img=sensor.snapshot(chn=CAM_CHN_ID_1)
    # 转换成ulab.numpy.ndarray格式的数据,CHW
    img_np=img.to_numpy_ref()
    # 创建nncase_runtime.tensor用于给到ai2d进行预处理
    ai2d_input_tensor=nn.from_numpy(img_np)
    #------------------------推理前的预处理步骤----------------------------------------
    # 执行预处理过程
    ai2d_builder.run(ai2d_input_tensor, kpu_input_tensor)
    #------------------------使用kpu完成模型推理--------------------------------------
    # 设置kpu的第0个输入为ai2d预处理后的tensor,如果有多个,可以依次设置
    kpu.set_input_tensor(0,kpu_input_tensor)
    # 在kpu上执行模型推理
    kpu.run()
    #------------------------获取模型推理结束的输出----------------------------------------
    # 获取模型推理的输出tensor,并将其转换成ulab.numpy.ndarray数据进行后处理
    results=[]
    for i in range(kpu.outputs_size()):
        output_i_tensor = kpu.get_output_tensor(i)
        result_i = output_i_tensor.to_numpy()
        results.append(result_i)
        del output_i_tensor
    #------------------------推理输出的后处理步骤----------------------------------------
    # YOLOv8检测模型输出只有1个,也就是results[0]的shape为[1,box_dim,box_num],results[0][0]表示[box_dim,box_num],转换成[box_num,box_dim]方便依次处理每个框
    output_data=results[0][0].transpose()
    # 每个框前四个数据为中心点坐标和宽高
    boxes_ori = output_data[:,0:4]
    # 剩余数据为每个类别的分数,通过argmax找到分数最大的类别编号和分数值
    class_ori = output_data[:,4:]
    class_res=np.argmax(class_ori,axis=-1)
    scores_ = np.max(class_ori,axis=-1)
    # 通过置信度阈值筛选框(小于置信度阈值的丢弃),同时处理坐标为x1,y1,x2,y2,为框的左上和右下的坐标,注意比例变换,将输入分辨率坐标(model_input_size)转换成原图坐标(AI_RGB888P_WIDTH,AI_RGB888P_HEIGHT)
    boxes,inds,scores=[],[],[]
    for i in range(len(boxes_ori)):
        if scores_[i]>confidence_threshold:
            x,y,w,h=boxes_ori[i][0],boxes_ori[i][1],boxes_ori[i][2],boxes_ori[i][3]
            x1 = int((x - 0.5 * w)/ratio)
            y1 = int((y - 0.5 * h)/ratio)
            x2 = int((x + 0.5 * w)/ratio)
            y2 = int((y + 0.5 * h)/ratio)
            boxes.append([x1,y1,x2,y2])
            inds.append(class_res[i])
            scores.append(scores_[i])
    osd_img.clear()
    #如果第一轮筛选后有框,继续下一帧处理
    if len(boxes)!=0:
        # 将list转换成ulab.numpy.ndarray方便处理
        boxes = np.array(boxes)
        scores = np.array(scores)
        inds = np.array(inds)
        # NMS过程,去除重叠的冗余框,keep为NMS去除重叠框后的索引列表
        keep = nms(boxes,scores,nms_threshold)
        dets = np.concatenate((boxes, scores.reshape((len(boxes),1)), inds.reshape((len(boxes),1))), axis=1)
        # 得到最后的检测框的结果
        det_res = []
        for keep_i in keep:
            det_res.append(dets[keep_i])
        det_res = np.array(det_res)
        # 去前max_box_num个,防止检测框过多
        det_res = det_res[:max_boxes_num, :]
        #------------------------绘制检测框结果----------------------------------------
        osd_img.clear()
        # 分别处理每一个框,将原图坐标(AI_RGB888P_WIDTH,AI_RGB888P_HEIGHT)转换成显示屏幕坐标(DISPLAY_WIDTH,DISPLAY_HEIGHT)
        for det in det_res:
            x_1, y_1, x_2, y_2 = map(lambda pos: int(round(pos, 0)), det[:4])
            draw_x= int(x_1 * DISPLAY_WIDTH // AI_RGB888P_WIDTH)
            draw_y= int(y_1 * DISPLAY_HEIGHT // AI_RGB888P_HEIGHT)
            draw_w = int((x_2 - x_1) * DISPLAY_WIDTH // AI_RGB888P_WIDTH)
            draw_h = int((y_2 - y_1) * DISPLAY_HEIGHT // AI_RGB888P_HEIGHT)
            osd_img.draw_rectangle(draw_x,draw_y, draw_w, draw_h, color=colors[int(det[5])],thickness=4)
            osd_img.draw_string_advanced( draw_x , max(0,draw_y-50), 24, "类别:"+labels[int(det[5])] + " 分数:{0:.3f}".format(det[4]), color=colors[int(det[5])])
    #------------------------在屏幕显示检测框结果----------------------------------------
    Display.show_image(osd_img)
    print("det fps:",fps.fps())
    gc.collect()

#退出循环,释放资源
del ai2d
del kpu
sensor.stop()
Display.deinit()
time.sleep_ms(50)
MediaManager.deinit()
nn.shrink_memory_pool()
YOLO Deployment Library#
YOLO is a commonly used model in vision tasks, supporting classification, detection, segmentation, rotated object detection, and other tasks. We selected the classic YOLOv5, YOLOv8, and YOLO11 from the YOLO series models as the foundation, and encapsulated MicroPython deployment libraries for YOLOv5, YOLOv8, and YOLO11 to facilitate users in quickly deploying YOLO models. For details, see the link: yolo_battle.
YOLOv5 Cat-Dog Classification#
Deploy a cat-dog classification model based on YOLOv5 on K230.
YOLOv5 Source Code and Training Environment Setup#
For setting up the YOLOv5 training environment, please refer to ultralytics/yolov5: YOLOv5 🚀 in PyTorch > ONNX > CoreML > TFLite (github.com)
git clone https://github.com/ultralytics/yolov5.git
cd yolov5
pip install -r requirements.txt
If you have already set up the environment, please ignore this step.
Training Data Preparation#
Please download the provided sample dataset. The sample dataset uses cat-dog classification as the scenario and is trained using YOLOv5.
cd yolov5
wget https://kendryte-download.canaan-creative.com/developer/k230/yolo_dataset/cat_dog.zip
unzip cat_dog.zip
⚠️ For Windows systems, please directly copy the link to the browser to download and extract it to the corresponding directory.
If you have already downloaded the data, please ignore this step.
Using YOLOv5 to Train the Cat-Dog Classification Model#
Execute the command in the yolov5 directory to train the cat-dog classification model using yolov5:
python classify/train.py --model yolov5n-cls.pt --data cat_dog --epochs 100 --batch-size 8 --imgsz 224 --device '0'
Convert Cat-Dog Classification kmodel#
Model conversion requires installing the following libraries in the training environment:
# linux platform: nncase and nncase-kpu can be installed online, nncase-2.x requires dotnet-7
sudo apt-get install -y dotnet-sdk-7.0
pip install --upgrade pip
pip install nncase==2.11.0
pip install nncase-kpu==2.11.0

# windows platform: please install dotnet-7 by yourself and add environment variables. nncase can be installed online via pip, but the nncase-kpu library requires offline installation. Download nncase_kpu-2.*-py2.py3-none-win_amd64.whl from https://github.com/kendryte/nncase/releases
# Enter the corresponding python environment and use pip to install in the directory where nncase_kpu-2.*-py2.py3-none-win_amd64.whl is downloaded
pip install nncase_kpu-2.*-py2.py3-none-win_amd64.whl

# In addition to nncase and nncase-kpu, the script also uses the following libraries:
pip install onnx==1.15.0
pip install onnxruntime==1.19.0
pip install onnxsim==0.4.36
Download the script tool and extract the model conversion script tool test_yolov5.zip to the yolov5 directory;
wget https://kendryte-download.canaan-creative.com/developer/k230/yolo_files/test_yolov5.zip
unzip test_yolov5.zip
According to the following commands, first export the pt model under runs/train-cls/exp/weights to an onnx model, then convert it to a kmodel model:
# Export onnx, please choose the pt model path yourself
python export.py --weight runs/train-cls/exp/weights/best.pt --imgsz 224 --batch 1 --include onnx
cd test_yolov5/classify
# Replace the images in the test directory with a portion of your own training data, convert kmodel, please choose the onnx model path yourself, the generated kmodel is in the same directory level as the onnx model
python to_kmodel.py --target k230 --model ../../runs/train-cls/exp/weights/best.onnx --dataset ../test --input_width 224 --input_height 224 --ptq_option 0
cd ../../
💡 Model Conversion Script (to_kmodel.py) Parameter Description:
Parameter Name |
Description |
Notes |
Type |
|---|---|---|---|
target |
Target Platform |
Options are k230/cpu, corresponding to k230 kpu and cpu; |
str |
model |
Model Path |
The path of the ONNX model to be converted; |
str |
dataset |
Calibration Image Set |
Image data used for model conversion, used in the quantization stage, can be taken from a portion of the training data |
str |
input_width |
Input Width |
Width of the model input |
int |
input_height |
Input Height |
Height of the model input |
int |
ptq_option |
Quantization Method |
Quantization strategies are |
0/1/2/3/4/5 |
Deploying Models on k230 Using MicroPython#
Flash Image and Install CanMV IDE#
💡 Firmware Introduction: Please download the latest Daily Build Firmware according to your development board type to ensure the latest features are supported! Or use the latest code to compile firmware yourself, see tutorial: Firmware Compilation.
Download and install CanMV IDE (download link: CanMV IDE download), write and run code in the IDE.
Model File Copy#
Connect the IDE and copy the converted model and test images to the path CanMV/data. This path can be customized; you only need to modify the corresponding path when writing code.
YOLOv5 Module#
The YOLOv5 class integrates three tasks of YOLOv5, including classification (classify), detection (detect), and segmentation (segment); it supports two inference modes, including image and video stream (video); this class encapsulates the kmodel inference process of YOLOv5.
Import Method
from libs.YOLO import YOLOv5
Parameter Description
Parameter Name |
Description |
Notes |
Type |
|---|---|---|---|
task_type |
Task Type |
Supports three types of tasks, options are ‘classify’/’detect’/’segment’; |
str |
mode |
Inference Mode |
Supports two inference modes, options are ‘image’/’video’, ‘image’ means inference image, ‘video’ means inference on real-time video stream captured by camera; |
str |
kmodel_path |
kmodel Path |
Path of the kmodel copied to the development board; |
str |
labels |
Category Label List |
Label names for different categories; |
list[str] |
rgb888p_size |
Inference Frame Resolution |
Resolution of the current frame for inference, such as [1920,1080], [1280,720], [640,640]; |
list[int] |
model_input_size |
Model Input Resolution |
Input resolution when training the YOLOv5 model, such as [224,224], [320,320], [640,640]; |
list[int] |
display_size |
Display Resolution |
Set when the inference mode is ‘video’, supports hdmi([1920,1080]) and lcd([800,480]); |
list[int] |
conf_thresh |
Confidence Threshold |
Category confidence threshold for classification tasks, object confidence threshold for detection and segmentation tasks, such as 0.5; |
float【0~1】 |
nms_thresh |
nms Threshold |
Non-maximum suppression threshold, required for detection and segmentation tasks; |
float【0~1】 |
mask_thresh |
mask Threshold |
Binarization threshold for segmenting objects in detection boxes in segmentation tasks; |
float【0~1】 |
max_boxes_num |
Maximum Number of Detection Boxes |
Maximum number of detection boxes allowed to be returned in one frame; |
int |
debug_mode |
Debug Mode |
Whether the timing function takes effect, options 0/1, 0 means no timing, 1 means timing; |
int【0/1】 |
Deploy Model for Image Inference#
For image inference, please refer to the following code, modify the defined parameter variables in __main__ according to the actual situation;
from libs.YOLO import YOLOv5
from libs.Utils import *
import os,sys,gc
import ulab.numpy as np
import image

if __name__=="__main__":
    # This is only an example, please modify it to your own test image, model path, label name, model input size for custom scenarios
    img_path="/data/test.jpg"
    kmodel_path="/data/best.kmodel"
    labels = ["cat","dog"]
    model_input_size=[224,224]

    confidence_threshold = 0.5
    img,img_ori=read_image(img_path)
    rgb888p_size=[img.shape[2],img.shape[1]]
    # Initialize YOLOv5 instance
    yolo=YOLOv5(task_type="classify",mode="image",kmodel_path=kmodel_path,labels=labels,rgb888p_size=rgb888p_size,model_input_size=model_input_size,conf_thresh=confidence_threshold,debug_mode=0)
    yolo.config_preprocess()
    res=yolo.run(img)
    yolo.draw_result(res,img_ori)
    yolo.deinit()
    gc.collect()
Deploy Model for Video Inference#
For video inference, please refer to the following code, modify the defined variables in __main__ according to the actual situation;
from libs.PipeLine import PipeLine
from libs.YOLO import YOLOv5
from libs.Utils import *
import os,sys,gc
import ulab.numpy as np
import image

if __name__=="__main__":
    # This is only an example, please modify it to your own model path, label name, model input size for custom scenarios
    kmodel_path="/data/best.kmodel"
    labels = ["cat","dog"]
    model_input_size=[224,224]

    # Add display mode, default hdmi, optional hdmi/lcd/lt9611/st7701/hx8399, where hdmi defaults to lt9611, resolution 1920*1080; lcd defaults to st7701, resolution 800*480
    display_mode="lcd"
    rgb888p_size=[640,360]
    confidence_threshold = 0.5
    pl=PipeLine(rgb888p_size=rgb888p_size,display_mode=display_mode)
    pl.create()
    display_size=pl.get_display_size()
    # Initialize YOLOv5 instance
    yolo=YOLOv5(task_type="classify",mode="video",kmodel_path=kmodel_path,labels=labels,rgb888p_size=rgb888p_size,model_input_size=model_input_size,display_size=display_size,conf_thresh=confidence_threshold,debug_mode=0)
    yolo.config_preprocess()
    while True:
        with ScopedTiming("total",1):
            img=pl.get_frame()
            res=yolo.run(img)
            yolo.draw_result(res,pl.osd_img)
            pl.show_image()
            gc.collect()
    yolo.deinit()
    pl.destroy()
Deployment Effect#
Select two cat-dog images and use kmodel for classification. The effect is as shown below:
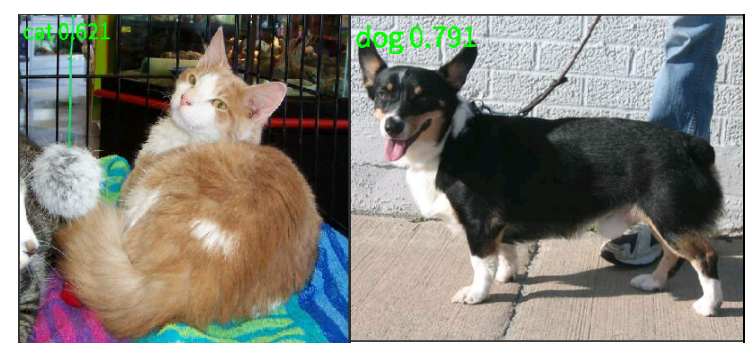
YOLOv8 Fall Detection#
Implement a fall detection model based on YOLOv8 and deploy it on K230.
YOLOv8 Source Code and Training Environment Setup#
For setting up the YOLOv8 training environment, please refer to ultralytics/ultralytics: Ultralytics YOLO 🚀 (github.com)
# Pip install the ultralytics package including all requirements in a Python>=3.8 environment with PyTorch>=1.8.
pip install ultralytics
If you have already set up the environment, please ignore this step.
Training Data Preparation#
Download the provided fall detection dataset and unzip it.
cd yolov8
wget https://kendryte-download.canaan-creative.com/developer/k230/yolo_dataset/fall_det.zip
unzip fall_det.zip
⚠️ For Windows system, please copy the link to the browser to download directly, and unzip it to the corresponding directory.
If you have already downloaded the data, please ignore this step.
Training the Fall Detection Model with YOLOv8#
Execute the command in the yolov8 directory to train the fall detection model using yolov8:
yolo detect train data=fall_det.yaml model=yolov8n.pt epochs=300 imgsz=320
Converting Fall Detection kmodel#
Model conversion requires installing the following libraries in the training environment:
# Linux platform: nncase and nncase-kpu can be installed online, nncase-2.x requires installing dotnet-7
sudo apt-get install -y dotnet-sdk-7.0
pip install --upgrade pip
pip install nncase==2.11.0
pip install nncase-kpu==2.11.0

# Windows platform: Please install dotnet-7 yourself and add environment variables. pip can be used for online installation of nncase, but the nncase-kpu library needs to be installed offline. Download nncase_kpu-2.*-py2.py3-none-win_amd64.whl at https://github.com/kendryte/nncase/releases
# Enter the corresponding python environment, and use pip to install in the download directory of nncase_kpu-2.*-py2.py3-none-win_amd64.whl
pip install nncase_kpu-2.*-py2.py3-none-win_amd64.whl

# In addition to nncase and nncase-kpu, other libraries used by the script include:
pip install onnx==1.15.0
pip install onnxruntime==1.19.0
pip install onnxsim==0.4.36
Download the script tool and unzip the model conversion script tool test_yolov8.zip to the yolov8 directory;
wget https://kendryte-download.canaan-creative.com/developer/k230/yolo_files/test_yolov8.zip
unzip test_yolov8.zip
Follow the commands below to first export the pt model under runs/detect/train/weights to an onnx model, and then convert it to a kmodel model:
# Export onnx, please select the pt model path yourself
yolo export model=runs/detect/train/weights/best.pt format=onnx imgsz=320
cd test_yolov8/detect
# Replace the images in the test directory with part of your own training data, convert kmodel, please select the onnx model path yourself, the generated kmodel is in the same directory level as the onnx model
python to_kmodel.py --target k230 --model ../../runs/detect/train/weights/best.onnx --dataset ../test --input_width 320 --input_height 320 --ptq_option 1
cd ../../
💡 Description of Model Conversion Script (to_kmodel.py) Parameters:
Parameter Name |
Description |
Details |
Type |
|---|---|---|---|
target |
Target platform |
Options are k230/cpu, corresponding to k230 kpu and cpu; |
str |
model |
Model path |
Path to the ONNX model to be converted; |
str |
dataset |
Calibration image set |
Image data used during model conversion, used in the quantization stage, you can take some images from the training set to replace |
str |
input_width |
Input width |
Width of the model input |
int |
input_height |
Input height |
Height of the model input |
int |
ptq_option |
Quantization method |
Quantization strategies are |
0/1/2/3/4/5 |
Deploying the Model on k230 Using MicroPython#
Flashing the Image and Installing CanMV IDE#
💡 Firmware Introduction: Please download the latest Dalily Build firmware according to your development board type to ensure that the latest features are supported! Or use the latest code to compile the firmware yourself, see the tutorial: Firmware Compilation.
Download and install CanMV IDE (download link: CanMV IDE download), write and run code in the IDE.
Copying Model Files#
Connect the IDE, copy the converted model and test images to the path CanMV/data directory. This path can be customized, just modify the corresponding path when writing the code.
YOLOv8 Module#
The YOLOv8 class integrates five tasks of YOLOv8, including classification (classify), detection (detect), segmentation (segment), rotated object detection (obb), and keypoint detection (pose); it supports two inference modes, including image and video stream; this class encapsulates the kmodel inference process of YOLOv8.
Import Method
from libs.YOLO import YOLOv8
Parameter Description
Parameter Name |
Description |
Details |
Type |
|---|---|---|---|
task_type |
Task type |
Supports four tasks, options are ‘classify’/’detect’/’segment’/’obb’; |
str |
mode |
Inference mode |
Supports two inference modes, options are ‘image’/’video’, ‘image’ means inferring image, ‘video’ means inferring real-time video stream captured by camera; |
str |
kmodel_path |
kmodel path |
Path to kmodel copied to the development board; |
str |
labels |
Category label list |
Label names for different categories; |
list[str] |
rgb888p_size |
Inference frame resolution |
Resolution of the current inference frame, such as [1920,1080], [1280,720], [640,640]; |
list[int] |
model_input_size |
Model input resolution |
Input resolution when training the YOLOv8 model, such as [224,224], [320,320], [640,640]; |
list[int] |
display_size |
Display resolution |
Set when inference mode is ‘video’, supports hdmi([1920,1080]) and lcd([800,480]); |
list[int] |
conf_thresh |
Confidence threshold |
Category confidence threshold for classification tasks, object confidence threshold for detection and segmentation tasks, such as 0.5; |
float【0~1】 |
nms_thresh |
nms threshold |
Non-maximum suppression threshold, required for detection and segmentation tasks; |
float【0~1】 |
mask_thresh |
mask threshold |
Binarization threshold for segmenting objects in the detection box in segmentation tasks; |
float【0~1】 |
max_boxes_num |
Maximum number of detection boxes |
Maximum number of detection boxes allowed to be returned in one frame of image; |
int |
kp_num |
Number of keypoints |
Number of keypoints in the keypoint detection task; |
int |
kp_dim |
Keypoint dimension |
Dimension of keypoints in the keypoint detection task, only 2 and 3 are supported, determined by the training model; |
int【2/3】 |
debug_mode |
Debug mode |
Whether the timing function takes effect, options are 0/1, 0 is no timing, 1 is timing; |
int【0/1】 |
Deploying Model for Image Inference#
For image inference, please refer to the following code, modify the defined parameter variables in __main__ according to the actual situation;
from libs.YOLO import YOLOv8
from libs.Utils import *
import os,sys,gc
import ulab.numpy as np
import image

if __name__=="__main__":
    # This is just an example, please modify to your own test image, model path, label name, model input size for custom scenarios
    img_path="/data/test.jpg"
    kmodel_path="/data/best.kmodel"
    labels = ["fall"]
    model_input_size=[320,320]

    confidence_threshold = 0.5
    nms_threshold=0.45
    img,img_ori=read_image(img_path)
    rgb888p_size=[img.shape[2],img.shape[1]]
    # Initialize YOLOv8 instance
    yolo=YOLOv8(task_type="detect",mode="image",kmodel_path=kmodel_path,labels=labels,rgb888p_size=rgb888p_size,model_input_size=model_input_size,conf_thresh=confidence_threshold,nms_thresh=nms_threshold,max_boxes_num=50,debug_mode=0)
    yolo.config_preprocess()
    res=yolo.run(img)
    yolo.draw_result(res,img_ori)
    yolo.deinit()
    gc.collect()
Deploying Model for Video Inference#
For video inference, please refer to the following code, modify the defined variables in __main__ according to the actual situation;
from libs.PipeLine import PipeLine
from libs.YOLO import YOLOv8
from libs.Utils import *
import os,sys,gc
import ulab.numpy as np
import image

if __name__=="__main__":
    # This is just an example, please modify to your own model path, label name, model input size for custom scenarios
    kmodel_path="/data/best.kmodel"
    labels = ["fall"]
    model_input_size=[320,320]

    # Add display mode, default is hdmi, optional hdmi/lcd/lt9611/st7701/hx8399, where hdmi is lt9611 by default, resolution 1920*1080; lcd is st7701 by default, resolution 800*480
    display_mode="lcd"
    rgb888p_size=[640,360]
    confidence_threshold = 0.5
    nms_threshold=0.45
    # Initialize PipeLine
    pl=PipeLine(rgb888p_size=rgb888p_size,display_mode=display_mode)
    pl.create()
    display_size=pl.get_display_size()
    # Initialize YOLOv8 instance
    yolo=YOLOv8(task_type="detect",mode="video",kmodel_path=kmodel_path,labels=labels,rgb888p_size=rgb888p_size,model_input_size=model_input_size,display_size=display_size,conf_thresh=confidence_threshold,nms_thresh=nms_threshold,max_boxes_num=50,debug_mode=0)
    yolo.config_preprocess()
    while True:
        with ScopedTiming("total",1):
            # Frame by frame inference
            img=pl.get_frame()
            res=yolo.run(img)
            yolo.draw_result(res,pl.osd_img)
            pl.show_image()
            gc.collect()
    yolo.deinit()
    pl.destroy()
Deployment Effect#
Select a fall image and use kmodel for fall detection. The comparison between the original image and the inference result is shown below:
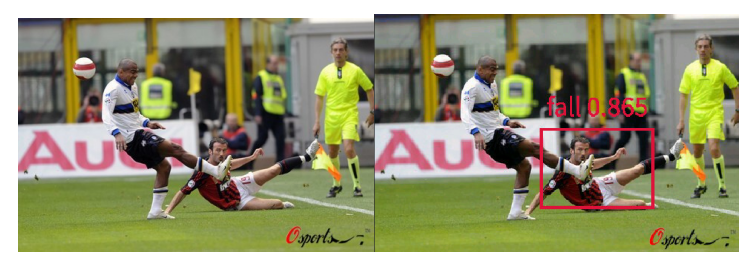
YOLO11 Fruit Segmentation#
YOLO11 Source Code and Training Environment Setup#
For setting up the YOLO11 training environment, please refer to ultralytics/ultralytics: Ultralytics YOLO 🚀 (github.com)
# Pip install the ultralytics package including all requirements in a Python>=3.8 environment with PyTorch>=1.8.
pip install ultralytics
If you have already set up the environment, please ignore this step.
Training Data Preparation#
Download the provided fruit segmentation dataset and extract it.
cd yolo11
wget https://kendryte-download.canaan-creative.com/developer/k230/yolo_dataset/fruit_seg.zip
unzip fruit_seg.zip
⚠️ For Windows systems, please copy the link directly to your browser to download, and extract it to the corresponding directory.
If you have already downloaded the data, please ignore this step.
Using YOLO11 to Train the Fruit Segmentation Model#
Run the command in the yolo11 directory to train a three-class fruit segmentation model using yolo11:
yolo segment train data=fruits_seg.yaml model=yolo11n-seg.pt epochs=100 imgsz=320
Converting the Fruit Segmentation kmodel#
Model conversion requires installing the following libraries in the training environment:
# linux platform: nncase and nncase-kpu can be installed online, nncase-2.x requires installing dotnet-7
sudo apt-get install -y dotnet-sdk-7.0
pip install --upgrade pip
pip install nncase==2.11.0
pip install nncase-kpu==2.11.0

# windows platform: please install dotnet-7 yourself and add environment variables. nncase can be installed online using pip, but the nncase-kpu library needs to be installed offline. Download nncase_kpu-2.*-py2.py3-none-win_amd64.whl from https://github.com/kendryte/nncase/releases
# Enter the corresponding python environment, and use pip to install in the download directory of nncase_kpu-2.*-py2.py3-none-win_amd64.whl
pip install nncase_kpu-2.*-py2.py3-none-win_amd64.whl

# In addition to nncase and nncase-kpu, other libraries used in the script include:
pip install onnx==1.15.0
pip install onnxruntime==1.19.0
pip install onnxsim==0.4.36
Download the script tool and extract the model conversion script tool test_yolo11.zip to the yolo11 directory;
wget https://kendryte-download.canaan-creative.com/developer/k230/yolo_files/test_yolo11.zip
unzip test_yolo11.zip
Follow the commands below to first export the pt model under runs/segment/train/weights as an onnx model, and then convert it to a kmodel model:
# Export onnx, please select the pt model path by yourself
yolo export model=runs/segment/train/weights/best.pt format=onnx imgsz=320
cd test_yolo11/segment
# The images in test can be selected from the training set to replace some. To convert kmodel, please select the onnx model path by yourself. The generated kmodel is in the same directory as the onnx model
python to_kmodel.py --target k230 --model ../../runs/segment/train/weights/best.onnx --dataset ../test --input_width 320 --input_height 320 --ptq_option 1
cd ../../
💡 Model conversion script (to_kmodel.py) parameter description:
Parameter Name |
Description |
Instructions |
Type |
|---|---|---|---|
target |
Target platform |
Options are k230/cpu, corresponding to k230 kpu and cpu; |
str |
model |
Model path |
The path of the ONNX model to be converted; |
str |
dataset |
Calibration image set |
The image data used during model conversion, used in the quantization stage, can be taken from a part of the training set to replace |
str |
input_width |
Input width |
The width of the model input |
int |
input_height |
Input height |
The height of the model input |
int |
ptq_option |
Quantization method |
The quantization strategy is |
0/1/2/3/4/5 |
Deploying the Model on k230 Using MicroPython#
Flashing the Image and Installing CanMV IDE#
💡 Firmware Introduction: Please download the latest Daily Build firmware according to your development board type to ensure that the latest features are supported! Or use the latest code to compile the firmware yourself, see the tutorial: Firmware Compilation.
Download and install CanMV IDE (download link: CanMV IDE download), write and run code in the IDE.
Model File Copying#
Connect the IDE, and copy the converted model and test images to the path CanMV/data. This path can be customized, just modify the corresponding path when writing the code.
YOLO11 Module#
The YOLO11 class integrates the five tasks of YOLO11, including classification (classify), detection (detect), segmentation (segment), rotated object detection (obb), and keypoint detection (pose); it supports two inference modes, including image and video stream; this class encapsulates the kmodel inference process of YOLO11.
Import Method
from libs.YOLO import YOLO11
Parameter Description
Parameter Name |
Description |
Instructions |
Type |
|---|---|---|---|
task_type |
Task type |
Supports four types of tasks, options are ‘classify’/’detect’/’segment’/’obb’; |
str |
mode |
Inference mode |
Supports two inference modes, options are ‘image’/’video’, ‘image’ means inferring images, ‘video’ means inferring real-time video stream captured by the camera; |
str |
kmodel_path |
kmodel path |
The path of the kmodel copied to the development board; |
str |
labels |
Class label list |
Label names for different categories; |
list[str] |
rgb888p_size |
Inference frame resolution |
The resolution of the current inference frame, such as [1920,1080], [1280,720], [640,640]; |
list[int] |
model_input_size |
Model input resolution |
The input resolution when training the YOLO11 model, such as [224,224], [320,320], [640,640]; |
list[int] |
display_size |
Display resolution |
Set when the inference mode is ‘video’, supports hdmi([1920,1080]) and lcd([800,480]); |
list[int] |
conf_thresh |
Confidence threshold |
The category confidence threshold for classification tasks, the target confidence threshold for detection and segmentation tasks, such as 0.5; |
float[0~1] |
nms_thresh |
nms threshold |
Non-maximum suppression threshold, required for detection and segmentation tasks; |
float[0~1] |
mask_thresh |
mask threshold |
The binarization threshold for segmenting the object in the detection box in the segmentation task; |
float[0~1] |
max_boxes_num |
Maximum number of detection boxes |
The maximum number of detection boxes allowed to be returned in a frame of image; |
int |
kp_num |
Number of keypoints |
The number of keypoints in the keypoint detection task; |
int |
kp_dim |
Keypoint dimension |
The dimension of keypoints in the keypoint detection task, only 2 and 3 are supported, determined by the training model; |
int[2/3] |
debug_mode |
Debug mode |
Whether the timing function is effective, options are 0/1, 0 means no timing, 1 means timing; |
int[0/1] |
Deploying the Model to Implement Image Inference#
For image inference, please refer to the following code, modify the defined parameter variables in __main__ according to the actual situation;
from libs.YOLO import YOLO11
from libs.Utils import *
import os,sys,gc
import ulab.numpy as np
import image

if __name__=="__main__":
    # This is just an example. For custom scenarios, please modify it to your own test image, model path, label name, and model input size
    img_path="/data/test.jpg"
    kmodel_path="/data/best.kmodel"
    labels = ["apple","banana","orange"]
    model_input_size=[320,320]

    confidence_threshold = 0.5
    nms_threshold=0.45
    mask_threshold=0.5
    img,img_ori=read_image(img_path)
    rgb888p_size=[img.shape[2],img.shape[1]]
    # Initialize YOLO11 instance
    yolo=YOLO11(task_type="segment",mode="image",kmodel_path=kmodel_path,labels=labels,rgb888p_size=rgb888p_size,model_input_size=model_input_size,conf_thresh=confidence_threshold,nms_thresh=nms_threshold,mask_thresh=mask_threshold,max_boxes_num=50,debug_mode=0)
    yolo.config_preprocess()
    res=yolo.run(img)
    yolo.draw_result(res,img_ori)
    yolo.deinit()
    gc.collect()
Deploying the Model to Implement Video Inference#
For video inference, please refer to the following code, modify the defined variables in __main__ according to the actual situation;
from libs.PipeLine import PipeLine
from libs.YOLO import YOLO11
from libs.Utils import *
import os,sys,gc
import ulab.numpy as np
import image

if __name__=="__main__":
    # This is just an example. For custom scenarios, please modify it to your own model path, label name, and model input size
    kmodel_path="/data/best.kmodel"
    labels = ["apple","banana","orange"]
    model_input_size=[320,320]

    # Add display mode, default hdmi, optional hdmi/lcd/lt9611/st7701/hx8399, where hdmi defaults to lt9611, resolution 1920*1080; lcd defaults to st7701, resolution 800*480
    display_mode="lcd"
    rgb888p_size=[320,320]
    confidence_threshold = 0.5
    nms_threshold=0.45
    mask_threshold=0.5
    # Initialize PipeLine
    pl=PipeLine(rgb888p_size=rgb888p_size,display_mode=display_mode)
    pl.create()
    display_size=pl.get_display_size()
    # Initialize YOLO11 instance
    yolo=YOLO11(task_type="segment",mode="video",kmodel_path=kmodel_path,labels=labels,rgb888p_size=rgb888p_size,model_input_size=model_input_size,display_size=display_size,conf_thresh=confidence_threshold,nms_thresh=nms_threshold,mask_thresh=mask_threshold,max_boxes_num=50,debug_mode=0)
    yolo.config_preprocess()
    while True:
        with ScopedTiming("total",1):
            # Inference frame by frame
            img=pl.get_frame()
            res=yolo.run(img)
            yolo.draw_result(res,pl.osd_img)
            pl.show_image()
            gc.collect()
    yolo.deinit()
    pl.destroy()
Deployment Effect#
Select a fruit image and use the kmodel for fruit segmentation. The comparison between the original image and the inference result is shown in the figure below:
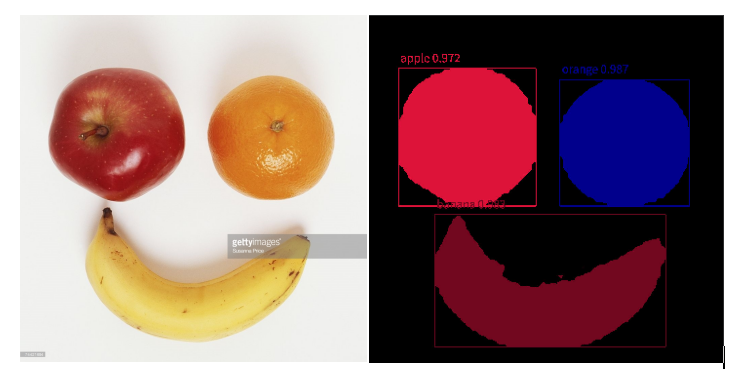
YOLO11 Rotated Object Detection#
YOLO11 Source Code and Training Environment Setup#
For setting up the YOLO11 training environment, please refer to ultralytics/ultralytics: Ultralytics YOLO 🚀 (github.com)
# Pip install the ultralytics package including all requirements in a Python>=3.8 environment with PyTorch>=1.8.
pip install ultralytics
If you have already set up the environment, please ignore this step.
Training Data Preparation#
Download the desktop pen rotated object detection dataset and extract it.
cd yolo11
wget https://kendryte-download.canaan-creative.com/developer/k230/yolo_dataset/pen_obb.zip
unzip pen_obb.zip
⚠️ For Windows systems, please directly copy the link to your browser to download and extract it to the corresponding directory.
If you have already downloaded the data, please ignore this step.
Using the YOLO11 Rotated Object Detection Model#
Execute the following command in the yolo11 directory to train a single-class rotated object detection model using yolo11:
yolo obb train data=pen_obb.yaml model=yolo11n-obb.pt epochs=100 imgsz=320
Converting Rotated Object Detection to kmodel#
Model conversion requires installing the following libraries in the training environment:
# linux platform: nncase and nncase-kpu can be installed online, nncase-2.x requires dotnet-7
sudo apt-get install -y dotnet-sdk-7.0
pip install --upgrade pip
pip install nncase==2.11.0
pip install nncase-kpu==2.11.0

# windows platform: please install dotnet-7 yourself and add environment variables. nncase can be installed online via pip, but nncase-kpu needs to be installed offline. Download nncase_kpu-2.*-py2.py3-none-win_amd64.whl from https://github.com/kendryte/nncase/releases
# Enter the corresponding python environment, and use pip to install in the directory where nncase_kpu-2.*-py2.py3-none-win_amd64.whl is downloaded
pip install nncase_kpu-2.*-py2.py3-none-win_amd64.whl

# Besides nncase and nncase-kpu, other libraries used by the script include:
pip install onnx==1.15.0
pip install onnxruntime==1.19.0
pip install onnxsim==0.4.36
Download the script tool and extract the model conversion script tool test_yolo11.zip to the yolo11 directory;
wget https://kendryte-download.canaan-creative.com/developer/k230/yolo_files/test_yolo11.zip
unzip test_yolo11.zip
According to the following commands, first export the pt model under runs/obb/train/weights to an onnx model, then convert it to a kmodel model:
# Export onnx, please select the pt model path yourself
yolo export model=runs/obb/train/weights/best.pt format=onnx imgsz=320
cd test_yolo11/obb
# Images under test can be selected from the training set to replace some. Convert to kmodel, please select the onnx model path yourself. The generated kmodel is in the same level directory as the onnx model.
python to_kmodel.py --target k230 --model ../../runs/obb/train/weights/best.onnx --dataset ../test_obb --input_width 320 --input_height 320 --ptq_option 0
cd ../../
💡 Model conversion script (to_kmodel.py) parameter description:
Parameter Name |
Description |
Explanation |
Type |
|---|---|---|---|
target |
Target platform |
Options are k230/cpu, corresponding to k230 kpu and cpu; |
str |
model |
Model path |
Path of the ONNX model to be converted; |
str |
dataset |
Calibration image set |
Image data used during model conversion, used in the quantization stage, can be taken from part of the training set to replace |
str |
input_width |
Input width |
The width of model input |
int |
input_height |
Input height |
The height of model input |
int |
ptq_option |
Quantization method |
The quantization strategy is |
0/1/2/3/4/5 |
Deploying the Model on k230 Using MicroPython#
Flashing the Image and Installing CanMV IDE#
💡 Firmware Introduction: Please download the latest Dalily Build firmware according to your development board type to ensure that the latest features are supported! Or use the latest code to compile the firmware yourself. See the tutorial: Firmware Compilation.
Download and install CanMV IDE (download link: CanMV IDE download), write and run code in the IDE.
Copying Model Files#
Connect the IDE and copy the converted model and test images to the path CanMV/data directory. This path can be customized, just modify the corresponding path when writing code.
YOLO11 Module#
The YOLO11 class integrates four tasks of YOLO11, including classification (classify), detection (detect), segmentation (segment), and rotated object detection (obb); it supports two inference modes, including image and video stream; this class encapsulates the kmodel inference process of YOLO11.
Import Method
from libs.YOLO import YOLO11
Parameter Description
Parameter Name |
Description |
Explanation |
Type |
|---|---|---|---|
task_type |
Task type |
Supports four types of tasks, options are ‘classify’/’detect’/’segment’/’obb’; |
str |
mode |
Inference mode |
Supports two inference modes, options are ‘image’/’video’. ‘image’ means inferring an image, ‘video’ means inferring the real-time video stream captured by the camera; |
str |
kmodel_path |
kmodel path |
Path of the kmodel copied to the development board; |
str |
labels |
Class label list |
Label names of different classes; |
list[str] |
rgb888p_size |
Inference frame resolution |
Current frame resolution for inference, such as [1920,1080], [1280,720], [640,640]; |
list[int] |
model_input_size |
Model input resolution |
Input resolution when training the YOLO11 model, such as [224,224], [320,320], [640,640]; |
list[int] |
display_size |
Display resolution |
Set when the inference mode is ‘video’, supports hdmi([1920,1080]) and lcd([800,480]); |
list[int] |
conf_thresh |
Confidence threshold |
Class confidence threshold for classification tasks, object confidence threshold for detection and segmentation tasks, such as 0.5; |
float【0~1】 |
nms_thresh |
nms threshold |
Non-maximum suppression threshold, required for detection and segmentation tasks; |
float【0~1】 |
mask_thresh |
mask threshold |
Binarization threshold for segmenting objects in the detection box in segmentation tasks; |
float【0~1】 |
max_boxes_num |
Maximum number of detection boxes |
The maximum number of detection boxes allowed to be returned in one frame of image; |
int |
kp_num |
Number of keypoints |
The number of keypoints in the keypoint detection task; |
int |
kp_dim |
Keypoint dimension |
The dimension of keypoints in the keypoint detection task, only 2 and 3 are supported, determined by the training model; |
int【2/3】 |
debug_mode |
Debug mode |
Whether the timing function is enabled, options are 0/1, 0 means no timing, 1 means timing; |
int【0/1】 |
Deploying the Model for Image Inference#
For image inference, please refer to the following code, modify the parameter variables defined in __main__ according to the actual situation;
from libs.YOLO import YOLO11
from libs.Utils import *
import os,sys,gc
import ulab.numpy as np
import image

if __name__=="__main__":
    # This is just an example, please modify it to your own test image, model path, label name, model input size for custom scenarios
    img_path="/data/test_obb.jpg"
    kmodel_path="/data/best.kmodel"
    labels = ['pen']
    model_input_size=[320,320]

    confidence_threshold = 0.1
    nms_threshold=0.6
    img,img_ori=read_image(img_path)
    rgb888p_size=[img.shape[2],img.shape[1]]
    # Initialize YOLO11 instance
    yolo=YOLO11(task_type="obb",mode="image",kmodel_path=kmodel_path,labels=labels,rgb888p_size=rgb888p_size,model_input_size=model_input_size,conf_thresh=confidence_threshold,nms_thresh=nms_threshold,max_boxes_num=100,debug_mode=0)
    yolo.config_preprocess()
    res=yolo.run(img)
    yolo.draw_result(res,img_ori)
    yolo.deinit()
    gc.collect()
Deploying the Model for Video Inference#
For video inference, please refer to the following code, modify the variables defined in __main__ according to the actual situation;
from libs.PipeLine import PipeLine
from libs.Utils import *
from libs.YOLO import YOLO11
import os,sys,gc
import ulab.numpy as np
import image

if __name__=="__main__":
    # This is just an example, please modify it to your own model path, label name, model input size for custom scenarios
    kmodel_path="/data/best.kmodel"
    labels = ['pen']
    model_input_size=[320,320]

    # Add display mode, default is hdmi, options are hdmi/lcd/lt9611/st7701/hx8399, where hdmi is defaulted to lt9611, resolution 1920*1080; lcd is defaulted to st7701, resolution 800*480
    display_mode="lcd"
    rgb888p_size=[640,360]
    confidence_threshold = 0.1
    nms_threshold=0.6
    # Initialize PipeLine
    pl=PipeLine(rgb888p_size=rgb888p_size,display_mode=display_mode)
    pl.create()
    display_size=pl.get_display_size()
    # Initialize YOLO11 instance
    yolo=YOLO11(task_type="obb",mode="video",kmodel_path=kmodel_path,labels=labels,rgb888p_size=rgb888p_size,model_input_size=model_input_size,display_size=display_size,conf_thresh=confidence_threshold,nms_thresh=nms_threshold,max_boxes_num=50,debug_mode=0)
    yolo.config_preprocess()
    while True:
        with ScopedTiming("total",1):
            # Frame-by-frame inference
            img=pl.get_frame()
            res=yolo.run(img)
            yolo.draw_result(res,pl.osd_img)
            pl.show_image()
            gc.collect()
    yolo.deinit()
    pl.destroy()
Deployment Effect#
Select a desktop pen image and use kmodel for rotated object detection. The comparison between the original image and the inference result is shown below:
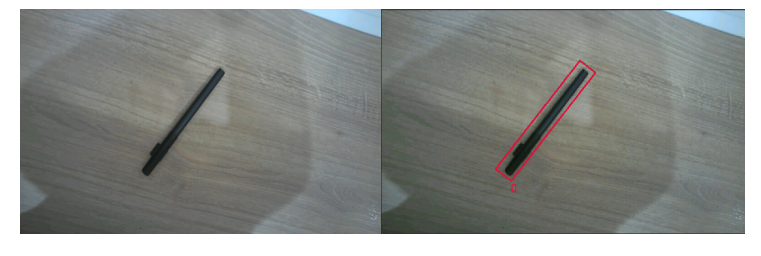
Auxiliary Tools#
Online Training Platform#
Introduction to Cloud Training Platform#
The Canaan Developer Community model training feature is a training platform opened to simplify the development process and improve development efficiency. This platform enables users to focus on the implementation of visual scenarios, more quickly complete the process from data annotation to obtaining the KModel in the deployment package, and deploy it on K230 and K230D chip development boards equipped with Canaan Technology Kendryte® series AIoT chips. Users only need to upload datasets and simply configure parameters to start training.
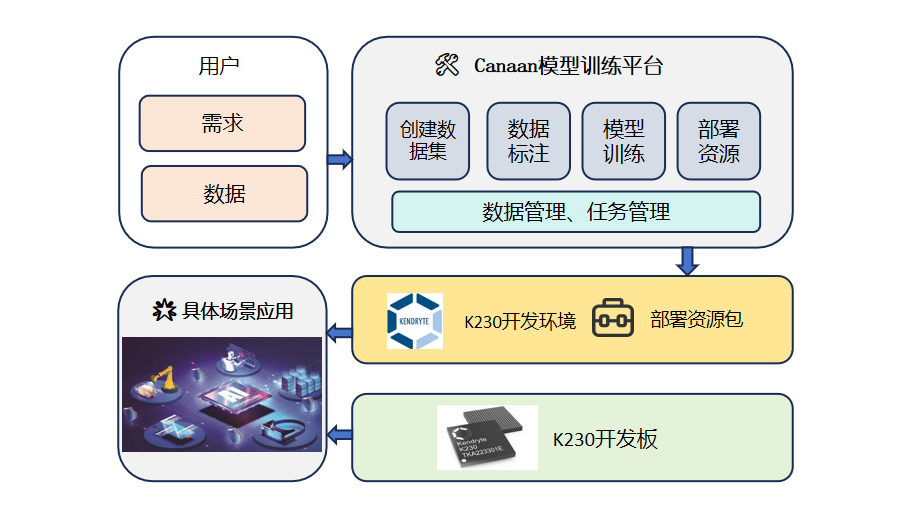
📌Platform Address: Canaan Cloud Training Platform
📌Platform Usage Documentation Reference: Canaan Cloud Training Platform Documentation Tutorial, please pay attention to the dataset format!
Supported Task Introduction#
The cloud training platform supports 7 types of visual tasks for K230 series chips, as described in the table below:
💡 Task Introduction:
Task Name |
Task Description |
|---|---|
Image Classification |
Classify images and obtain the category results and scores of the images. |
Image Detection |
Detect target objects in images, and provide location information, category information, and scores of the objects. |
Semantic Segmentation |
Segment the target regions in images, cut out different label regions in the image, which is a pixel-level task. |
OCR Detection |
Detect text regions in images, and provide the location information of text regions. |
OCR Recognition |
Recognize text content in images. |
Metric Learning |
Train a model that can characterize images. Use this model to create a feature library, and through feature comparison, classify new categories without retraining the model, also known as self-learning. |
Multi-label Classification |
Perform multi-category classification on images. Some images may not belong to a single category, sky and sea can exist simultaneously, obtaining multi-label classification results of images. |
Deployment Steps#
Deployment Package Description#
After training, you can download the deployment package for the corresponding training task. After extracting the downloaded deployment zip package, the directory is as follows:
📦 task_name
├── 📁 **_result
│   ├── test_0.jpg
│   ├── test_1.jpg
│   └──...
├── mp_deployment_source
├── **_image_1_2_2.py
├── **_image_1_3.py
├── **_video_1_2_2.py
├── **_video_1_3.py
└── README.pdf
The content is shown in the figure:
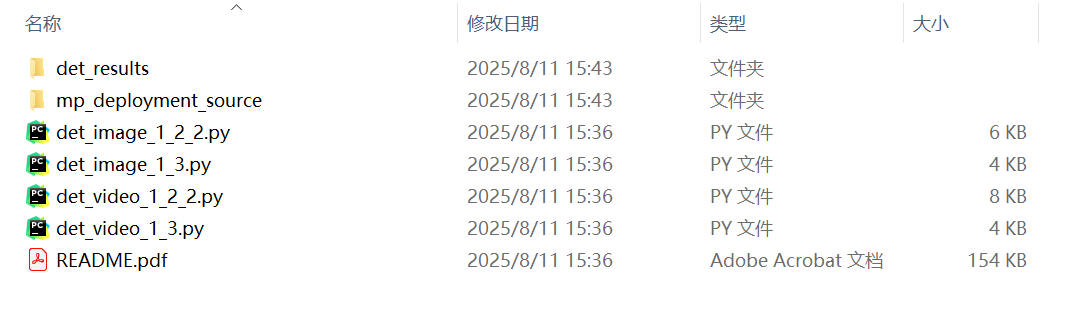
Where mp_deployment_source is the code package deployed on the K230 MicroPython image, which contains the deployment configuration files and the deployed KModel.
File Copy#
✅ Firmware Selection: Please download the latest PreRelease firmware on github according to your development board type to ensure that the latest features are supported! Or use the latest code to compile the firmware yourself, see the tutorial: Firmware Compilation.
✅ Firmware Burning: Burn the firmware according to the development board type, firmware burning reference: Firmware Burning.
✅ Deployment Script: After the firmware is successfully burned, power on and boot, you can find the CanMV/sdcard directory in the file system root directory, copy mp_deployment_source to the CanMV/sdcard directory.
Script Running#
Open CanMV IDE K230, select File(F)->Open File->select different task scripts in CanMV/sdcard/examples/19-CloudPlatScripts to run.
💡 Script Introduction:
Script Name |
Script Description |
|---|---|
deploy_cls_image.py |
Image classification single image inference script, you need to add test images by yourself and modify the path of reading images in the script. |
deploy_cls_video.py |
Image classification video stream inference script, see the comments in the script for details. |
deploy_det_image.py |
Object detection single image inference script, you need to add test images by yourself and modify the path of reading images in the script. |
deploy_det_video.py |
Object detection video stream inference script, see the comments in the script for details. |
deploy_seg_image.py |
Semantic segmentation single image inference script, you need to add test images by yourself and modify the path of reading images in the script. |
deploy_seg_video.py |
Semantic segmentation video stream inference script, see the comments in the script for details. |
deploy_ocrdet_image.py |
OCR detection single image inference script, you need to add test images by yourself and modify the path of reading images in the script. |
deploy_ocrdet_video.py |
OCR detection video stream inference script, see the comments in the script for details. |
deploy_ocrrec_image.py |
OCR recognition single image inference script, you need to add test images by yourself and modify the path of reading images in the script. Considering that the platform OCR recognition model reads long strip-shaped text data for a single inference, video stream inference is not supported. |
deploy_ocr_image.py |
OCR single image inference script, you need to add test images by yourself and modify the path of reading images in the script. Dual model task, need to add both OCR detection and OCR recognition deployment packages, pay attention to modifying the directory path in the script. |
deploy_ocr_video.py |
OCR video stream inference script, see the comments in the script for details. Dual model task, need to add both OCR detection and OCR recognition deployment packages, pay attention to modifying the directory path in the script. |
deploy_ml_image.py |
Metric learning single image inference script, you need to add test images by yourself and modify the path of reading images in the script. The output is features of the corresponding dimension, and subsequent operations are modified according to the application scenario. |
deploy_ml_video.py |
Metric learning video stream inference script, see the comments in the script for details. The output is features of the corresponding dimension, and subsequent operations are modified according to the application scenario. |
deploy_multl_image.py |
Multi-label classification single image inference script, you need to add test images by yourself and modify the path of reading images in the script. |
deploy_multl_video.py |
Multi-label classification video stream inference script, see the comments in the script for details. |
Deployment Description#
📢 When deploying the model, if the effect is not ideal, first adjust the threshold of the corresponding task and the resolution of the inference image, and test whether the results can improve!
📢 Learn to locate problems, for example, check the test images in the
**_resultsdirectory in the deployment package. If the images are normal, it may be a problem with the deployment code, model conversion, or threshold!📢 Adjust the parameters of model training, such as
epoch,learning_rate, etc., to prevent insufficient training!
AICube#
AICube Introduction#
AICube is an offline training tool provided by Canaan for developers. This platform ensures data security and enables visualized local training. The platform supports 8 tasks in total: image classification, object detection, semantic segmentation, OCR detection, OCR recognition, metric learning, multi-label classification, and anomaly detection. Compared with the online training platform, it allows users to use local GPUs for model training, and converts the model into kmodel for deployment on K230.
Environment Preparation and Software Installation#
Before installing AICube, please check whether the following prerequisites are met:
A device with an NVIDIA GPU, recommended video memory of 8GB or above;
The computer has CUDA 11.7 or above installed, and CUDNN installed;
The computer has dotnet 7.0 installed, and the installation path added to environment variables;
Recommended computer memory of 8GB or above, with at least 20GB of remaining hard disk space;
If your computer meets the above conditions, you can download AICube and extract it for use. AICube provides installation packages for Ubuntu and Windows. Because the installation package includes the supporting torch training environment, multiple pre-trained models, and sample datasets, the package is large. Please download in a suitable network environment. The download address is: AICube Download. For usage steps, please refer to the user guide for the corresponding version.
📢 Please select the latest version when downloading.
Supported Tasks Introduction#
AICube supports 8 types of visual tasks for the K230 series chips, as shown in the table below:
💡 Task Introduction:
Task Name |
Task Description |
|---|---|
Image Classification |
Classify images to obtain the category result and score of the image. |
Image Detection |
Detect target objects in images, and provide the position information, category information, and score of the objects. |
Semantic Segmentation |
Segment the target regions in images, cut out different label regions in the image, which is a pixel-level task. |
OCR Detection |
Detect text regions in images, and provide the position information of the text regions. |
OCR Recognition |
Recognize text content in images. |
Metric Learning |
Train a model that can characterize images, use the model to create a feature database, and classify new categories without retraining the model through feature comparison, which can also be called self-learning. |
Multi-label Classification |
Perform multi-category classification on images. Some images may not belong to a single category, sky and sea can exist at the same time, and obtain multi-label classification results of images. |
Anomaly Detection |
Used to detect abnormal categories in a certain type of product, commonly used in industrial quality inspection and other fields. |
Usage Instructions#
Function Page Introduction#
AI Cube contains 5 function pages. The “Project” page mainly implements project management functions, displaying the current project and recent projects; the “Image” page displays the dataset information of the current project, making it convenient for users to view the images of the dataset; the “Split” page displays split information, counting the split categories and images of different split sets; the “Training” page implements training parameter configuration, training information, and training curve display; the “Evaluation” page implements model evaluation and evaluation information display, and can configure necessary deployment parameters to generate deployment packages.
🗂️ Project Page Illustration:
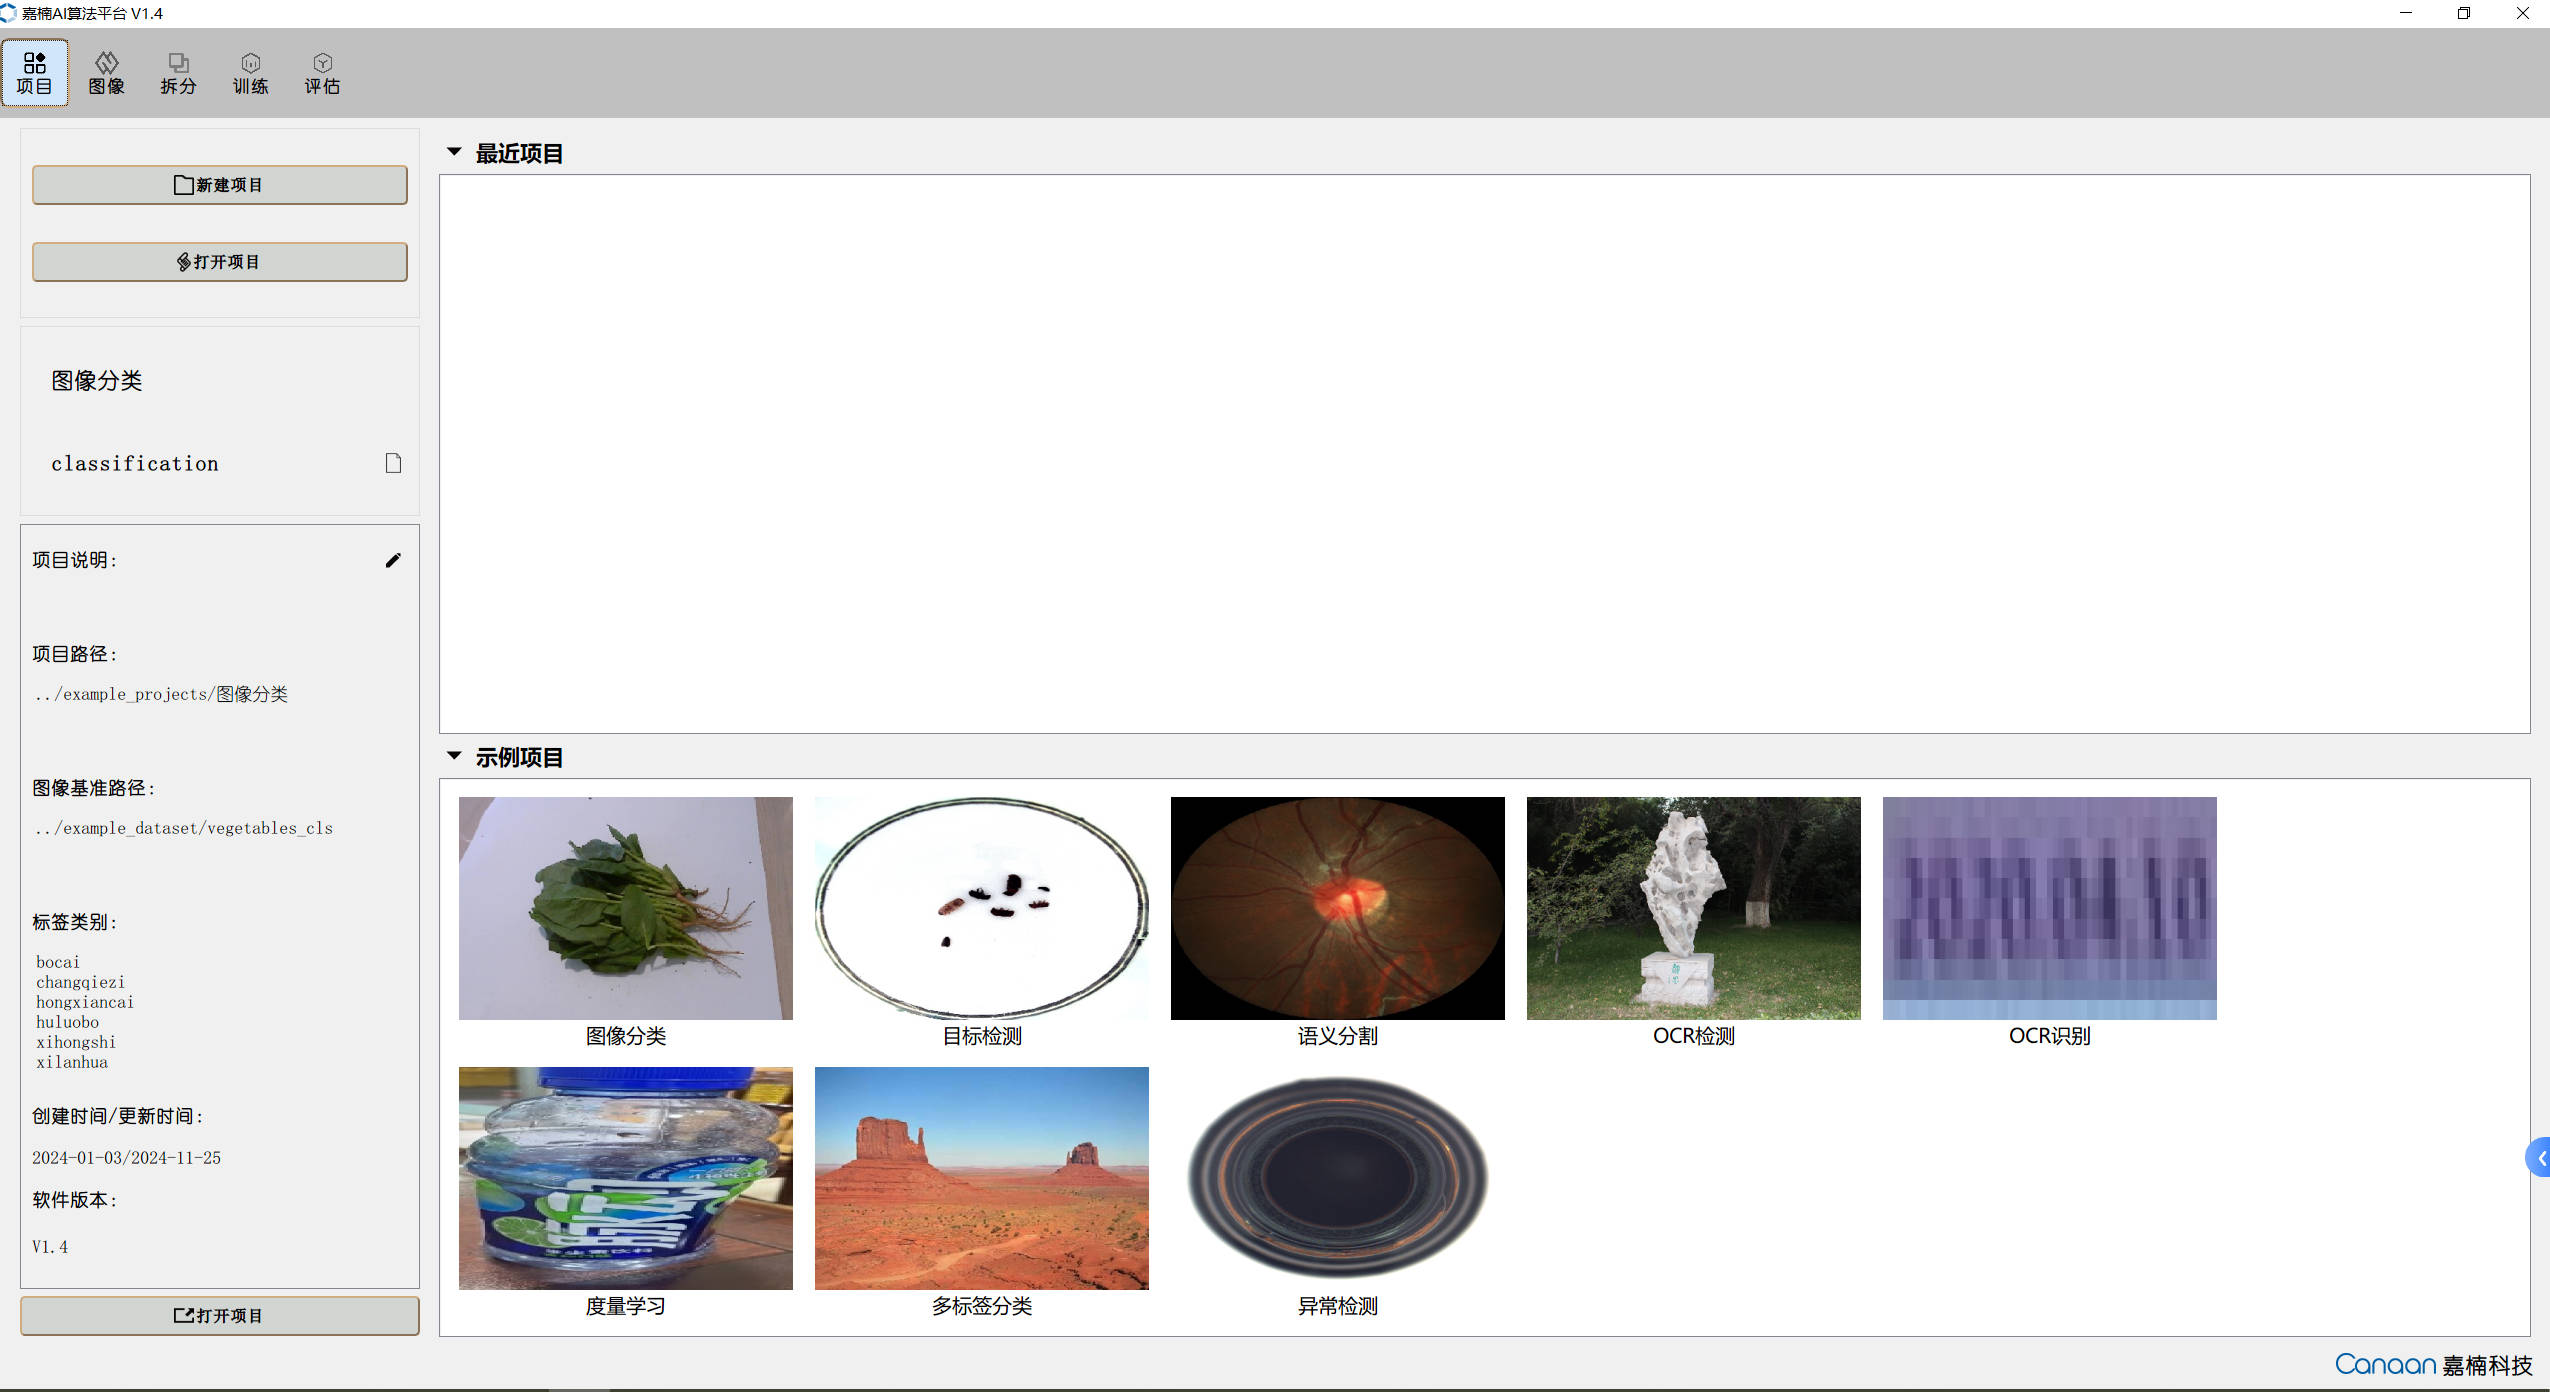
🗂️ Image Page Illustration:

🗂️ Split Page Illustration:
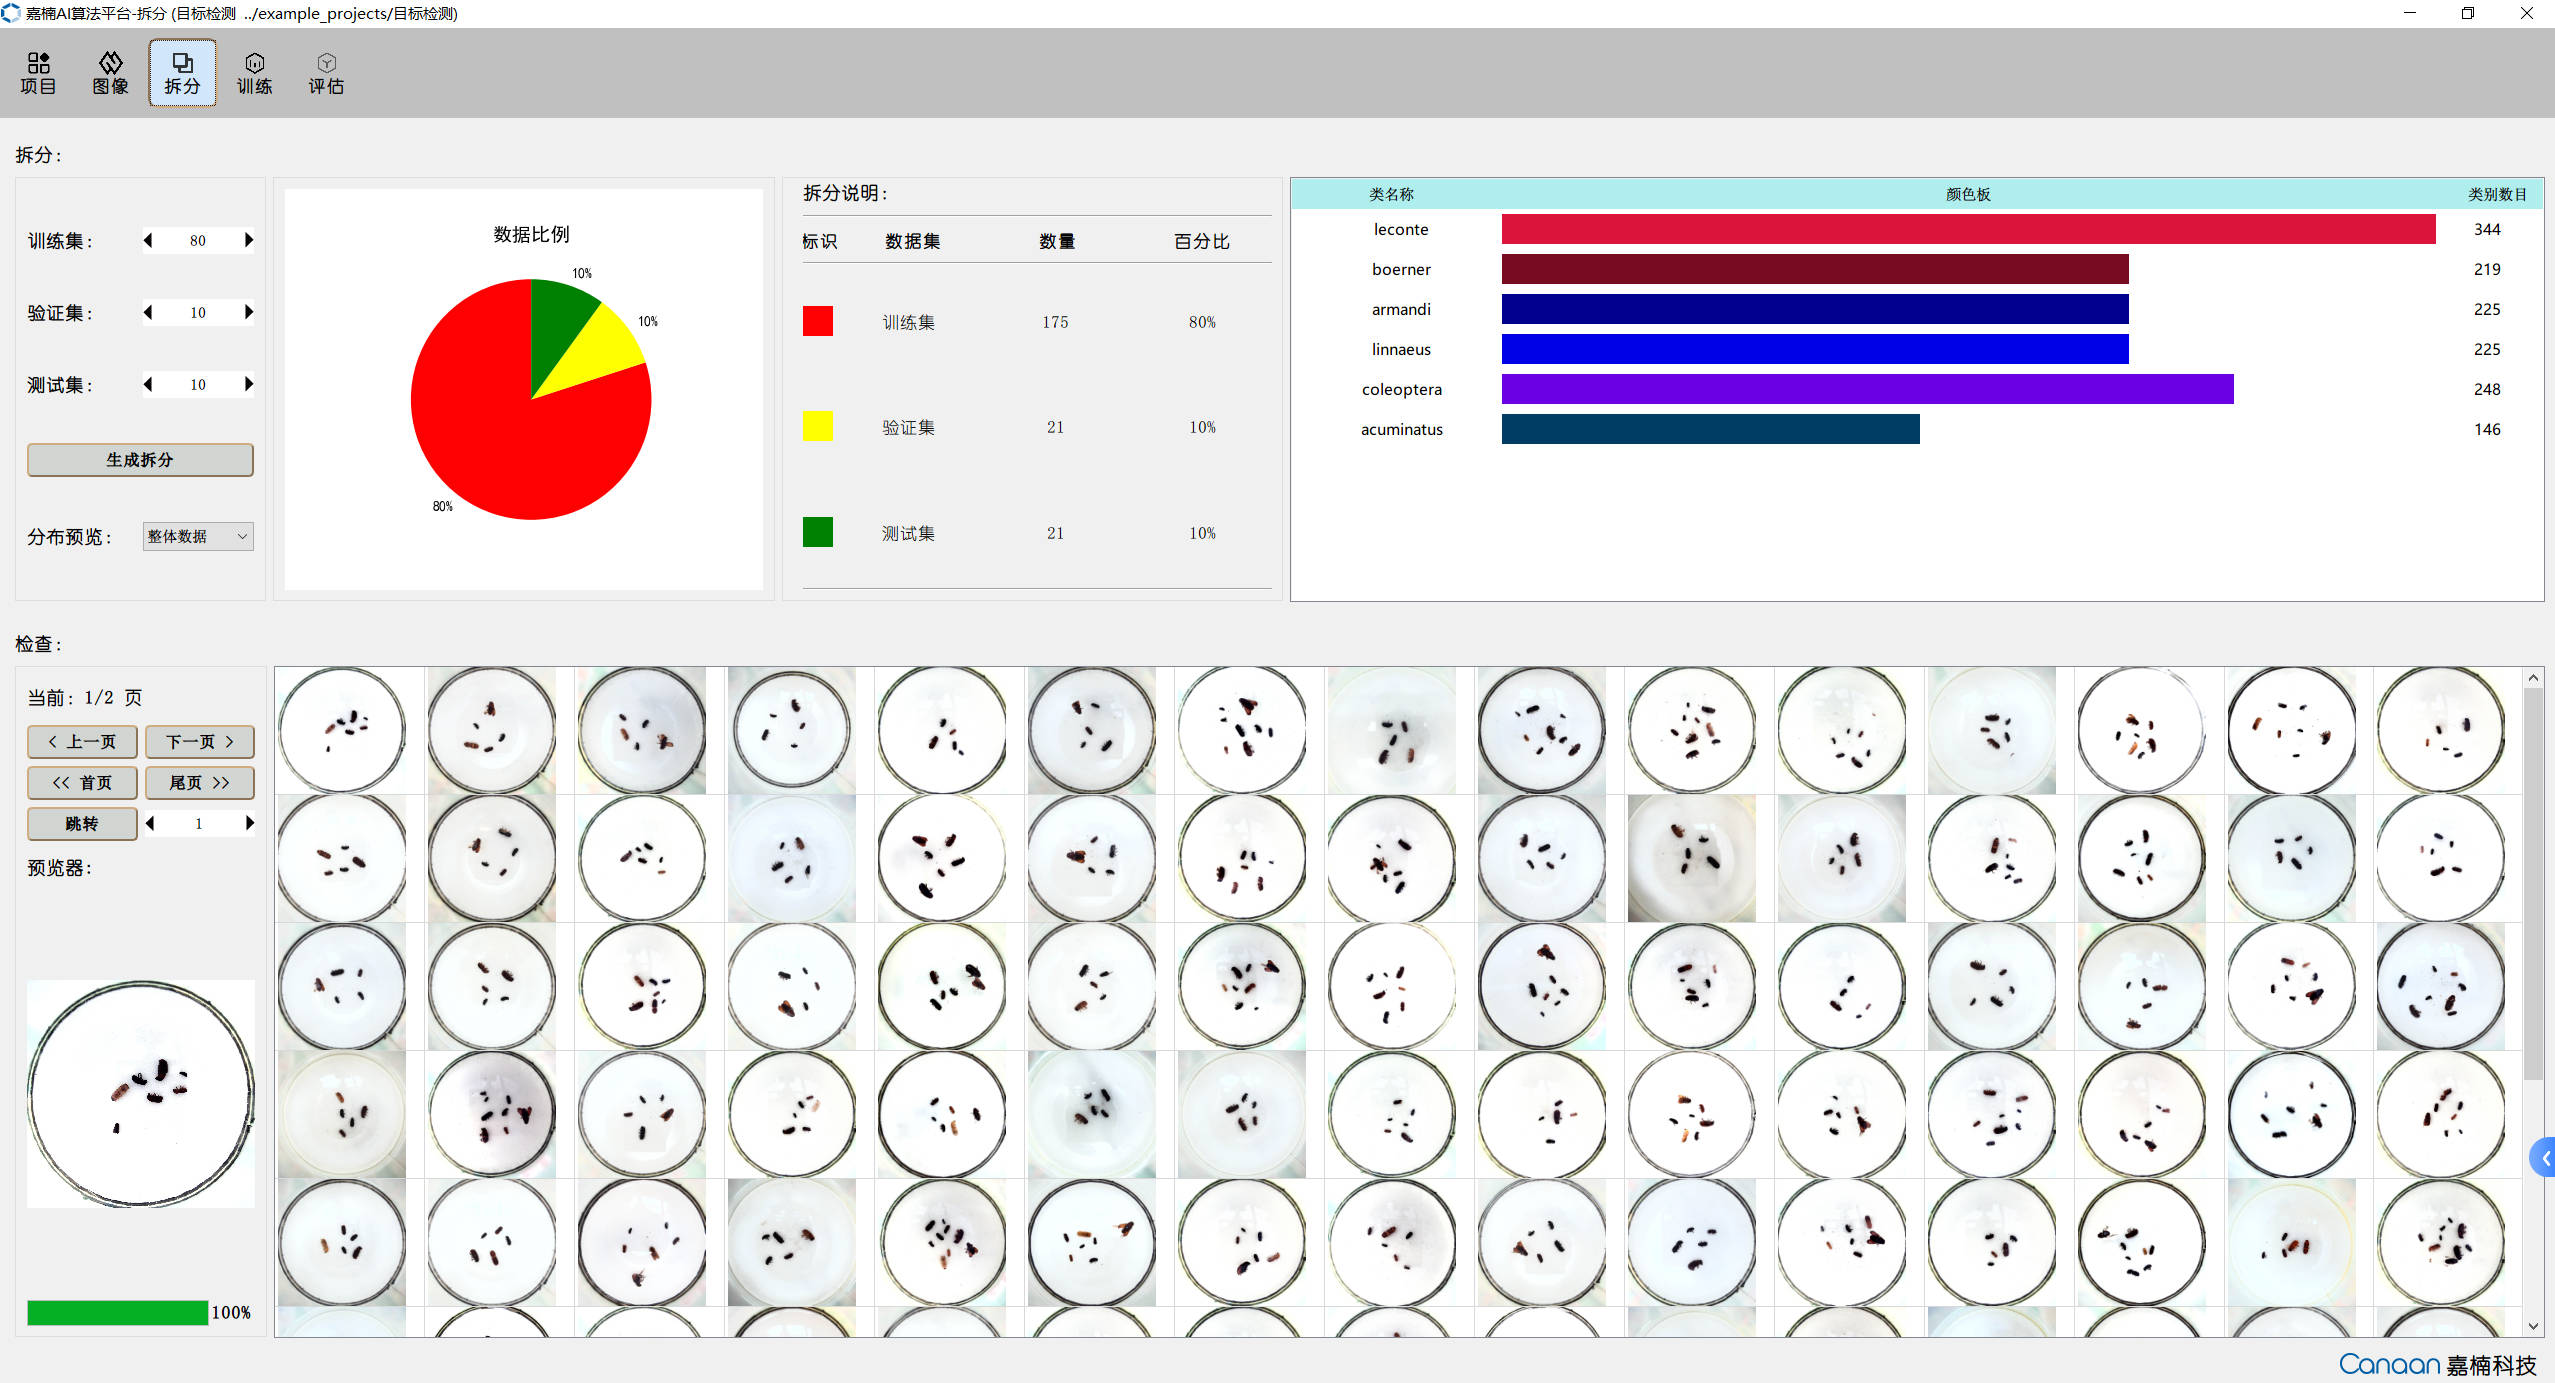
🗂️ Training Page Illustration:
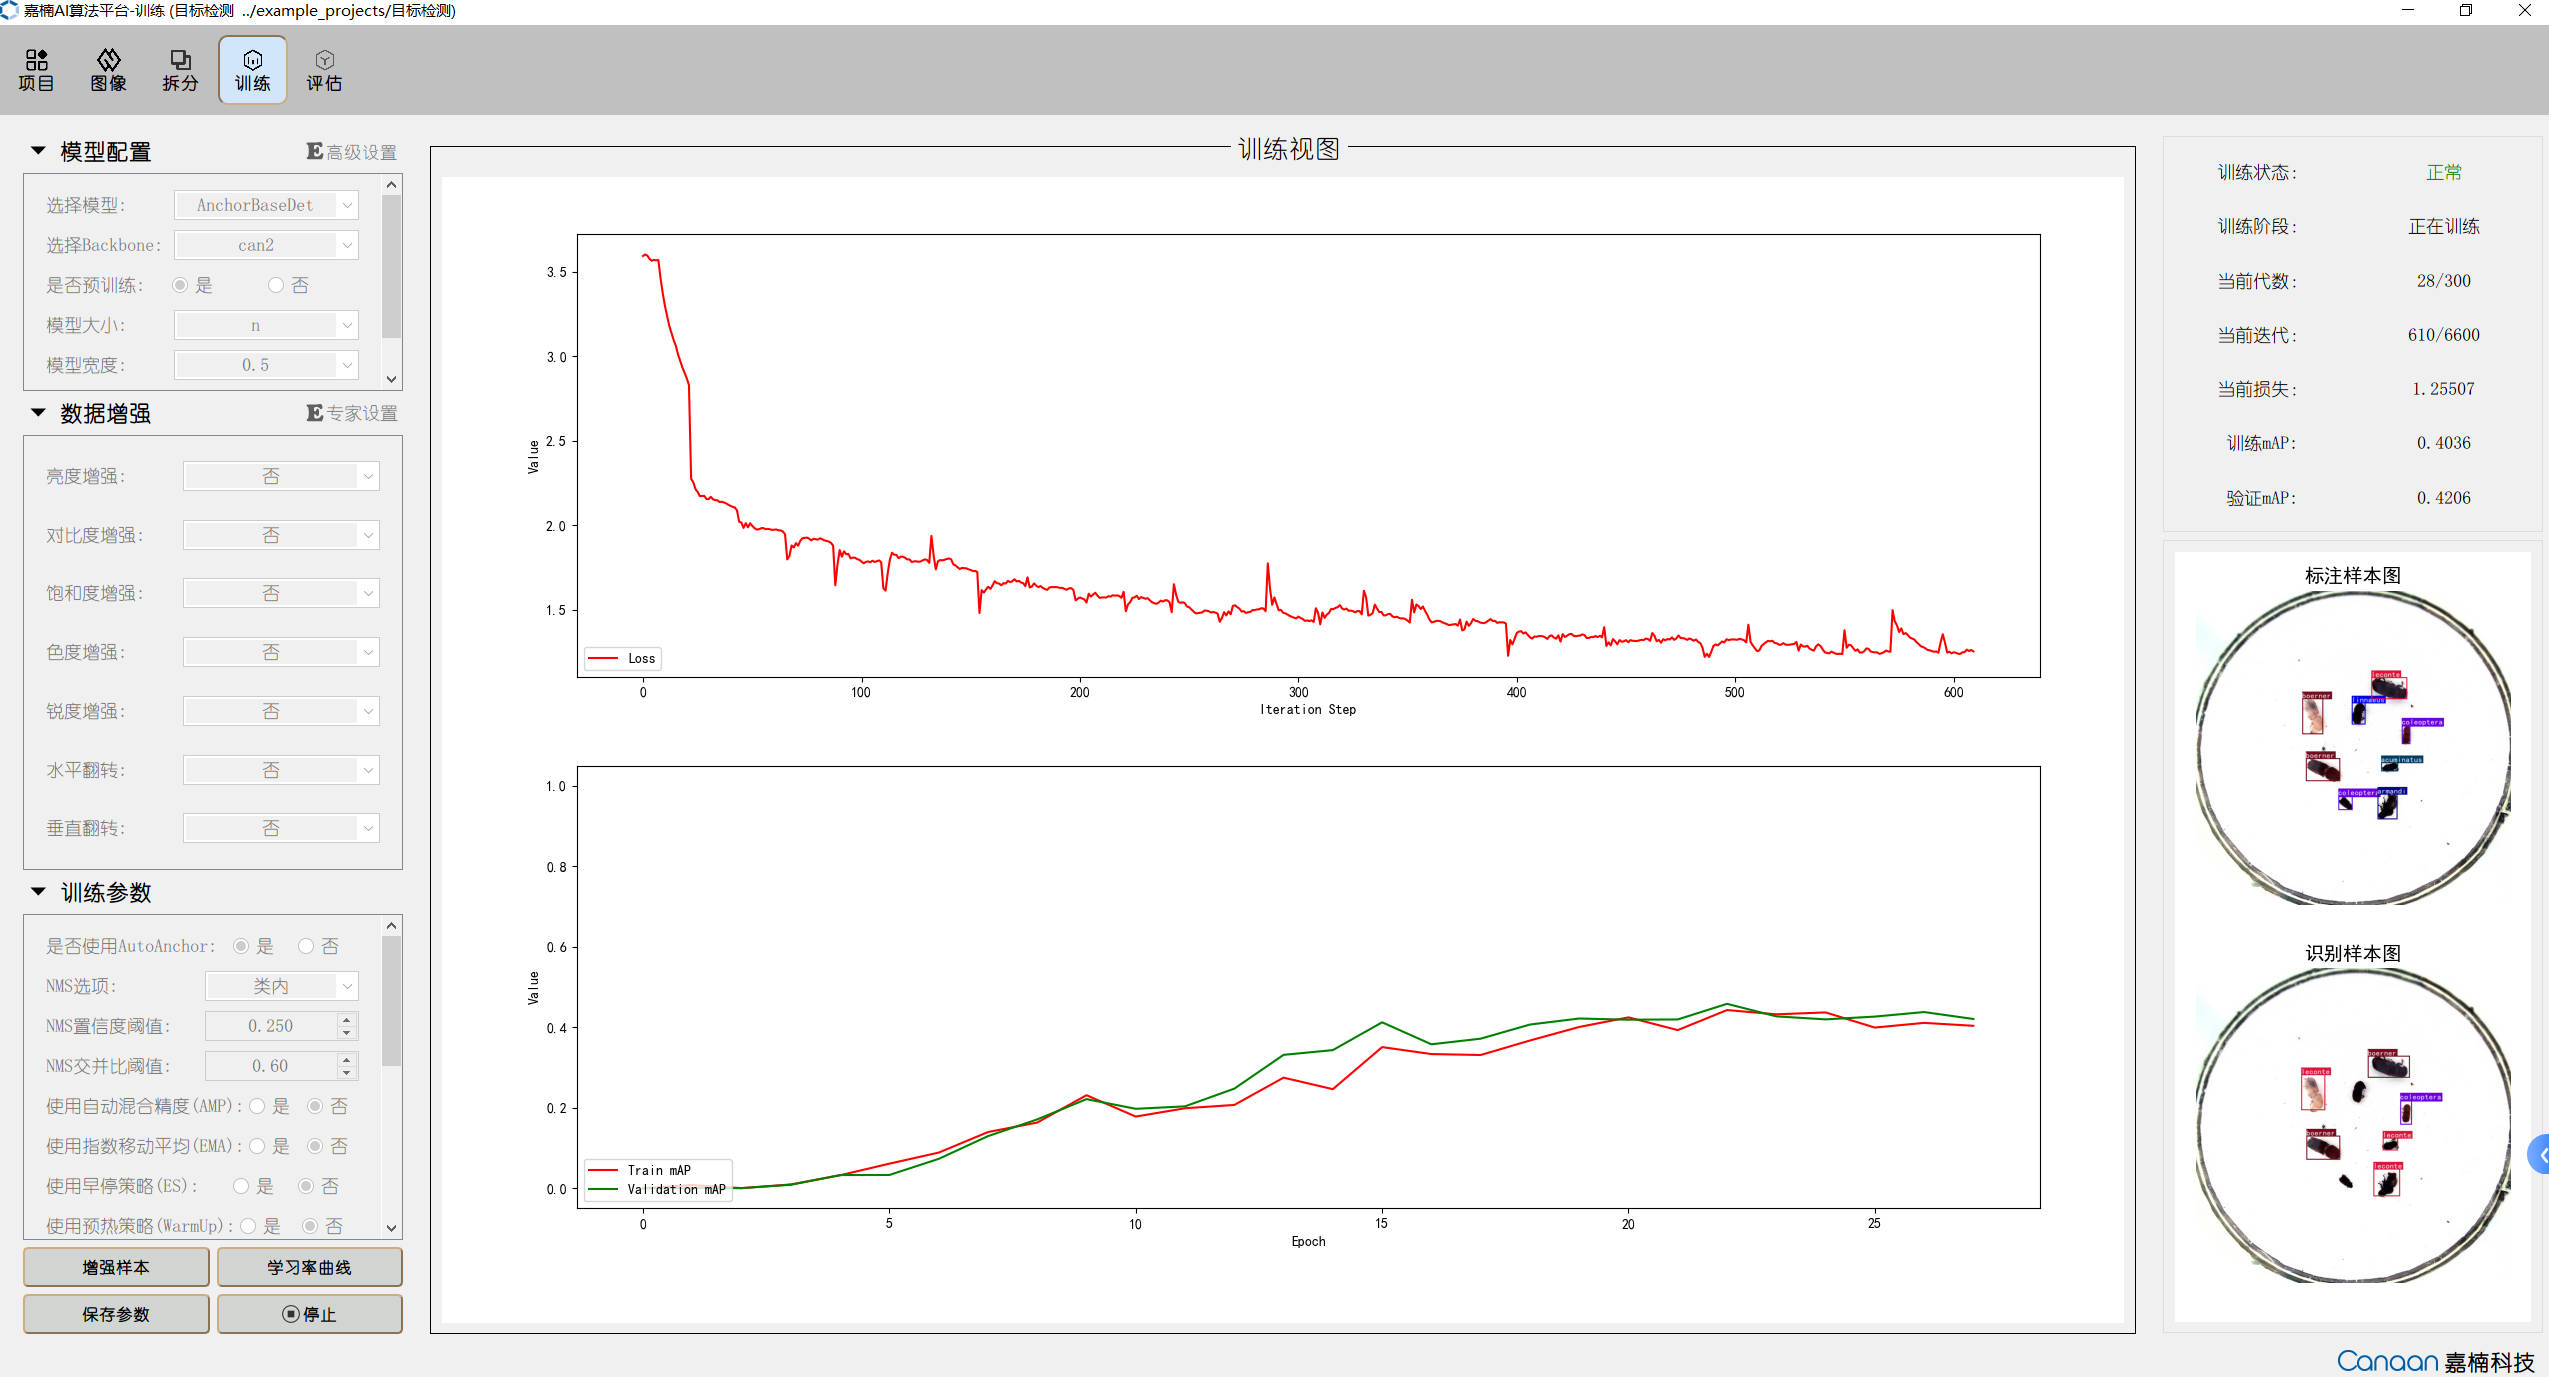
🗂️ Evaluation Page Illustration:
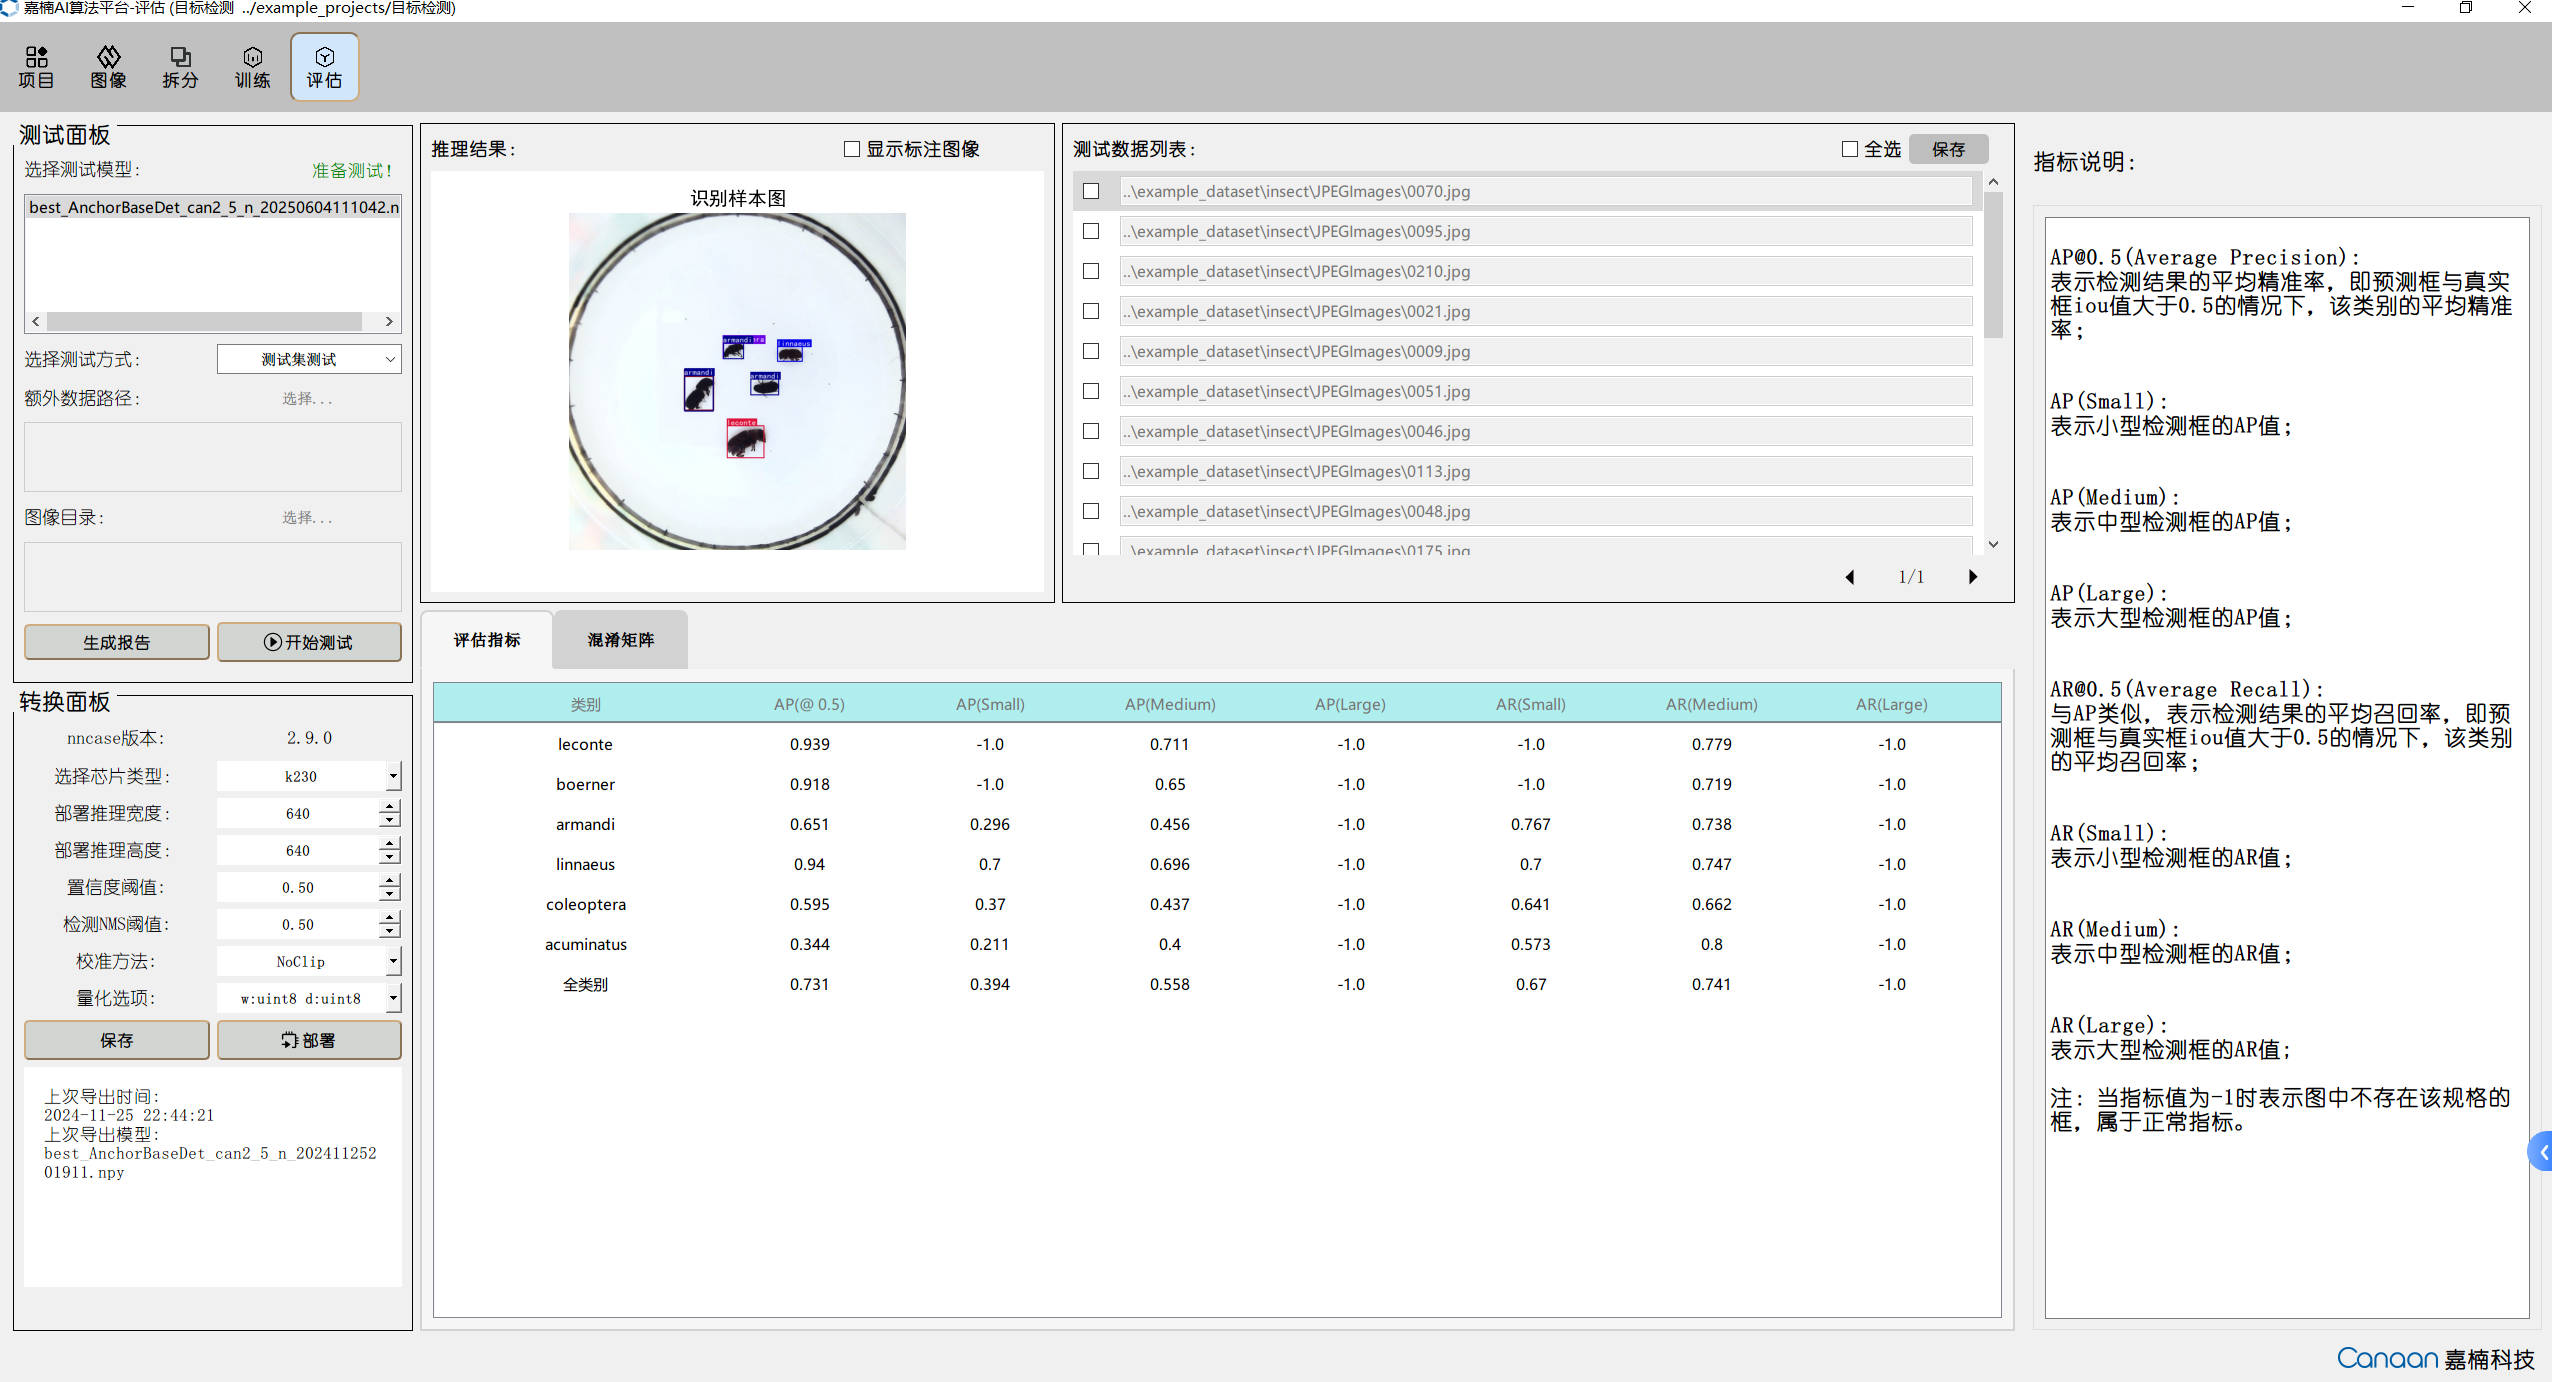
Creating Datasets#
Organize the dataset according to the dataset format of different tasks. The corresponding dataset format can be viewed by clicking “New Project” on the Project Page. At the same time, we provide sample datasets for different tasks, which are in the example_dataset directory; and we use these sample datasets to create sample projects, which are located in the example_projects directory.
The corresponding relationships between sample datasets and sample tasks for different tasks are as follows:
Dataset Name |
Sample Task |
Description |
|---|---|---|
vegetable_cls |
Image Classification |
Vegetable classification scenario |
insect |
Object Detection |
Insect detection scenario |
Ocular_lesions |
Semantic Segmentation |
Eye lesion region segmentation scenario |
dataset_td100 |
OCR Detection |
OCR text detection scenario |
ProductionDate |
OCR Recognition |
Production date recognition scenario |
drink |
Metric Learning |
Beverage bottle classification scenario |
multilabel2000 |
Multi-label Classification |
Natural scenery multi-label classification scenario |
bottle |
Anomaly Detection |
Bottle mouth anomaly detection scenario |
You can use the sample datasets we provide, or you can organize your own dataset according to the corresponding task format in the New Project Interface. Most of the problems encountered by AICube are data problems. We only check the directory structure of the dataset and do not check the annotation information inside the data. Please handle the data carefully.
Creating Projects#
Enter the Project Page —> Click the New Project button —> Select the task type —> Import the dataset —> Select the storage path of the project —> Add the project name —> Create the project.
The new project interface is shown in the figure below:
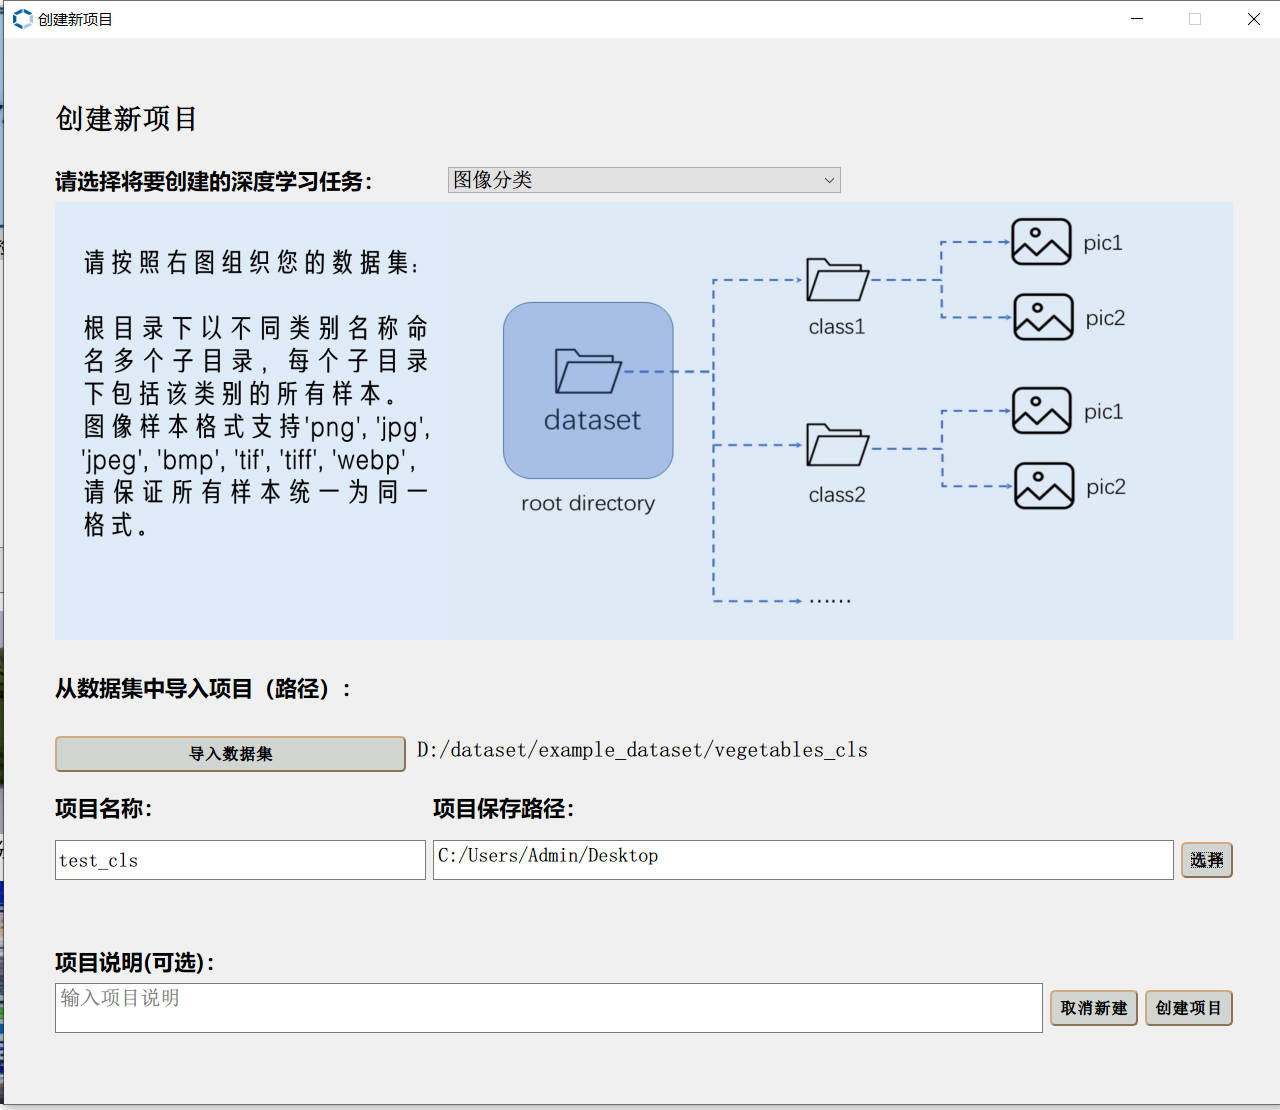
After the project is created, it will automatically jump to the Image Page, where you can view your dataset details. Enter the Split Page, you can split the dataset according to a custom ratio, and view the statistical information of the split set.
Starting Training#
Enter the Training Page, and configure model, data augmentation, and training parameters on the left side.
Common parameter analysis:
Platform Parameter Name |
Common Parameter Definition |
Parameter Meaning Analysis |
|---|---|---|
Model |
model |
Network models with different structures, used to implement different tasks; |
Backbone |
model backbone |
The feature extraction part of the network structure in the model, such as models for detection and segmentation tasks; |
Whether to Pre-train |
pretrain |
Whether to load the pre-trained model provided by AICube; |
Pre-trained Model Language |
pretrain language |
Task-specific parameter for OCR Recognition, select the sample language for training the pre-trained model; ignored for other tasks; |
Model Size |
model size |
n, s, m, l, x, variants of the same model, the difference is the model size, used to balance accuracy and speed; |
Model Width |
model width |
The larger the width, the larger the number of parameters; |
Image Size |
model input size |
Model input resolution, a single value indicates the input is [x,x], double values indicate the input is [x,y]; |
ASPP Dilation Rate |
ASPP dilation rate |
Task-specific parameter for Semantic Segmentation, the scale of different atrous convolutions and pooling operations, performing atrous convolution with different dilation rates can expand the receptive field and obtain broader contextual information; |
Embedding Length |
embedding length |
Task-specific parameter for Metric Learning, the vector length of the vectorized samples; |
Automatic Data Augmentation |
TrivialAugment |
Parameter-free single-image random automatic data augmentation; |
Other Data Augmentation Methods |
— |
Brightness, contrast, saturation, hue, sharpness enhancement, flip, rotation, random scaling, random cropping, perspective transformation, Gaussian blur, histogram equalization, gray world algorithm, CutOut, Random Erasing, Mask; |
Learning Rate |
learning rate |
Parameters of the optimization algorithm, the adjustment step size for each iteration; |
Epoch |
epoch |
One epoch is the process of the neural network training once using all training samples; |
Training Batch Size |
batchsize |
The number of samples used for each forward and backward propagation; |
Optimizer |
optimizer |
The optimization function used when optimizing the network, such as SGD, Adam, etc.; |
AutoAnchor |
autoanchor |
Anchor box adaptation in object detection tasks; |
NMS Option |
nms option |
Non-maximum suppression option in object detection tasks to distinguish intra-class and inter-class; |
Confidence Threshold |
confidience threshold |
Used to filter predicted boxes of categories, predicted boxes below this threshold will be deleted; |
IoU Threshold |
IOU threshold |
Perform maximum value screening on multiple overlapping boxes, calculate the scores of all detection boxes, compare them with the highest-scored detection box in turn, and detection boxes greater than this threshold will be deleted; the Box threshold in OCR detection is similar; |
Automatic Mixed Precision |
AMP |
Adopt different data precision for different layers to save video memory and improve calculation speed; |
Exponential Moving Average |
EMA |
Smoothing method to prevent the influence of outliers, with weights decreasing exponentially over time; |
Early Stopping |
Early Stopping |
A method to increase model generalization and prevent overfitting; |
Warmup Strategy |
WarmUp |
Operate the learning rate in the initial stage of training to make the model converge faster; |
Multi-Scale Training |
MST |
Train input images of different scales to improve the detection generalization of the detection model for objects of different sizes; |
Loss Function |
loss function |
Used to evaluate the degree of difference between the predicted value of the model and the true value. The smaller the loss, the better the model performance; |
Learning Rate Scheduler |
learning rate scheduler |
Learning rate adjustment strategy, dynamically adjust the learning rate during the training process to adapt to the gradient descent process, including StepLR, CosineAnnealingLR, LinearLR, MultiStepLR, etc.; |
Loss Refresh Step |
loss refresh step |
Interface Loss curve drawing frequency, in units of batch; |
GPU Index |
gpu index |
Graphics card index; |
After configuring the corresponding parameters according to different tasks, you can click the Augmented Sample Button to view some sample samples after data augmentation; click Learning Rate Curve to view the learning rate changes caused by different learning rate strategies; click the Start Training Button, the training information will be displayed in the upper right panel, and the loss curve and indicator curve will be drawn in the middle; the prediction results of the sample samples will be displayed iteratively for each epoch in the lower right panel. The training interface is shown in the figure below:
Model Testing#
Enter the Evaluation Page, select the trained model, and then select the test method. The test methods are as follows:
Test Method |
Description |
|---|---|
Test Set Test |
Test and evaluate the test set obtained by splitting, and output test indicator data; |
Extra Data Test |
Use labeled data in the same format as the training dataset for testing, and output test indicator data; |
Image Directory Test |
Only select and use the trained model and parameters to infer all unlabeled samples in the image directory, without test indicators; |
Click the “Start Test” button to perform the test. After the test is finished, check your model performance according to the evaluation indicators; double-click the items in the test data list to view the large image of the inference result.
Model Deployment#
If the model performance meets your needs, you can configure deployment parameters on the chip adaptation panel, mainly the input resolution of the model and some basic parameters, and click the Deploy Button to generate the deployment package.
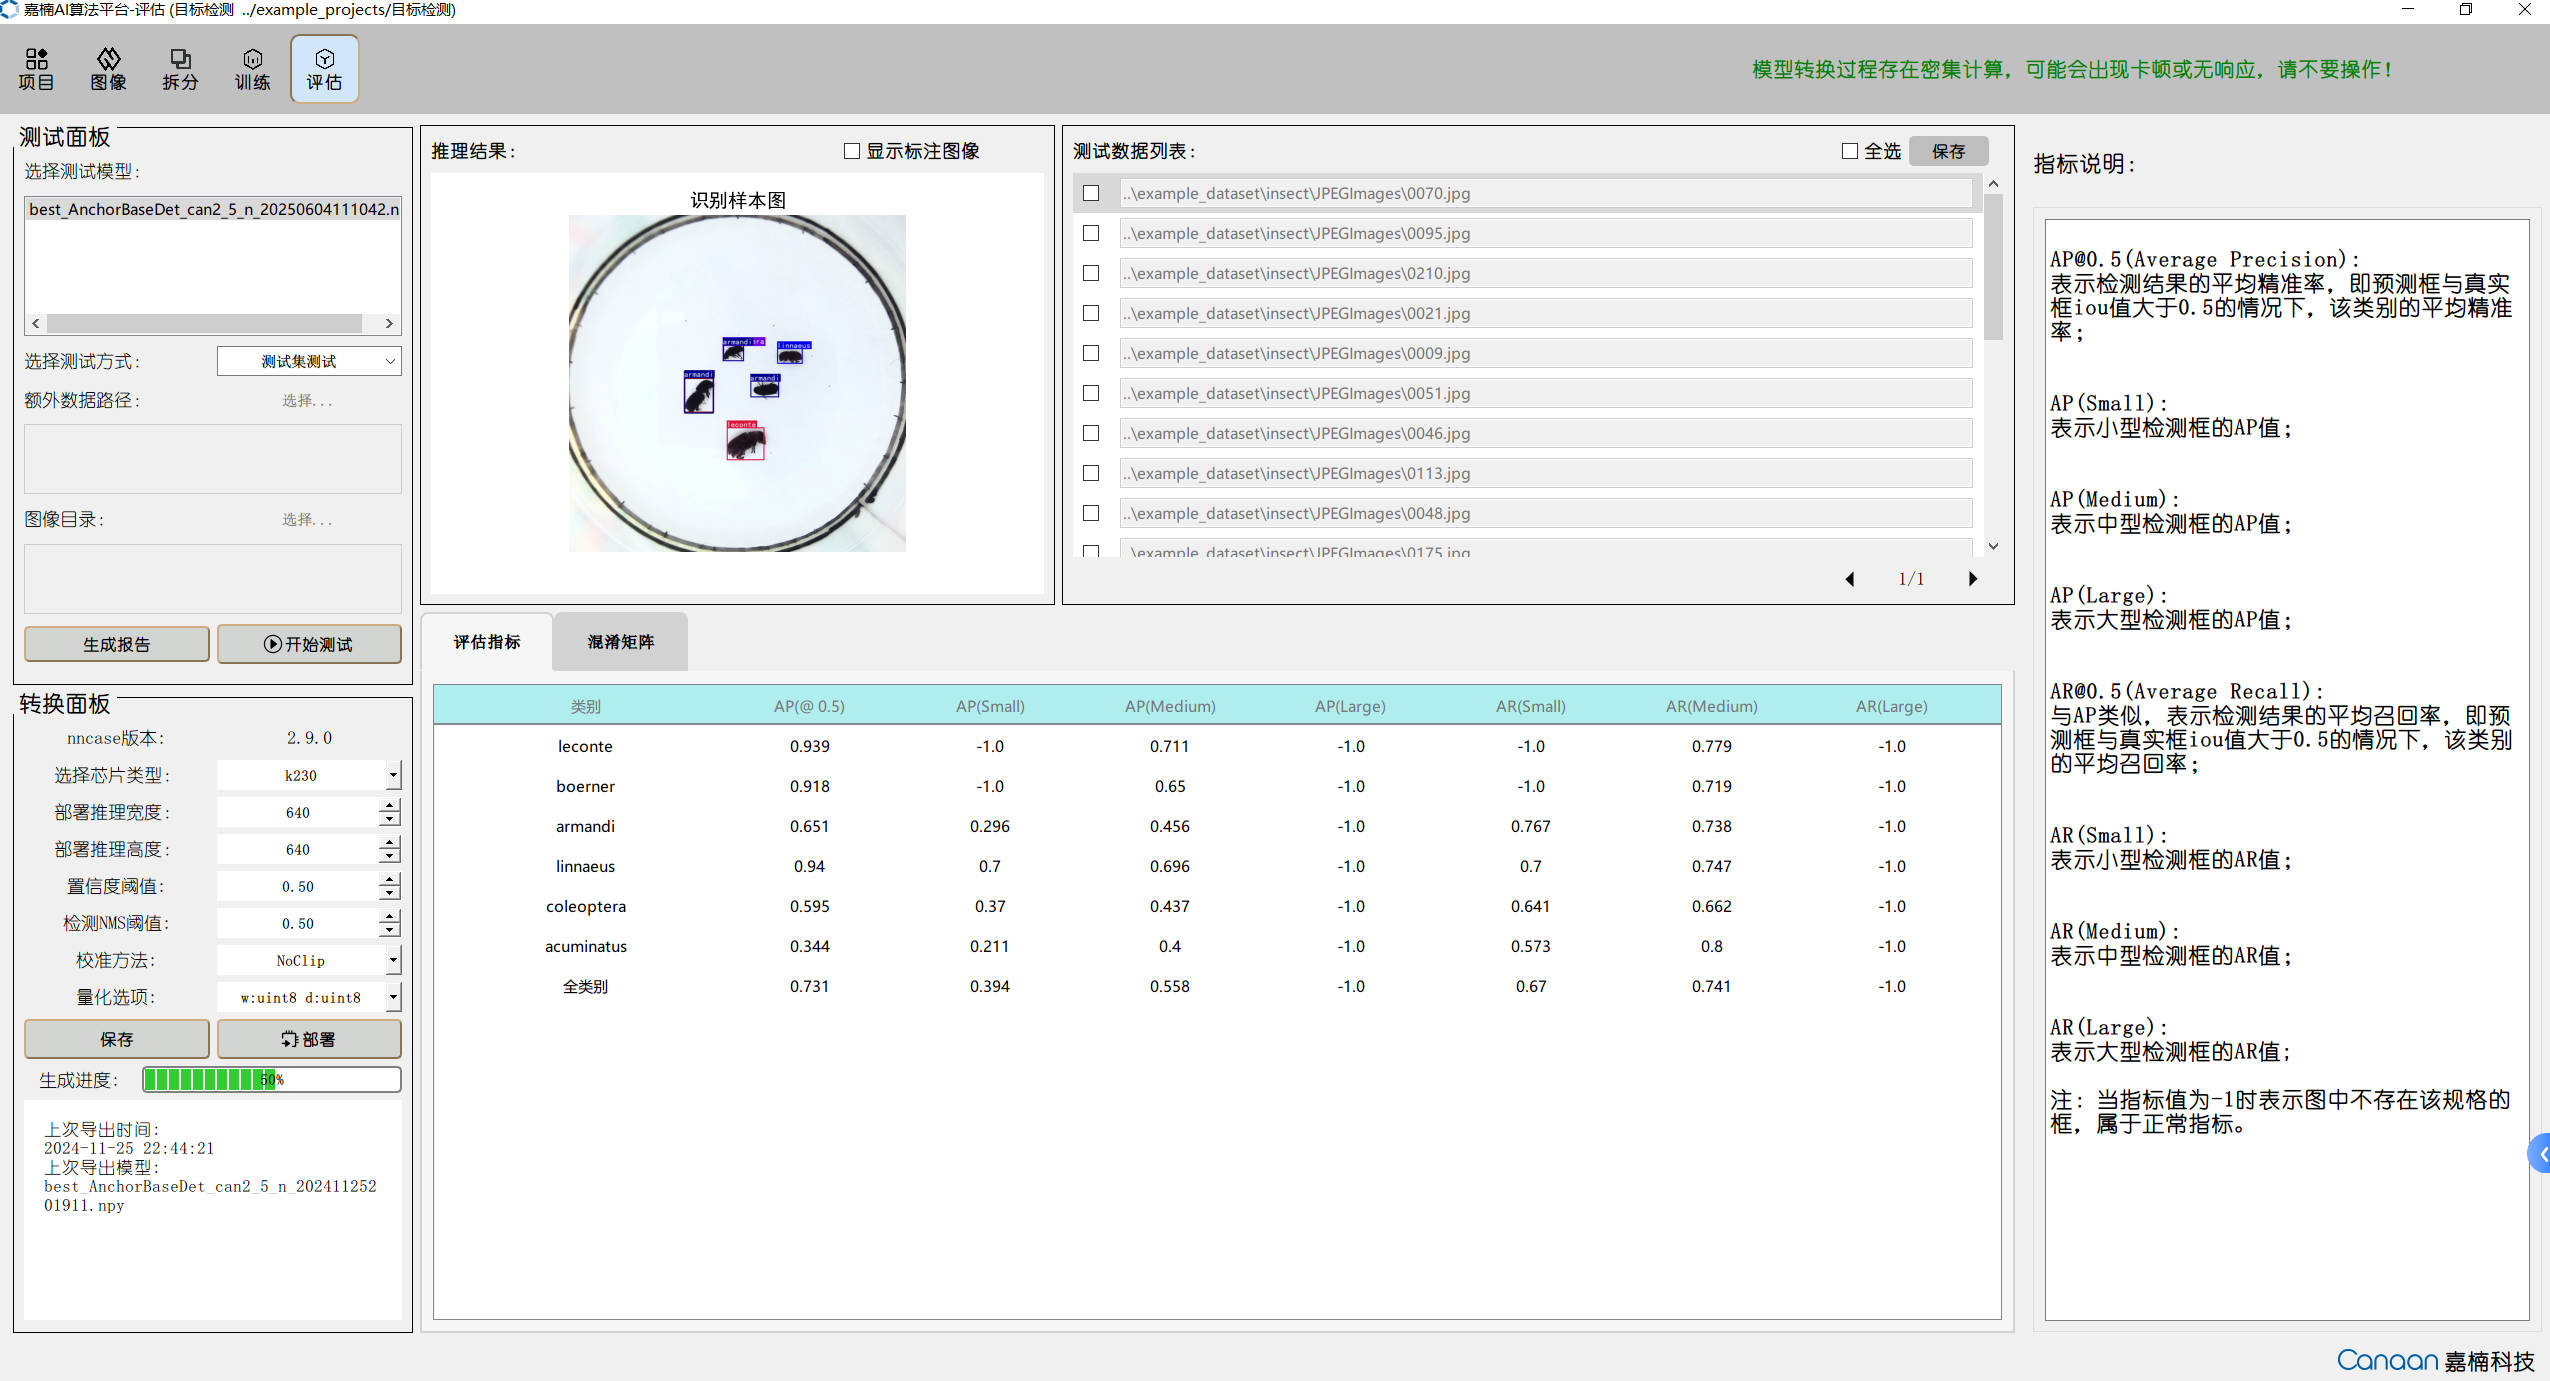
After the deployment product is generated, you can find the following files in the root directory of the current project. We mainly use kmodel and the configuration file deploy_config.json:
📦 task_name
├── 📁 cpp_deployment_source
├── 📁 mp_deployment_source
└── README.md
Among them, the mp_deployment_source directory is the resource deployed on the K230 MicroPython solution, including the Kmodel file and deployment configuration file!
Deployment Steps#
Deployment Package Description#
After training ends, you can obtain the deployment artifacts for the corresponding training task.
File Copying#
✅ Firmware Selection: Please download the latest PreRelease firmware according to your development board type on github to ensure that the latest features are supported! Or use the latest code to compile the firmware yourself. See the tutorial: Firmware Compilation.
✅ Firmware Flashing: Flash the firmware according to the development board type. For firmware flashing, refer to: Firmware Flashing.
✅ Deployment Script: After the firmware is successfully flashed, power on. You can find the CanMV/sdcard directory in the root of the file system. Copy mp_deployment_source to the CanMV/sdcard directory.
Script Execution#
Open CanMV IDE K230, select File(F)->Open File->CanMV/sdcard/examples/19-CloudPlatScripts in the upper left corner, and select the scripts for different tasks to run. Alternatively, select the deployment scripts in the deployment resource directory to run.
💡 Script Introduction:
Script Name |
Script Description |
|---|---|
deploy_cls_image.py |
Image classification single-image inference script. You need to add test images yourself and modify the path for reading the image in the script. |
deploy_cls_video.py |
Image classification video stream inference script. See the comments inside the script for details. |
deploy_det_image.py |
Object detection single-image inference script. You need to add test images yourself and modify the path for reading the image in the script. |
deploy_det_video.py |
Object detection video stream inference script. See the comments inside the script for details. |
deploy_seg_image.py |
Semantic segmentation single-image inference script. You need to add test images yourself and modify the path for reading the image in the script. |
deploy_seg_video.py |
Semantic segmentation video stream inference script. See the comments inside the script for details. |
deploy_ocrdet_image.py |
OCR detection single-image inference script. You need to add test images yourself and modify the path for reading the image in the script. |
deploy_ocrdet_video.py |
OCR detection video stream inference script. See the comments inside the script for details. |
deploy_ocrrec_image.py |
OCR recognition single-image inference script. You need to add test images yourself and modify the path for reading the image in the script. Considering that the data read in a single inference of the platform OCR recognition model is long strip-shaped text, video stream inference is not supported. |
deploy_ocr_image.py |
OCR single-image inference script. You need to add test images yourself and modify the path for reading the image in the script. Dual-model task, requires adding the deployment packages for OCR detection and OCR recognition at the same time. Note to modify the directory path in the script. |
deploy_ocr_video.py |
OCR video stream inference script. See the comments inside the script for details. Dual-model task, requires adding the deployment packages for OCR detection and OCR recognition at the same time. Note to modify the directory path in the script. |
deploy_ml_image.py |
Metric learning single-image inference script. You need to add test images yourself and modify the path for reading the image in the script. The output is the features of the corresponding dimension. Subsequent operations are modified according to the application scenario. |
deploy_ml_video.py |
Metric learning video stream inference script. See the comments inside the script for details. The output is the features of the corresponding dimension. Subsequent operations are modified according to the application scenario. |
deploy_multl_image.py |
Multi-label classification single-image inference script. You need to add test images yourself and modify the path for reading the image in the script. |
deploy_multl_video.py |
Multi-label classification video stream inference script. See the comments inside the script for details. |
Deployment Instructions#
📢 If the effect is not ideal when deploying the model, first adjust the threshold of the corresponding task and the resolution of the inference image to test whether the results can be improved!
📢 Learn to locate problems, such as checking the AICube model evaluation results. If the image is normal, it may be a problem with the deployment code, model conversion, or threshold. You can choose to adjust the quantization method or adjust the deployment parameters for optimization!
📢 AICube has a large number of training parameters. Users who understand deep learning can adjust the training parameters according to the possible optimization directions, and adjust the parameters of the model training to achieve retraining and conversion!
Advanced Development#
Here are some complex examples for different scenarios, based on AI + other modules, to achieve advanced development.
AI Multi-threading Inference#
Use multi-threading to implement simultaneous inference of multiple AI models, noting that the KPU is mutually exclusive. Here, taking YOLOv8 detection and face detection as examples, it shows how to use multi-threading to implement simultaneous inference. The example code is as follows:
from libs.PipeLine import PipeLine
from libs.AIBase import AIBase
from libs.AI2D import Ai2d
from libs.Utils import *
import nncase_runtime as nn
import ulab.numpy as np
import aidemo
from media.display import *
from media.media import *
from media.sensor import *
import time, os, sys, gc
import lvgl as lv
from machine import TOUCH
from machine import RTC
import _thread

DISPLAY_WIDTH = ALIGN_UP(800, 16)
DISPLAY_HEIGHT = 480

sensor = None
rgb888p_size=[1280,720]
display_size = [800, 480]
face_det_stop=False
yolo_det_stop=False
face_osd_img=None
yolo_osd_img=None
lock = _thread.allocate_lock()

# 自定义YOLOv8检测类
class ObjectDetectionApp(AIBase):
    def __init__(self,kmodel_path,labels,model_input_size,max_boxes_num,confidence_threshold=0.5,nms_threshold=0.2,rgb888p_size=[224,224],display_size=[1920,1080],debug_mode=0):
        super().__init__(kmodel_path,model_input_size,rgb888p_size,debug_mode)
        self.kmodel_path=kmodel_path
        self.labels=labels
        self.model_input_size=model_input_size
        self.confidence_threshold=confidence_threshold
        self.nms_threshold=nms_threshold
        self.max_boxes_num=max_boxes_num
        self.rgb888p_size=[ALIGN_UP(rgb888p_size[0],16),rgb888p_size[1]]
        self.display_size=[ALIGN_UP(display_size[0],16),display_size[1]]
        self.debug_mode=debug_mode
        self.color_four=get_colors(len(self.labels))
        self.x_factor = float(self.rgb888p_size[0])/self.model_input_size[0]
        self.y_factor = float(self.rgb888p_size[1])/self.model_input_size[1]
        self.ai2d=Ai2d(debug_mode)
        self.ai2d.set_ai2d_dtype(nn.ai2d_format.NCHW_FMT,nn.ai2d_format.NCHW_FMT,np.uint8, np.uint8)

    # 配置预处理操作,这里使用了resize,Ai2d支持crop/shift/pad/resize/affine,具体代码请打开/sdcard/app/libs/AI2D.py查看
    def config_preprocess(self,input_image_size=None):
        with ScopedTiming("set preprocess config",self.debug_mode > 0):
            ai2d_input_size=input_image_size if input_image_size else self.rgb888p_size
            top,bottom,left,right,self.scale=letterbox_pad_param(self.rgb888p_size,self.model_input_size)
            self.ai2d.pad([0,0,0,0,top,bottom,left,right], 0, [128,128,128])
            self.ai2d.resize(nn.interp_method.tf_bilinear, nn.interp_mode.half_pixel)
            self.ai2d.build([1,3,ai2d_input_size[1],ai2d_input_size[0]],[1,3,self.model_input_size[1],self.model_input_size[0]])

    def postprocess(self,results):
        with ScopedTiming("postprocess",self.debug_mode > 0):
            new_result=results[0][0].transpose()
            det_res = aidemo.yolov8_det_postprocess(new_result.copy(),[self.rgb888p_size[1],self.rgb888p_size[0]],[self.model_input_size[1],self.model_input_size[0]],[self.display_size[1],self.display_size[0]],len(self.labels),self.confidence_threshold,self.nms_threshold,self.max_boxes_num)
            return det_res

    def draw_result(self,osd_img,dets):
        with ScopedTiming("display_draw",self.debug_mode >0):
            osd_img.clear()
            if dets:
                for i in range(len(dets[0])):
                    x, y, w, h = map(lambda x: int(round(x, 0)), dets[0][i])
                    osd_img.draw_rectangle(x,y, w, h, color=self.color_four[dets[1][i]],thickness=4)
                    osd_img.draw_string_advanced(x, y-50,32," " + self.labels[dets[1][i]] + " " + str(round(dets[2][i],2)) , color=self.color_four[dets[1][i]])


# 自定义人脸检测类,继承自AIBase基类
class FaceDetectionApp(AIBase):
    def __init__(self, kmodel_path, model_input_size, anchors, confidence_threshold=0.5, nms_threshold=0.2, rgb888p_size=[224,224], display_size=[1920,1080], debug_mode=0):
        super().__init__(kmodel_path, model_input_size, rgb888p_size, debug_mode)  # 调用基类的构造函数
        self.kmodel_path = kmodel_path  # 模型文件路径
        self.model_input_size = model_input_size  # 模型输入分辨率
        self.confidence_threshold = confidence_threshold  # 置信度阈值
        self.nms_threshold = nms_threshold  # NMS(非极大值抑制)阈值
        self.anchors = anchors  # 锚点数据,用于目标检测
        self.rgb888p_size = [ALIGN_UP(rgb888p_size[0], 16), rgb888p_size[1]]  # sensor给到AI的图像分辨率,并对宽度进行16的对齐
        self.display_size = [ALIGN_UP(display_size[0], 16), display_size[1]]  # 显示分辨率,并对宽度进行16的对齐
        self.debug_mode = debug_mode  # 是否开启调试模式
        self.ai2d = Ai2d(debug_mode)  # 实例化Ai2d,用于实现模型预处理
        self.ai2d.set_ai2d_dtype(nn.ai2d_format.NCHW_FMT, nn.ai2d_format.NCHW_FMT, np.uint8, np.uint8)  # 设置Ai2d的输入输出格式和类型

    # 配置预处理操作,这里使用了pad和resize,Ai2d支持crop/shift/pad/resize/affine,具体代码请打开/sdcard/app/libs/AI2D.py查看
    def config_preprocess(self, input_image_size=None):
        with ScopedTiming("set preprocess config", self.debug_mode > 0):  # 计时器,如果debug_mode大于0则开启
            ai2d_input_size = input_image_size if input_image_size else self.rgb888p_size  # 初始化ai2d预处理配置,默认为sensor给到AI的尺寸,可以通过设置input_image_size自行修改输入尺寸
            top, bottom, left, right,_ = letterbox_pad_param(self.rgb888p_size,self.model_input_size)
            self.ai2d.pad([0, 0, 0, 0, top, bottom, left, right], 0, [104, 117, 123])  # 填充边缘
            self.ai2d.resize(nn.interp_method.tf_bilinear, nn.interp_mode.half_pixel)  # 缩放图像
            self.ai2d.build([1,3,ai2d_input_size[1],ai2d_input_size[0]],[1,3,self.model_input_size[1],self.model_input_size[0]])  # 构建预处理流程

    # 自定义当前任务的后处理,results是模型输出array列表,这里使用了aidemo库的face_det_post_process接口
    def postprocess(self, results):
        with ScopedTiming("postprocess", self.debug_mode > 0):
            post_ret = aidemo.face_det_post_process(self.confidence_threshold, self.nms_threshold, self.model_input_size[1], self.anchors, self.rgb888p_size, results)
            if len(post_ret) == 0:
                return post_ret
            else:
                return post_ret[0]

    # 绘制检测结果到画面上
    def draw_result(self, osd_img, dets):
        with ScopedTiming("display_draw", self.debug_mode > 0):
            osd_img.clear()
            if dets:
                for det in dets:
                    # 将检测框的坐标转换为显示分辨率下的坐标
                    x, y, w, h = map(lambda x: int(round(x, 0)), det[:4])
                    x = x * self.display_size[0] // self.rgb888p_size[0]
                    y = y * self.display_size[1] // self.rgb888p_size[1]
                    w = w * self.display_size[0] // self.rgb888p_size[0]
                    h = h * self.display_size[1] // self.rgb888p_size[1]
                    osd_img.draw_rectangle(x, y, w, h, color=(255, 255, 0, 255), thickness=2)


def face_det_thread():
    global sensor,osd_img,rgb888p_size,display_size,face_osd_img
    # 设置模型路径和其他参数
    kmodel_path = "/sdcard/examples/kmodel/face_detection_320.kmodel"
    # 其它参数
    confidence_threshold = 0.5
    nms_threshold = 0.2
    anchor_len = 4200
    det_dim = 4
    anchors_path = "/sdcard/examples/utils/prior_data_320.bin"
    anchors = np.fromfile(anchors_path, dtype=np.float)
    anchors = anchors.reshape((anchor_len, det_dim))
    face_det = FaceDetectionApp(kmodel_path, model_input_size=[320, 320], anchors=anchors, confidence_threshold=confidence_threshold, nms_threshold=nms_threshold, rgb888p_size=rgb888p_size, display_size=display_size, debug_mode=0)
    face_det.config_preprocess()  # 配置预处理
    while True:
        if face_det_stop:
            break
        img_2 = sensor.snapshot(chn = CAM_CHN_ID_2)
        img_np =img_2.to_numpy_ref()
        with lock:
            res = face_det.run(img_np)         # 推理当前帧
        face_det.draw_result(face_osd_img, res)   # 绘制结果
        Display.show_image(face_osd_img, 0, 0, Display.LAYER_OSD2)
        gc.collect()
    face_det.deinit()


def yolov8_det_thread():
    global sensor,osd_img,rgb888p_size,display_size,yolo_osd_img
    kmodel_path="/sdcard/examples/kmodel/yolov8n_224.kmodel"
    labels = ["person", "bicycle", "car", "motorcycle", "airplane", "bus", "train", "truck", "boat", "traffic light", "fire hydrant", "stop sign", "parking meter", "bench", "bird", "cat", "dog", "horse", "sheep", "cow", "elephant", "bear", "zebra", "giraffe", "backpack", "umbrella", "handbag", "tie", "suitcase", "frisbee", "skis", "snowboard", "sports ball", "kite", "baseball bat", "baseball glove", "skateboard", "surfboard", "tennis racket", "bottle", "wine glass", "cup", "fork", "knife", "spoon", "bowl", "banana", "apple", "sandwich", "orange", "broccoli", "carrot", "hot dog", "pizza", "donut", "cake", "chair", "couch", "potted plant", "bed", "dining table", "toilet", "tv", "laptop", "mouse", "remote", "keyboard", "cell phone", "microwave", "oven", "toaster", "sink", "refrigerator", "book", "clock", "vase", "scissors", "teddy bear", "hair drier", "toothbrush"]
    confidence_threshold = 0.3
    nms_threshold = 0.4
    ob_det=ObjectDetectionApp(kmodel_path,labels=labels,model_input_size=[224,224],max_boxes_num=50,confidence_threshold=confidence_threshold,nms_threshold=nms_threshold,rgb888p_size=rgb888p_size,display_size=display_size,debug_mode=0)
    ob_det.config_preprocess()
    while True:
        if yolo_det_stop:
            break
        img_2 = sensor.snapshot(chn = CAM_CHN_ID_2)
        img_np =img_2.to_numpy_ref()
        with lock:
            det_res = ob_det.run(img_np)
        ob_det.draw_result(yolo_osd_img, det_res)
        Display.show_image(yolo_osd_img, 0, 0, Display.LAYER_OSD1)
        gc.collect()
    ob_det.deinit()


def media_init():
    global sensor,osd_img,rgb888p_size,display_size,face_osd_img,yolo_osd_img
    Display.init(Display.ST7701, width = DISPLAY_WIDTH, height = DISPLAY_HEIGHT, to_ide = True, osd_num=3)
    sensor = Sensor(fps=30)
    sensor.reset()
    sensor.set_framesize(w = 800, h = 480,chn=CAM_CHN_ID_0)
    sensor.set_pixformat(Sensor.YUV420SP)
    sensor.set_framesize(w = rgb888p_size[0], h = rgb888p_size[1], chn=CAM_CHN_ID_2)
    sensor.set_pixformat(Sensor.RGBP888, chn=CAM_CHN_ID_2)

    sensor_bind_info = sensor.bind_info(x = 0, y = 0, chn = CAM_CHN_ID_0)
    Display.bind_layer(**sensor_bind_info, layer = Display.LAYER_VIDEO1)
    face_osd_img = image.Image(display_size[0], display_size[1], image.ARGB8888)
    yolo_osd_img = image.Image(display_size[0], display_size[1], image.ARGB8888)
    MediaManager.init()
    sensor.run()

def media_deinit():
    global sensor
    os.exitpoint(os.EXITPOINT_ENABLE_SLEEP)
    sensor.stop()
    Display.deinit()
    time.sleep_ms(50)
    MediaManager.deinit()

if __name__ == "__main__":
    media_init()
    _thread.start_new_thread(yolov8_det_thread,())
    _thread.start_new_thread(face_det_thread,())
    try:
        while True:
            time.sleep_ms(50)
    except BaseException as e:
        import sys
        sys.print_exception(e)
        yolo_det_stop=True
        face_det_stop=True
    media_deinit()
    gc.collect()
AI+UART Communication#
After AI inference is complete, how to send the recognized content to the host computer via serial port. Here, taking YOLOv8 detection as the AI part as an example, it shows how to use UART communication to implement AI+UART communication. The example code is as follows:
from libs.PipeLine import PipeLine
from libs.AIBase import AIBase
from libs.AI2D import Ai2d
from libs.Utils import *
import os, sys, ujson, gc, math
from media.media import *
import nncase_runtime as nn
import ulab.numpy as np
import image
import aidemo
from machine import UART
from machine import FPIOA
import time

# Custom YOLOv8 object detection class
class ObjectDetectionApp(AIBase):
    def __init__(self, kmodel_path, labels, model_input_size, max_boxes_num, confidence_threshold=0.5, nms_threshold=0.2, rgb888p_size=[224,224], display_size=[1920,1080], debug_mode=0):
        """
        Initialize object detection system.

        Parameters:
        - kmodel_path: Path to YOLOv8 KModel.
        - labels: List of class labels.
        - model_input_size: Model input resolution.
        - max_boxes_num: Max detection results to keep.
        - confidence_threshold: Detection score threshold.
        - nms_threshold: Non-max suppression threshold.
        - rgb888p_size: Camera input size (aligned to 16-width).
        - display_size: Output display size.
        - debug_mode: Enable debug timing logs.
        """
        super().__init__(kmodel_path, model_input_size, rgb888p_size, debug_mode)
        self.kmodel_path = kmodel_path
        self.labels = labels
        self.model_input_size = model_input_size
        self.confidence_threshold = confidence_threshold
        self.nms_threshold = nms_threshold
        self.max_boxes_num = max_boxes_num

        # Align width to multiple of 16 for hardware compatibility
        self.rgb888p_size = [ALIGN_UP(rgb888p_size[0], 16), rgb888p_size[1]]
        self.display_size = [ALIGN_UP(display_size[0], 16), display_size[1]]
        self.debug_mode = debug_mode

        # Predefined colors for each class
        self.color_four = get_colors(len(self.labels))

        # Input scaling factors
        self.x_factor = float(self.rgb888p_size[0]) / self.model_input_size[0]
        self.y_factor = float(self.rgb888p_size[1]) / self.model_input_size[1]

        # Ai2d instance for preprocessing
        self.ai2d = Ai2d(debug_mode)
        self.ai2d.set_ai2d_dtype(nn.ai2d_format.NCHW_FMT, nn.ai2d_format.NCHW_FMT, np.uint8, np.uint8)

        # Configure UART pins using FPIOA
        self.fpioa = FPIOA()
        self.fpioa.set_function(3, self.fpioa.UART1_TXD, ie=1, oe=1)
        self.fpioa.set_function(4, self.fpioa.UART1_RXD, ie=1, oe=1)

        # Initialize UART1
        self.uart = UART(UART.UART1, baudrate=115200, bits=UART.EIGHTBITS, parity=UART.PARITY_NONE, stop=UART.STOPBITS_ONE)

    def config_preprocess(self, input_image_size=None):
        """
        Configure pre-processing: padding and resizing using Ai2d.
        """
        with ScopedTiming("set preprocess config", self.debug_mode > 0):
            ai2d_input_size = input_image_size if input_image_size else self.rgb888p_size
            top, bottom, left, right, self.scale = letterbox_pad_param(self.rgb888p_size, self.model_input_size)
            self.ai2d.pad([0,0,0,0,top,bottom,left,right], 0, [128,128,128])
            self.ai2d.resize(nn.interp_method.tf_bilinear, nn.interp_mode.half_pixel)
            self.ai2d.build(
                [1, 3, ai2d_input_size[1], ai2d_input_size[0]],
                [1, 3, self.model_input_size[1], self.model_input_size[0]]
            )

    def preprocess(self, input_np):
        """
        Prepare numpy image for inference.
        """
        with ScopedTiming("preprocess", self.debug_mode > 0):
            return [nn.from_numpy(input_np)]

    def postprocess(self, results):
        """
        Apply YOLOv8 post-processing including NMS and thresholding.
        """
        with ScopedTiming("postprocess", self.debug_mode > 0):
            new_result = results[0][0].transpose()
            det_res = aidemo.yolov8_det_postprocess(
                new_result.copy(),
                [self.rgb888p_size[1], self.rgb888p_size[0]],
                [self.model_input_size[1], self.model_input_size[0]],
                [self.display_size[1], self.display_size[0]],
                len(self.labels),
                self.confidence_threshold,
                self.nms_threshold,
                self.max_boxes_num
            )
            return det_res

    def draw_result(self, pl, dets):
        """
        Draw detection results and send label info via UART.
        """
        with ScopedTiming("display_draw", self.debug_mode > 0):
            if dets:
                pl.osd_img.clear()
                for i in range(len(dets[0])):
                    x, y, w, h = map(lambda x: int(round(x, 0)), dets[0][i])
                    pl.osd_img.draw_rectangle(x, y, w, h, color=self.color_four[dets[1][i]], thickness=4)
                    pl.osd_img.draw_string_advanced(
                        x, y - 50, 32,
                        " " + self.labels[dets[1][i]] + " " + str(round(dets[2][i], 2)),
                        color=self.color_four[dets[1][i]]
                    )
                    # Send detected label over UART
                    uart_write_res = self.labels[dets[1][i]] + " "
                    self.uart.write(uart_write_res.encode("utf-8"))
            else:
                pl.osd_img.clear()

if __name__ == "__main__":
    # Choose display mode: lcd / hdmi / lt9611 / st7701 / hx8399
    display_mode = "lcd"
    rgb888p_size = [224, 224]
    kmodel_path = "/sdcard/examples/kmodel/yolov8n_224.kmodel"

    # Class labels for COCO dataset
    labels = ["person", "bicycle", "car", "motorcycle", "airplane", "bus", "train", "truck", "boat",
              "traffic light", "fire hydrant", "stop sign", "parking meter", "bench", "bird", "cat",
              "dog", "horse", "sheep", "cow", "elephant", "bear", "zebra", "giraffe", "backpack",
              "umbrella", "handbag", "tie", "suitcase", "frisbee", "skis", "snowboard", "sports ball",
              "kite", "baseball bat", "baseball glove", "skateboard", "surfboard", "tennis racket",
              "bottle", "wine glass", "cup", "fork", "knife", "spoon", "bowl", "banana", "apple",
              "sandwich", "orange", "broccoli", "carrot", "hot dog", "pizza", "donut", "cake", "chair",
              "couch", "potted plant", "bed", "dining table", "toilet", "tv", "laptop", "mouse", "remote",
              "keyboard", "cell phone", "microwave", "oven", "toaster", "sink", "refrigerator", "book",
              "clock", "vase", "scissors", "teddy bear", "hair drier", "toothbrush"]

    confidence_threshold = 0.3
    nms_threshold = 0.4
    max_boxes_num = 30

    # Initialize video pipeline
    pl = PipeLine(rgb888p_size=rgb888p_size, display_mode=display_mode)
    pl.create()
    display_size = pl.get_display_size()

    # Initialize detection app
    ob_det = ObjectDetectionApp(
        kmodel_path,
        labels=labels,
        model_input_size=[224, 224],
        max_boxes_num=max_boxes_num,
        confidence_threshold=confidence_threshold,
        nms_threshold=nms_threshold,
        rgb888p_size=rgb888p_size,
        display_size=display_size,
        debug_mode=0
    )
    ob_det.config_preprocess()

    # Real-time processing loop
    while True:
        with ScopedTiming("total", 1):
            img = pl.get_frame()                         # Capture frame
            res = ob_det.run(img)                        # Run inference
            ob_det.draw_result(pl, res)                  # Draw results
            pl.show_image()                              # Display results
            gc.collect()                                 # Free memory

    ob_det.deinit()
    pl.destroy()
AI Multi-camera Inference#
Multi-camera AI inference refers to using multiple cameras simultaneously for AI inference. Here, taking two cameras for YOLOv8 detection and face detection as examples, it shows how to use dual-camera multi-threading to implement AI inference. The example code is as follows:
import os,sys
from media.sensor import *
from media.display import *
from media.media import *
import nncase_runtime as nn
import ulab.numpy as np
import time,image,random,gc
from libs.AIBase import AIBase
from libs.AI2D import Ai2d
from libs.Utils import *
import aidemo
import _thread

# 一些初始化设置
DISPLAY_WIDTH=ALIGN_UP(1920, 16)
DISPLAY_HEIGHT=1080
display_size=[DISPLAY_WIDTH//2,DISPLAY_HEIGHT//2]
sensor1 = None
sensor2 = None
yolo_rgb888p_size=[224,224]
face_rgb888p_size=[640,360]
face_det_run=True
yolo_det_run=True
face_osd_img=None
yolo_osd_img=None
lock = _thread.allocate_lock()

# 自定义YOLOv8检测类
class ObjectDetectionApp(AIBase):
    def __init__(self,kmodel_path,labels,model_input_size,max_boxes_num,confidence_threshold=0.5,nms_threshold=0.2,rgb888p_size=[224,224],display_size=[1920,1080],debug_mode=0):
        super().__init__(kmodel_path,model_input_size,rgb888p_size,debug_mode)
        self.kmodel_path=kmodel_path
        self.labels=labels
        # 模型输入分辨率
        self.model_input_size=model_input_size
        # 阈值设置
        self.confidence_threshold=confidence_threshold
        self.nms_threshold=nms_threshold
        self.max_boxes_num=max_boxes_num
        # sensor给到AI的图像分辨率
        self.rgb888p_size=[ALIGN_UP(rgb888p_size[0],16),rgb888p_size[1]]
        # 显示分辨率
        self.display_size=[ALIGN_UP(display_size[0],16),display_size[1]]
        self.debug_mode=debug_mode
        # 检测框预置颜色值
        self.color_four=get_colors(len(self.labels))
        # 宽高缩放比例
        self.x_factor = float(self.rgb888p_size[0])/self.model_input_size[0]
        self.y_factor = float(self.rgb888p_size[1])/self.model_input_size[1]
        # Ai2d实例,用于实现模型预处理
        self.ai2d=Ai2d(debug_mode)
        # 设置Ai2d的输入输出格式和类型
        self.ai2d.set_ai2d_dtype(nn.ai2d_format.NCHW_FMT,nn.ai2d_format.NCHW_FMT,np.uint8, np.uint8)

    # 配置预处理操作,这里使用了resize,Ai2d支持crop/shift/pad/resize/affine,具体代码请打开/sdcard/app/libs/AI2D.py查看
    def config_preprocess(self,input_image_size=None):
        with ScopedTiming("set preprocess config",self.debug_mode > 0):
            # 初始化ai2d预处理配置,默认为sensor给到AI的尺寸,您可以通过设置input_image_size自行修改输入尺寸
            ai2d_input_size=input_image_size if input_image_size else self.rgb888p_size
            top,bottom,left,right,self.scale=letterbox_pad_param(self.rgb888p_size,self.model_input_size)
            # 配置padding预处理
            self.ai2d.pad([0,0,0,0,top,bottom,left,right], 0, [128,128,128])
            self.ai2d.resize(nn.interp_method.tf_bilinear, nn.interp_mode.half_pixel)
            self.ai2d.build([1,3,ai2d_input_size[1],ai2d_input_size[0]],[1,3,self.model_input_size[1],self.model_input_size[0]])

    def preprocess(self,input_np):
        with ScopedTiming("preprocess",self.debug_mode > 0):
            return [nn.from_numpy(input_np)]

    # 自定义当前任务的后处理
    def postprocess(self,results):
        with ScopedTiming("postprocess",self.debug_mode > 0):
            new_result=results[0][0].transpose()
            det_res = aidemo.yolov8_det_postprocess(new_result.copy(),[self.rgb888p_size[1],self.rgb888p_size[0]],[self.model_input_size[1],self.model_input_size[0]],[self.display_size[1],self.display_size[0]],len(self.labels),self.confidence_threshold,self.nms_threshold,self.max_boxes_num)
            return det_res
    # 资源释放
    def deinit(self):
         del self.kpu
         del self.ai2d
         self.tensors.clear()
         del self.tensors
         gc.collect()
         time.sleep_ms(50)


 # 自定义人脸检测类,继承自AIBase基类
class FaceDetectionApp(AIBase):
    def __init__(self, kmodel_path, model_input_size, anchors, confidence_threshold=0.5, nms_threshold=0.2, rgb888p_size=[224,224], display_size=[1920,1080], debug_mode=0):
         super().__init__(kmodel_path, model_input_size, rgb888p_size, debug_mode)  # 调用基类的构造函数
         self.kmodel_path = kmodel_path  # 模型文件路径
         self.model_input_size = model_input_size  # 模型输入分辨率
         self.confidence_threshold = confidence_threshold  # 置信度阈值
         self.nms_threshold = nms_threshold  # NMS(非极大值抑制)阈值
         self.anchors = anchors  # 锚点数据,用于目标检测
         self.rgb888p_size = [ALIGN_UP(rgb888p_size[0], 16), rgb888p_size[1]]  # sensor给到AI的图像分辨率,并对宽度进行16的对齐
         self.display_size = [ALIGN_UP(display_size[0], 16), display_size[1]]  # 显示分辨率,并对宽度进行16的对齐
         self.debug_mode = debug_mode  # 是否开启调试模式
         self.ai2d = Ai2d(debug_mode)  # 实例化Ai2d,用于实现模型预处理
         self.ai2d.set_ai2d_dtype(nn.ai2d_format.NCHW_FMT, nn.ai2d_format.NCHW_FMT, np.uint8, np.uint8)  # 设置Ai2d的输入输出格式和类型

    # 配置预处理操作,这里使用了pad和resize,Ai2d支持crop/shift/pad/resize/affine,具体代码请打开/sdcard/app/libs/AI2D.py查看
    def config_preprocess(self, input_image_size=None):
         with ScopedTiming("set preprocess config", self.debug_mode > 0):  # 计时器,如果debug_mode大于0则开启
             ai2d_input_size = input_image_size if input_image_size else self.rgb888p_size  # 初始化ai2d预处理配置,默认为sensor给到AI的尺寸,可以通过设置input_image_size自行修改输入尺寸
             top, bottom, left, right,_ = letterbox_pad_param(self.rgb888p_size,self.model_input_size)
             self.ai2d.pad([0, 0, 0, 0, top, bottom, left, right], 0, [104, 117, 123])  # 填充边缘
             self.ai2d.resize(nn.interp_method.tf_bilinear, nn.interp_mode.half_pixel)  # 缩放图像
             self.ai2d.build([1,3,ai2d_input_size[1],ai2d_input_size[0]],[1,3,self.model_input_size[1],self.model_input_size[0]])  # 构建预处理流程

    # 自定义当前任务的后处理,results是模型输出array列表,这里使用了aidemo库的face_det_post_process接口
    def postprocess(self, results):
         with ScopedTiming("postprocess", self.debug_mode > 0):
             post_ret = aidemo.face_det_post_process(self.confidence_threshold, self.nms_threshold, self.model_input_size[1], self.anchors, self.rgb888p_size, results)
             if len(post_ret) == 0:
                 return post_ret
             else:
                 return post_ret[0]

    # 资源释放
    def deinit(self):
         del self.kpu
         del self.ai2d
         self.tensors.clear()
         del self.tensors
         gc.collect()
         time.sleep_ms(50)

#人脸检测线程
def face_det_thread():
     global display_size,sensor1,osd_img,face_rgb888p_size,face_osd_img
     # 设置模型路径和其他参数
     kmodel_path = "/sdcard/examples/kmodel/face_detection_320.kmodel"
     # 其它参数
     confidence_threshold = 0.5
     nms_threshold = 0.2
     anchor_len = 4200
     det_dim = 4
     anchors_path = "/sdcard/examples/utils/prior_data_320.bin"
     anchors = np.fromfile(anchors_path, dtype=np.float)
     anchors = anchors.reshape((anchor_len, det_dim))
     face_det = FaceDetectionApp(kmodel_path, model_input_size=[320, 320], anchors=anchors, confidence_threshold=confidence_threshold, nms_threshold=nms_threshold, rgb888p_size=face_rgb888p_size, display_size=display_size, debug_mode=0)
     face_det.config_preprocess()  # 配置预处理
     while face_det_run:
         img = sensor1.snapshot(chn = CAM_CHN_ID_1)
         img_np =img.to_numpy_ref()
         with lock:
             res = face_det.run(img_np)         # 推理当前帧
         face_osd_img.clear()
         if res:
             for det in res:
                 # 将检测框的坐标转换为显示分辨率下的坐标
                 x, y, w, h = map(lambda x: int(round(x, 0)), det[:4])
                 x = x * display_size[0] // face_rgb888p_size[0]
                 y = y * display_size[1] // face_rgb888p_size[1]
                 w = w * display_size[0] // face_rgb888p_size[0]
                 h = h * display_size[1] // face_rgb888p_size[1]
                 face_osd_img.draw_rectangle(x, y, w, h, color=(255, 255, 0, 255), thickness=2)
         Display.show_image(face_osd_img, 0, 0, Display.LAYER_OSD1)
         del img
         del img_np
         gc.collect()
     del face_osd_img
     face_det.deinit()

# YOLOv8检测线程
def yolov8_det_thread():
     global display_size,sensor2,osd_img,yolo_rgb888p_size,yolo_osd_img
     kmodel_path="/sdcard/examples/kmodel/yolov8n_224.kmodel"
     labels = ["person", "bicycle", "car", "motorcycle", "airplane", "bus", "train", "truck", "boat", "traffic light", "fire hydrant", "stop sign", "parking meter", "bench", "bird", "cat", "dog", "horse", "sheep", "cow", "elephant", "bear", "zebra", "giraffe", "backpack", "umbrella", "handbag", "tie", "suitcase", "frisbee", "skis", "snowboard", "sports ball", "kite", "baseball bat", "baseball glove", "skateboard", "surfboard", "tennis racket", "bottle", "wine glass", "cup", "fork", "knife", "spoon", "bowl", "banana", "apple", "sandwich", "orange", "broccoli", "carrot", "hot dog", "pizza", "donut", "cake", "chair", "couch", "potted plant", "bed", "dining table", "toilet", "tv", "laptop", "mouse", "remote", "keyboard", "cell phone", "microwave", "oven", "toaster", "sink", "refrigerator", "book", "clock", "vase", "scissors", "teddy bear", "hair drier", "toothbrush"]
     confidence_threshold = 0.3
     nms_threshold = 0.4
     color_four=get_colors(len(labels))
     ob_det=ObjectDetectionApp(kmodel_path,labels=labels,model_input_size=[224,224],max_boxes_num=50,confidence_threshold=confidence_threshold,nms_threshold=nms_threshold,rgb888p_size=yolo_rgb888p_size,display_size=display_size,debug_mode=0)
     ob_det.config_preprocess()
     while yolo_det_run:
         img = sensor2.snapshot(chn = CAM_CHN_ID_1)
         img_np =img.to_numpy_ref()
         with lock:
             res = ob_det.run(img_np)

         yolo_osd_img.clear()
         for i in range(len(res[0])):
             x, y, w, h = map(lambda x: int(round(x, 0)), res[0][i])
             x=x+display_size[0]
             y=y+display_size[1]
             yolo_osd_img.draw_rectangle(x,y, w, h, color=color_four[res[1][i]],thickness=4)
             yolo_osd_img.draw_string_advanced( x , y-50,32," " + labels[res[1][i]] + " " + str(round(res[2][i],2)) , color=color_four[res[1][i]])

         Display.show_image(yolo_osd_img, 0, 0, Display.LAYER_OSD2)
         del img
         del img_np
         gc.collect()
     del yolo_osd_img
     ob_det.deinit()

def media_init():
    global display_size,sensor1,sensor2,yolo_rgb888p_size,face_rgb888p_size,face_osd_img,yolo_osd_img
    #-----------------------------Sensor1初始化部分-------------------------------
    sensor1 = Sensor(id=1)
    sensor1.reset()
    # 设置水平镜像和垂直翻转,不同板子的方向不同,通过配置这两个参数使画面转正
    #sensor1.set_hmirror(False)
    #sensor1.set_vflip(False)
    # 配置sensor1的多通道出图,每个通道的出图格式和分辨率可以不同,最多可以出三路图,参考sensor API文档
    # 通道0直接给到显示VO,格式为YUV420
    sensor1.set_framesize(width = display_size[0], height = display_size[1],chn=CAM_CHN_ID_0)
    sensor1.set_pixformat(Sensor.YUV420SP,chn=CAM_CHN_ID_0)
    # 通道1给到AI做算法处理,格式为RGB888P
    sensor1.set_framesize(width = face_rgb888p_size[0] , height = face_rgb888p_size[1], chn=CAM_CHN_ID_1)
    # set chn1 output format
    sensor1.set_pixformat(Sensor.RGBP888, chn=CAM_CHN_ID_1)

    # 绑定通道0的摄像头图像到屏幕,防止另一个通道的AI推理过程太慢影响显示过程,导致出现卡顿效果
    sensor_bind_info1 = sensor1.bind_info(x = 0, y = 0, chn = CAM_CHN_ID_0)
    Display.bind_layer(**sensor_bind_info1, layer = Display.LAYER_VIDEO1)

    #-----------------------------Sensor2初始化部分-------------------------------
    sensor2 = Sensor(id=2)
    sensor2.reset()
    # 设置水平镜像和垂直翻转,不同板子的方向不同,通过配置这两个参数使画面转正
    #sensor2.set_hmirror(False)
    #sensor2.set_vflip(False)

    # 配置sensor2的多通道出图,每个通道的出图格式和分辨率可以不同,最多可以出三路图,参考sensor API文档
    # 通道0直接给到显示VO,格式为YUV420
    sensor2.set_framesize(width = display_size[0], height = display_size[1],chn=CAM_CHN_ID_0)
    sensor2.set_pixformat(Sensor.YUV420SP,chn=CAM_CHN_ID_0)
    # 通道1给到AI做算法处理,格式为RGB888P
    sensor2.set_framesize(width = yolo_rgb888p_size[0] , height = yolo_rgb888p_size[1], chn=CAM_CHN_ID_1)
    # set chn1 output format
    sensor2.set_pixformat(Sensor.RGBP888, chn=CAM_CHN_ID_1)

    # 绑定通道0的摄像头图像到屏幕,防止另一个通道的AI推理过程太慢影响显示过程,导致出现卡顿效果
    sensor_bind_info2 = sensor2.bind_info(x = display_size[0], y = display_size[1], chn = CAM_CHN_ID_0)
    Display.bind_layer(**sensor_bind_info2, layer = Display.LAYER_VIDEO2)


    # OSD图像初始化,创建一帧和屏幕分辨率同样大的透明图像,用于绘制AI推理结果
    face_osd_img = image.Image(DISPLAY_WIDTH, DISPLAY_HEIGHT, image.ARGB8888)
    yolo_osd_img = image.Image(DISPLAY_WIDTH, DISPLAY_HEIGHT, image.ARGB8888)

    # 设置为LT9611显示
    Display.init(Display.LT9611,osd_num=2, to_ide=True)

    # media初始化
    MediaManager.init()
    sensor1.run()

def media_deinit():
    global sensor1,sensor2,face_osd_img,yolo_osd_img
    sensor1.stop()
    sensor2.stop()
    Display.deinit()
    time.sleep_ms(50)
    MediaManager.deinit()
    nn.shrink_memory_pool()


if __name__=="__main__":
    media_init()
    _thread.start_new_thread(yolov8_det_thread,())
    _thread.start_new_thread(face_det_thread,())

    try:
        while True:
            time.sleep_ms(50)
    except BaseException as e:
        import sys
        sys.print_exception(e)
        yolo_det_run=False
        face_det_run=False
    time.sleep_ms(500)
    media_deinit()
    gc.collect()
AI+UVC Hardware Decoding Inference#
Use a UVC camera to acquire images, and use hardware CSC to convert the images to RGB888 format, create tensors, input the tensors into the AI model, get the output results of the AI model, and finally draw the output results on the screen. The AI inference scenario here is YOLOv8 detection. The example code is as follows:
from libs.PipeLine import PipeLine
from libs.AIBase import AIBase
from libs.AI2D import Ai2d
from libs.Utils import *
import os,sys,ujson,gc,math, urandom
from media.display import *
from media.media import *
from media.uvc import *
import nncase_runtime as nn
import ulab.numpy as np
import image
import aidemo
from nonai2d import CSC

# Custom YOLOv8 object detection class
class ObjectDetectionApp(AIBase):
    def __init__(self, kmodel_path, labels, model_input_size, max_boxes_num, confidence_threshold=0.5, nms_threshold=0.2, rgb888p_size=[224,224], display_size=[1920,1080], debug_mode=0):
        """
        Initialize object detection system.

        Parameters:
        - kmodel_path: Path to YOLOv8 KModel.
        - labels: List of class labels.
        - model_input_size: Model input size.
        - max_boxes_num: Max detection results to keep.
        - confidence_threshold: Detection score threshold.
        - nms_threshold: Non-max suppression threshold.
        - rgb888p_size: Camera input size (aligned to 16-width).
        - display_size: Output display size.
        - debug_mode: Enable debug timing logs.
        """
        super().__init__(kmodel_path, model_input_size, rgb888p_size, debug_mode)
        self.kmodel_path = kmodel_path
        self.labels = labels
        self.model_input_size = model_input_size
        self.confidence_threshold = confidence_threshold
        self.nms_threshold = nms_threshold
        self.max_boxes_num = max_boxes_num

        # Align width to multiple of 16 for hardware compatibility
        self.rgb888p_size = [ALIGN_UP(rgb888p_size[0], 16), rgb888p_size[1]]
        self.display_size = [ALIGN_UP(display_size[0], 16), display_size[1]]
        self.debug_mode = debug_mode

        # Predefined colors for each class
        self.color_four = get_colors(len(self.labels))

        # Input scaling factors
        self.x_factor = float(self.rgb888p_size[0]) / self.model_input_size[0]
        self.y_factor = float(self.rgb888p_size[1]) / self.model_input_size[1]

        # Ai2d instance for preprocessing
        self.ai2d = Ai2d(debug_mode)
        self.ai2d.set_ai2d_dtype(nn.ai2d_format.NCHW_FMT, nn.ai2d_format.NCHW_FMT, np.uint8, np.uint8)

    def config_preprocess(self, input_image_size=None):
        """
        Configure pre-processing: padding and resizing using Ai2d.
        """
        with ScopedTiming("set preprocess config", self.debug_mode > 0):
            ai2d_input_size = input_image_size if input_image_size else self.rgb888p_size
            top, bottom, left, right, self.scale = letterbox_pad_param(self.rgb888p_size, self.model_input_size)
            self.ai2d.pad([0,0,0,0,top,bottom,left,right], 0, [128,128,128])
            self.ai2d.resize(nn.interp_method.tf_bilinear, nn.interp_mode.half_pixel)
            self.ai2d.build(
                [1, 3, ai2d_input_size[1], ai2d_input_size[0]],
                [1, 3, self.model_input_size[1], self.model_input_size[0]]
            )

    def postprocess(self, results):
        """
        Apply YOLOv8 post-processing including NMS and thresholding.
        """
        with ScopedTiming("postprocess", self.debug_mode > 0):
            new_result = results[0][0].transpose()
            det_res = aidemo.yolov8_det_postprocess(
                new_result.copy(),
                [self.rgb888p_size[1], self.rgb888p_size[0]],
                [self.model_input_size[1], self.model_input_size[0]],
                [self.display_size[1], self.display_size[0]],
                len(self.labels),
                self.confidence_threshold,
                self.nms_threshold,
                self.max_boxes_num
            )
            return det_res

    def draw_result(self, img, dets):
        """
        Draw detection results and send label info via UART.
        """
        with ScopedTiming("display_draw",self.debug_mode >0):
            if dets:
                for i in range(len(dets[0])):
                    x, y, w, h = map(lambda x: int(round(x, 0)), dets[0][i])
                    img.draw_rectangle(x,y, w, h, color=self.color_four[dets[1][i]],thickness=4)
                    img.draw_string_advanced( x , y-50,32," " + self.labels[dets[1][i]] + " " + str(round(dets[2][i],2)) , color=self.color_four[dets[1][i]])


if __name__ == "__main__":

    # Align display width to 16 bytes for hardware requirement
    DISPLAY_WIDTH = ALIGN_UP(800, 16)
    DISPLAY_HEIGHT = 480

    # Create CSC instance for pixel format conversion (e.g., to RGB888)
    csc = CSC(0, CSC.PIXEL_FORMAT_RGB_888)

    # Initialize LCD display (ST7701) and enable IDE display
    Display.init(Display.ST7701, width=DISPLAY_WIDTH, height=DISPLAY_HEIGHT, to_ide=True)

    # Initialize media manager to manage frame buffers and UVC stream
    MediaManager.init()

    # Wait for USB camera to be detected
    while True:
        plugin, dev = UVC.probe()
        if plugin:
            print(f"detect USB Camera {dev}")
            break
        time.sleep_ms(100)

    # Select and configure UVC video mode: 640x480 @ 30 FPS, MJPEG format
    mode = UVC.video_mode(640, 480, UVC.FORMAT_MJPEG, 30)
    succ, mode = UVC.select_video_mode(mode)
    print(f"select mode success: {succ}, mode: {mode}")

    # Define input image from USB camera (sensor side)
    rgb888p_size = [640, 480]

    # Path to the YOLOv8n kmodel
    kmodel_path = "/sdcard/examples/kmodel/yolov8n_224.kmodel"

    # COCO class labels used for detection
    labels = ["person", "bicycle", "car", "motorcycle", "airplane", "bus", "train", "truck", "boat",
              "traffic light", "fire hydrant", "stop sign", "parking meter", "bench", "bird", "cat",
              "dog", "horse", "sheep", "cow", "elephant", "bear", "zebra", "giraffe", "backpack",
              "umbrella", "handbag", "tie", "suitcase", "frisbee", "skis", "snowboard", "sports ball",
              "kite", "baseball bat", "baseball glove", "skateboard", "surfboard", "tennis racket",
              "bottle", "wine glass", "cup", "fork", "knife", "spoon", "bowl", "banana", "apple",
              "sandwich", "orange", "broccoli", "carrot", "hot dog", "pizza", "donut", "cake", "chair",
              "couch", "potted plant", "bed", "dining table", "toilet", "tv", "laptop", "mouse", "remote",
              "keyboard", "cell phone", "microwave", "oven", "toaster", "sink", "refrigerator", "book",
              "clock", "vase", "scissors", "teddy bear", "hair drier", "toothbrush"]

    # Detection parameters
    confidence_threshold = 0.3  # Minimum confidence to accept a detection
    nms_threshold = 0.4         # Non-Maximum Suppression threshold
    max_boxes_num = 30          # Max boxes per frame after filtering

    # Initialize object detection application with YOLOv8 model
    ob_det = ObjectDetectionApp(
        kmodel_path,
        labels=labels,
        model_input_size=[224, 224],
        max_boxes_num=max_boxes_num,
        confidence_threshold=confidence_threshold,
        nms_threshold=nms_threshold,
        rgb888p_size=rgb888p_size,
        display_size=rgb888p_size,
        debug_mode=0
    )

    # Configure Ai2d preprocessing (resize + letterbox pad)
    ob_det.config_preprocess()
    # Start UVC video stream with pixel format conversion enabled
    UVC.start(cvt=True)
    clock = time.clock()
    # Main loop: acquire frame, run inference, draw and display
    while True:
        clock.tick()
        img = UVC.snapshot()
        if img is not None:
            # Convert format (e.g., to RGB888)
            img = csc.convert(img)
            # Convert to Ulab.Numpy.ndarray
            img_np_hwc = img.to_numpy_ref()
            # HWC->CHW
            img_np_chw = hwc2chw(img_np_hwc)
            # Run YOLOv8 inference on the current frame
            res = ob_det.run(img_np_chw)
            # Draw detection results on the frame
            ob_det.draw_result(img, res)
            # Show result on display
            Display.show_image(img)
            # Explicitly release image buffer
            img.__del__()
            gc.collect()
        # Print current frame rate
        print(f"fps: {clock.fps()}")
    # Clean up: stop display and media system
    ob_det.deinit()
    Display.deinit()
    csc.destroy()
    UVC.stop()
    time.sleep_ms(100)
    MediaManager.deinit()
AI+UVC Software Decoding Inference#
Use a UVC camera to acquire images, and use software decoding to convert the images to RGB888 format, create tensors, input the tensors into the AI model, get the output results of the AI model, and finally draw the output results on the screen. The AI inference scenario here is YOLOv8 detection. The example code is as follows:
from libs.PipeLine import PipeLine
from libs.AIBase import AIBase
from libs.AI2D import Ai2d
from libs.Utils import *
import os,sys,ujson,gc,math, urandom
from media.display import *
from media.media import *
from media.uvc import *
import nncase_runtime as nn
import ulab.numpy as np
import image
import aidemo

# Custom YOLOv8 object detection class
class ObjectDetectionApp(AIBase):
    def __init__(self, kmodel_path, labels, model_input_size, max_boxes_num, confidence_threshold=0.5, nms_threshold=0.2, rgb888p_size=[224,224], display_size=[1920,1080], debug_mode=0):
        """
        Initialize object detection system.

        Parameters:
        - kmodel_path: Path to YOLOv8 KModel.
        - labels: List of class labels.
        - model_input_size: Model input size.
        - max_boxes_num: Max detection results to keep.
        - confidence_threshold: Detection score threshold.
        - nms_threshold: Non-max suppression threshold.
        - rgb888p_size: Camera input size (aligned to 16-width).
        - display_size: Output display size.
        - debug_mode: Enable debug timing logs.
        """
        super().__init__(kmodel_path, model_input_size, rgb888p_size, debug_mode)
        self.kmodel_path = kmodel_path
        self.labels = labels
        self.model_input_size = model_input_size
        self.confidence_threshold = confidence_threshold
        self.nms_threshold = nms_threshold
        self.max_boxes_num = max_boxes_num

        # Align width to multiple of 16 for hardware compatibility
        self.rgb888p_size = [ALIGN_UP(rgb888p_size[0], 16), rgb888p_size[1]]
        self.display_size = [ALIGN_UP(display_size[0], 16), display_size[1]]
        self.debug_mode = debug_mode

        # Predefined colors for each class
        self.color_four = get_colors(len(self.labels))

        # Input scaling factors
        self.x_factor = float(self.rgb888p_size[0]) / self.model_input_size[0]
        self.y_factor = float(self.rgb888p_size[1]) / self.model_input_size[1]

        # Ai2d instance for preprocessing
        self.ai2d = Ai2d(debug_mode)
        self.ai2d.set_ai2d_dtype(nn.ai2d_format.NCHW_FMT, nn.ai2d_format.NCHW_FMT, np.uint8, np.uint8)

    def config_preprocess(self, input_image_size=None):
        """
        Configure pre-processing: padding and resizing using Ai2d.
        """
        with ScopedTiming("set preprocess config", self.debug_mode > 0):
            ai2d_input_size = input_image_size if input_image_size else self.rgb888p_size
            top, bottom, left, right, self.scale = letterbox_pad_param(self.rgb888p_size, self.model_input_size)
            self.ai2d.pad([0,0,0,0,top,bottom,left,right], 0, [128,128,128])
            self.ai2d.resize(nn.interp_method.tf_bilinear, nn.interp_mode.half_pixel)
            self.ai2d.build(
                [1, 3, ai2d_input_size[1], ai2d_input_size[0]],
                [1, 3, self.model_input_size[1], self.model_input_size[0]]
            )

    def postprocess(self, results):
        """
        Apply YOLOv8 post-processing including NMS and thresholding.
        """
        with ScopedTiming("postprocess", self.debug_mode > 0):
            new_result = results[0][0].transpose()
            det_res = aidemo.yolov8_det_postprocess(
                new_result.copy(),
                [self.rgb888p_size[1], self.rgb888p_size[0]],
                [self.model_input_size[1], self.model_input_size[0]],
                [self.display_size[1], self.display_size[0]],
                len(self.labels),
                self.confidence_threshold,
                self.nms_threshold,
                self.max_boxes_num
            )
            return det_res

    def draw_result(self, img, dets):
        """
        Draw detection results and send label info via UART.
        """
        with ScopedTiming("display_draw",self.debug_mode >0):
            if dets:
                for i in range(len(dets[0])):
                    x, y, w, h = map(lambda x: int(round(x, 0)), dets[0][i])
                    img.draw_rectangle(x,y, w, h, color=self.color_four[dets[1][i]],thickness=4)
                    img.draw_string_advanced( x , y-50,32," " + self.labels[dets[1][i]] + " " + str(round(dets[2][i],2)) , color=self.color_four[dets[1][i]])


if __name__ == "__main__":

    # Align display width to 16 bytes for hardware requirement
    DISPLAY_WIDTH = ALIGN_UP(800, 16)
    DISPLAY_HEIGHT = 480

    # Initialize LCD display (ST7701) and enable IDE display
    Display.init(Display.ST7701, width=DISPLAY_WIDTH, height=DISPLAY_HEIGHT, to_ide=True)

    # Initialize media manager to manage frame buffers and UVC stream
    MediaManager.init()

    # Wait for USB camera to be detected
    while True:
        plugin, dev = UVC.probe()
        if plugin:
            print(f"detect USB Camera {dev}")
            break
        time.sleep_ms(100)

    # Select and configure UVC video mode: 640x480 @ 30 FPS, MJPEG format
    mode = UVC.video_mode(640, 480, UVC.FORMAT_MJPEG, 30)
    succ, mode = UVC.select_video_mode(mode)
    print(f"select mode success: {succ}, mode: {mode}")

    # Define input image from USB camera (sensor side)
    rgb888p_size = [640, 480]

    # Path to the YOLOv8n kmodel
    kmodel_path = "/sdcard/examples/kmodel/yolov8n_224.kmodel"

    # COCO class labels used for detection
    labels = ["person", "bicycle", "car", "motorcycle", "airplane", "bus", "train", "truck", "boat",
              "traffic light", "fire hydrant", "stop sign", "parking meter", "bench", "bird", "cat",
              "dog", "horse", "sheep", "cow", "elephant", "bear", "zebra", "giraffe", "backpack",
              "umbrella", "handbag", "tie", "suitcase", "frisbee", "skis", "snowboard", "sports ball",
              "kite", "baseball bat", "baseball glove", "skateboard", "surfboard", "tennis racket",
              "bottle", "wine glass", "cup", "fork", "knife", "spoon", "bowl", "banana", "apple",
              "sandwich", "orange", "broccoli", "carrot", "hot dog", "pizza", "donut", "cake", "chair",
              "couch", "potted plant", "bed", "dining table", "toilet", "tv", "laptop", "mouse", "remote",
              "keyboard", "cell phone", "microwave", "oven", "toaster", "sink", "refrigerator", "book",
              "clock", "vase", "scissors", "teddy bear", "hair drier", "toothbrush"]

    # Detection parameters
    confidence_threshold = 0.3  # Minimum confidence to accept a detection
    nms_threshold = 0.4         # Non-Maximum Suppression threshold
    max_boxes_num = 30          # Max boxes per frame after filtering

    # Initialize object detection application with YOLOv8 model
    ob_det = ObjectDetectionApp(
        kmodel_path,
        labels=labels,
        model_input_size=[224, 224],
        max_boxes_num=max_boxes_num,
        confidence_threshold=confidence_threshold,
        nms_threshold=nms_threshold,
        rgb888p_size=rgb888p_size,
        display_size=rgb888p_size,
        debug_mode=0
    )

    # Configure Ai2d preprocessing (resize + letterbox pad)
    ob_det.config_preprocess()
    # Start UVC video stream with pixel format conversion enabled
    UVC.start(cvt=False)
    clock = time.clock()
    # Main loop: acquire frame, run inference, draw and display
    while True:
        clock.tick()
        img = UVC.snapshot()
        if img is not None:
            # Convert format (e.g., to RGB888)
            img = img.to_rgb888()
            # Convert to Ulab.Numpy.ndarray
            img_np_hwc = img.to_numpy_ref()
            # HWC->CHW
            img_np_chw = hwc2chw(img_np_hwc)
            # Run YOLOv8 inference on the current frame
            res = ob_det.run(img_np_chw)
            # Draw detection results on the frame
            ob_det.draw_result(img, res)
            # Show result on display
            Display.show_image(img)
            # Explicitly release image buffer
            img.__del__()
            gc.collect()
        # Print current frame rate
        print(f"fps: {clock.fps()}")
    # Clean up: stop display and media system
    ob_det.deinit()
    Display.deinit()
    UVC.stop()
    time.sleep_ms(100)
    MediaManager.deinit()
FAQ#
How to find the problem during development?#
📝 First, take different approaches based on different stages and errors:
If an error occurs during model conversion, there may be an issue with the conversion code. You need to read the usage of nncase and adjust the conversion code;
If the model conversion succeeds but the performance is not as expected, consider adjusting the threshold, changing the quantization method for model conversion, or adjusting training parameters during training;
If the model conversion succeeds but the frame rate is low, consider switching to a lighter model or reducing the model input resolution;
If a deployment error occurs, please check the line number where the deployment code reports an error, refer to the API documentation to find the cause of the error, and adjust the code;
Which operators does nncase support?#
📝 The ONNX operators and TFLite operators supported by nncase can be found at the following links: ONNX operator support and TFLite operator support
Error “ImportError: DLL load failed while importing _nncase” when converting the model#
📝 Please refer to the solution at the following link: ImportError: DLL load failed while importing _nncase
Error “RuntimeError: Failed to initialize hostfxr” when converting the model#
📝 Please install dotnet-sdk-7.0. Do not install dotnet-sdk in an Anaconda virtual environment.
Linux:
sudo apt-get update
sudo apt-get install dotnet-sdk-7.0
If you still have problems after installation, maybe you install dotnet in a virtual enviroment, set the environment variables. dotnet error
export DOTNET_ROOT=/usr/share/dotnet
Windows: Please refer to the Microsoft official website.
What is the difference between the online training platform and AICube?#
📝 The online training platform uses cloud computing power, which requires queuing when resources are tight. At the same time, parameter configuration is relatively simple, with one-click training and low flexibility; AICube uses local private computing power, with more complex environment and parameter configuration but high flexibility. The purpose of both is to obtain the kmodel and configuration files, which can be deployed using the CanMV/sdcard/examples/19-CloudPlatScripts script in the firmware.
How to set the debugged script as auto-start?#
📝 Save the script in the /sdcard directory and name it main.py. Or use CanMV IDE’s Tools(T)->Save open script to CanMV board (as main.py) to save it, then power cycle to start.
Which tasks are supported in the YOLO library?#
📝 YOLOv5 supports classification, detection, and segmentation tasks. YOLOv8 and YOLO11 support classification, detection, segmentation, and rotated object detection tasks.
What is the difference between UVC hardware and software decoding?#
📝 Hardware decoding uses CSC to implement format conversion, converting UVC image data into an RGB888 Image instance; software decoding uses the to_rgb888 interface of the Image instance to convert image data into an RGB888 Image instance. Hardware decoding is faster than software decoding and has a higher frame rate.
How to get support?#
📝 If you encounter problems during development, you can go to the Canaan Developer Community Q&A Forum to post a question. Forum address: Canaan Q&A Forum.
Appendix#
API#
For K230 MicroPython API documentation, see the link: API Documentation
KTS#
K230_training_scripts(KTS) is an end-to-end training process implementation. However, the code for this project is developed based on a dual-system C++ implementation. You can use this tool to obtain kmodel, but this tool does not include MicroPython deployment code, and you will need to write it yourself. Project address: K230_training_scripts.