
CanMV-K230 Quick Start Guide#
CanMV-K230 Introduction#
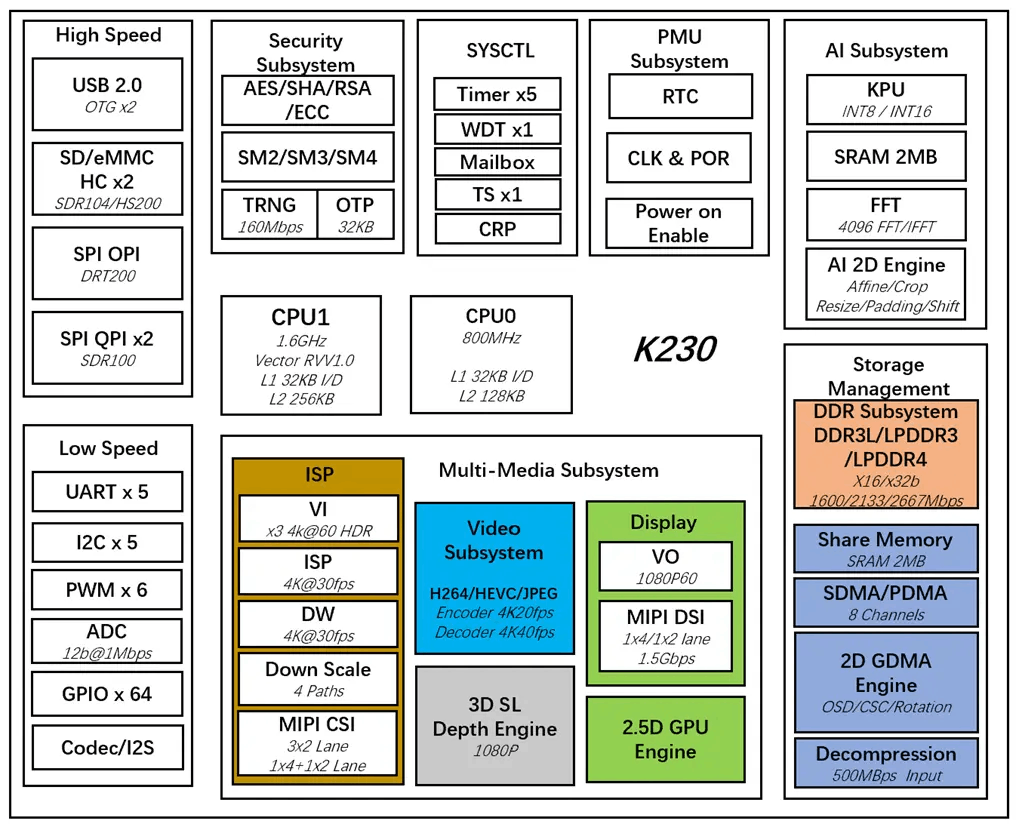
The CanMV-K230 development board is based on the latest generation AIoT SoC K230 series chip from Canaan Technology’s Kendryte ® series AIoT chips. This chip adopts a brand new multi-heterogeneous unit accelerated computing architecture, integrating 2 RISC-V high-efficiency computing cores, with a built-in next-generation KPU (Knowledge Process Unit) intelligent computing unit, providing multi-precision AI computing power, and widely supporting common AI computing frameworks, with the utilization rate of some typical networks exceeding 70%.
This chip also supports rich peripheral interfaces and integrates multiple dedicated hardware acceleration units such as 2D and 2.5D, capable of accelerating various types of tasks including image, video, audio, and AI, with features such as low latency, high performance, low power consumption, and fast startup.
Quick Start#
Get the Development Board#
Development Board |
Photo |
Introduction |
|---|---|---|
|
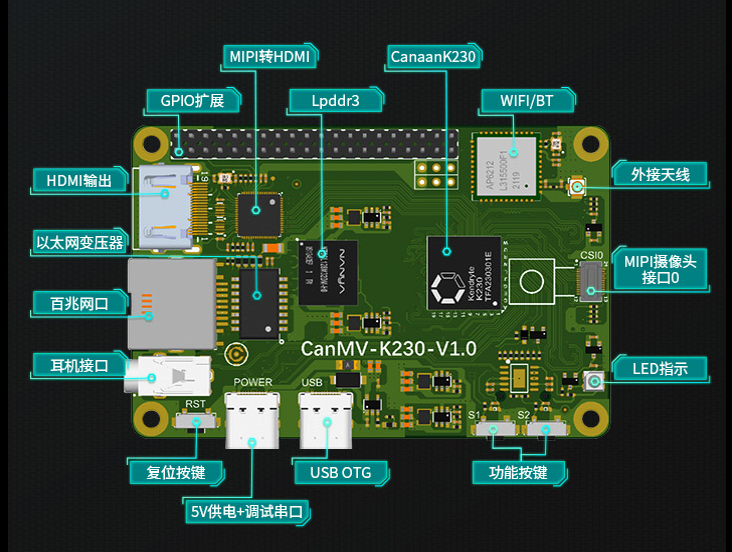
Based on K230, with external 512MB LPDDR, larger memory |
|
|
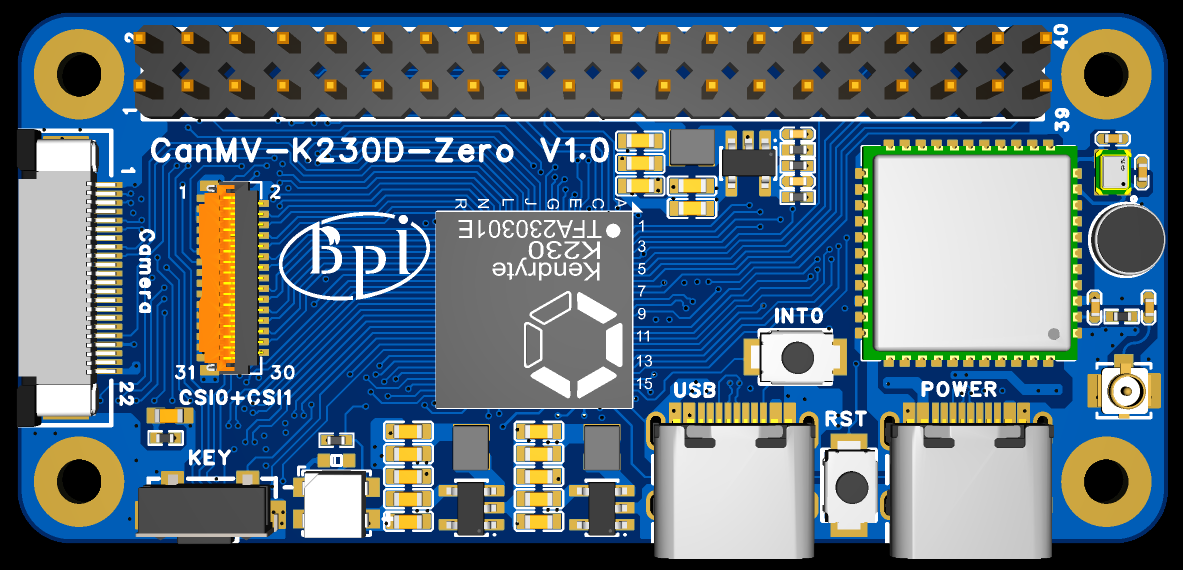
Based on K230D, with built-in 128MB LPDDR4, compact board size |
Flash Firmware#
Users can download firmware from Github or Canaan Developer Community. After downloading the firmware for the corresponding development board, please refer to Firmware Download Guide to flash the firmware to the development board.
Install CanMV Extension#
CanMV-K230 recommends using the CanMV Visual Studio Code extension for development. Users can connect to the development board, run code, view running results, preview images, and manage device files in Visual Studio Code. For detailed usage, please refer to CanMV Extension Instructions
Run Demo#
The CanMV-K230 firmware comes with a large number of pre-installed Demo programs, allowing users to experience them without downloading from the network. You can run examples in the Examples view of the CanMV extension, or open the Python example files in the virtual USB drive in Visual Studio Code and run them.
Please refer to How to Run Demo Programs
Camera Image Preview#
Capture images using the camera and display them via HDMI output:
import time, os, sys

from media.sensor import *
from media.display import *
from media.media import *

sensor = None

try:
    print("camera_test")

    # construct a Sensor object with default configure
    sensor = Sensor()
    # sensor reset
    sensor.reset()
    # set hmirror
    # sensor.set_hmirror(False)
    # sensor vflip
    # sensor.set_vflip(False)

    # set chn0 output size, 1920x1080
    sensor.set_framesize(Sensor.FHD)
    # set chn0 output format
    sensor.set_pixformat(Sensor.YUV420SP)
    # bind sensor chn0 to display layer video 1
    bind_info = sensor.bind_info()
    Display.bind_layer(**bind_info, layer = Display.LAYER_VIDEO1)

    # use hdmi as display output
    Display.init(Display.LT9611, to_ide = True, osd_num = 2)
    # init media manager
    MediaManager.init()
    # sensor start run
    sensor.run()

    while True:
        os.exitpoint()
except KeyboardInterrupt as e:
    print("user stop: ", e)
except BaseException as e:
    print(f"Exception {e}")
finally:
    # sensor stop run
    if isinstance(sensor, Sensor):
        sensor.stop()
    # deinit display
    Display.deinit()
    os.exitpoint(os.EXITPOINT_ENABLE_SLEEP)
    time.sleep_ms(100)
    # release media buffer
    MediaManager.deinit()
AI Demo#
This is a face detection demo
from libs.PipeLine import PipeLine, ScopedTiming
from libs.AIBase import AIBase
from libs.AI2D import Ai2d
import os
import ujson
from media.media import *
from time import *
import nncase_runtime as nn
import ulab.numpy as np
import time
import utime
import image
import random
import gc
import sys
import aidemo

# 自定义人脸检测类,继承自 AIBase 基类
class FaceDetectionApp(AIBase):
    def __init__(self, kmodel_path, model_input_size, anchors, confidence_threshold=0.5, nms_threshold=0.2, rgb888p_size=[224,224], display_size=[1920,1080], debug_mode=0):
        super().__init__(kmodel_path, model_input_size, rgb888p_size, debug_mode)  # 调用基类的构造函数
        self.kmodel_path = kmodel_path  # 模型文件路径
        self.model_input_size = model_input_size  # 模型输入分辨率
        self.confidence_threshold = confidence_threshold  # 置信度阈值
        self.nms_threshold = nms_threshold  # NMS(非极大值抑制)阈值
        self.anchors = anchors  # 锚点数据,用于目标检测
        self.rgb888p_size = [ALIGN_UP(rgb888p_size[0], 16), rgb888p_size[1]]  # sensor 给到 AI 的图像分辨率,并对宽度进行 16 的对齐
        self.display_size = [ALIGN_UP(display_size[0], 16), display_size[1]]  # 显示分辨率,并对宽度进行 16 的对齐
        self.debug_mode = debug_mode  # 是否开启调试模式
        self.ai2d = Ai2d(debug_mode)  # 实例化 Ai2d,用于实现模型预处理
        self.ai2d.set_ai2d_dtype(nn.ai2d_format.NCHW_FMT, nn.ai2d_format.NCHW_FMT, np.uint8, np.uint8)  # 设置 Ai2d 的输入输出格式和类型

    # 配置预处理操作,这里使用了 pad 和 resize, Ai2d 支持 crop/shift/pad/resize/affine,具体代码请打开 /sdcard/app/libs/AI2D.py 查看
    def config_preprocess(self, input_image_size=None):
        with ScopedTiming("set preprocess config", self.debug_mode > 0):  # 计时器,如果 debug_mode 大于 0 则开启
            ai2d_input_size = input_image_size if input_image_size else self.rgb888p_size  # 初始化 ai2d 预处理配置,默认为 sensor 给到 AI 的尺寸,可以通过设置 input_image_size 自行修改输入尺寸
            top, bottom, left, right = self.get_padding_param()  # 获取 padding 参数
            self.ai2d.pad([0, 0, 0, 0, top, bottom, left, right], 0, [104, 117, 123])  # 填充边缘
            self.ai2d.resize(nn.interp_method.tf_bilinear, nn.interp_mode.half_pixel)  # 缩放图像
            self.ai2d.build([1,3,ai2d_input_size[1],ai2d_input_size[0]],[1,3,self.model_input_size[1],self.model_input_size[0]])  # 构建预处理流程

    # 自定义当前任务的后处理, results 是模型输出 array 列表,这里使用了 aidemo 库的 face_det_post_process 接口
    def postprocess(self, results):
        with ScopedTiming("postprocess", self.debug_mode > 0):
            post_ret = aidemo.face_det_post_process(self.confidence_threshold, self.nms_threshold, self.model_input_size[1], self.anchors, self.rgb888p_size, results)
            if len(post_ret) == 0:
                return post_ret
            else:
                return post_ret[0]

    # 绘制检测结果到画面上
    def draw_result(self, pl, dets):
        with ScopedTiming("display_draw", self.debug_mode > 0):
            if dets:
                pl.osd_img.clear()  # 清除 OSD 图像
                for det in dets:
                    # 将检测框的坐标转换为显示分辨率下的坐标
                    x, y, w, h = map(lambda x: int(round(x, 0)), det[:4])
                    x = x * self.display_size[0] // self.rgb888p_size[0]
                    y = y * self.display_size[1] // self.rgb888p_size[1]
                    w = w * self.display_size[0] // self.rgb888p_size[0]
                    h = h * self.display_size[1] // self.rgb888p_size[1]
                    pl.osd_img.draw_rectangle(x, y, w, h, color=(255, 255, 0, 255), thickness=2)  # 绘制矩形框
            else:
                pl.osd_img.clear()

    # 获取 padding 参数
    def get_padding_param(self):
        dst_w = self.model_input_size[0]  # 模型输入宽度
        dst_h = self.model_input_size[1]  # 模型输入高度
        ratio_w = dst_w / self.rgb888p_size[0]  # 宽度缩放比例
        ratio_h = dst_h / self.rgb888p_size[1]  # 高度缩放比例
        ratio = min(ratio_w, ratio_h)  # 取较小的缩放比例
        new_w = int(ratio * self.rgb888p_size[0])  # 新宽度
        new_h = int(ratio * self.rgb888p_size[1])  # 新高度
        dw = (dst_w - new_w) / 2  # 宽度差
        dh = (dst_h - new_h) / 2  # 高度差
        top = int(round(0))
        bottom = int(round(dh * 2 + 0.1))
        left = int(round(0))
        right = int(round(dw * 2 - 0.1))
        return top, bottom, left, right

if __name__ == "__main__":
    # 显示模式,默认 "hdmi", 可以选择 "hdmi" 和 "lcd"
    display_mode="hdmi"
    if display_mode=="hdmi":
        display_size=[1920,1080]
    else:
        display_size=[800,480]
    # 设置模型路径和其他参数
    kmodel_path = "/sdcard/examples/kmodel/face_detection_320.kmodel"
    # 其它参数
    confidence_threshold = 0.5
    nms_threshold = 0.2
    anchor_len = 4200
    det_dim = 4
    anchors_path = "/sdcard/examples/utils/prior_data_320.bin"
    anchors = np.fromfile(anchors_path, dtype=np.float)
    anchors = anchors.reshape((anchor_len, det_dim))
    rgb888p_size = [1920, 1080]

    # 初始化 PipeLine,用于图像处理流程
    pl = PipeLine(rgb888p_size=rgb888p_size, display_size=display_size, display_mode=display_mode)
    pl.create()  # 创建 PipeLine 实例
    # 初始化自定义人脸检测实例
    face_det = FaceDetectionApp(kmodel_path, model_input_size=[320, 320], anchors=anchors, confidence_threshold=confidence_threshold, nms_threshold=nms_threshold, rgb888p_size=rgb888p_size, display_size=display_size, debug_mode=0)
    face_det.config_preprocess()  # 配置预处理

    try:
        while True:
            os.exitpoint()                      # 检查是否有退出信号
            with ScopedTiming("total",1):
                img = pl.get_frame()            # 获取当前帧数据
                res = face_det.run(img)         # 推理当前帧
                face_det.draw_result(pl, res)   # 绘制结果
                pl.show_image()                 # 显示结果
                gc.collect()                    # 垃圾回收
    except Exception as e:
        sys.print_exception(e)                  # 打印异常信息
    finally:
        face_det.deinit()                       # 反初始化
        pl.destroy()                            # 销毁 PipeLine 实例